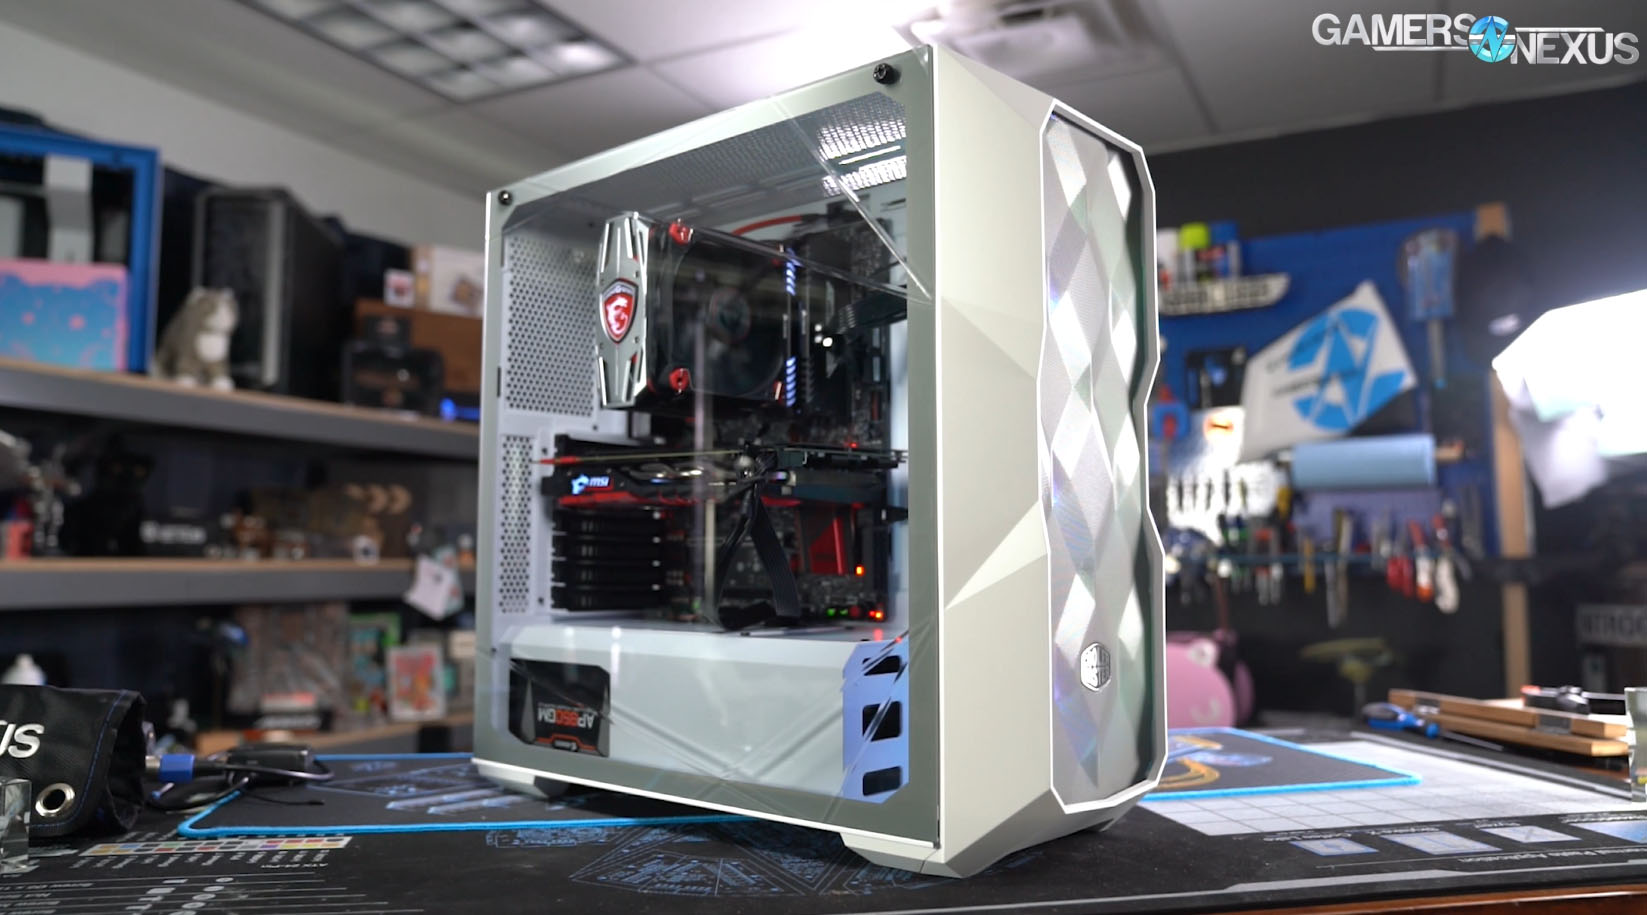
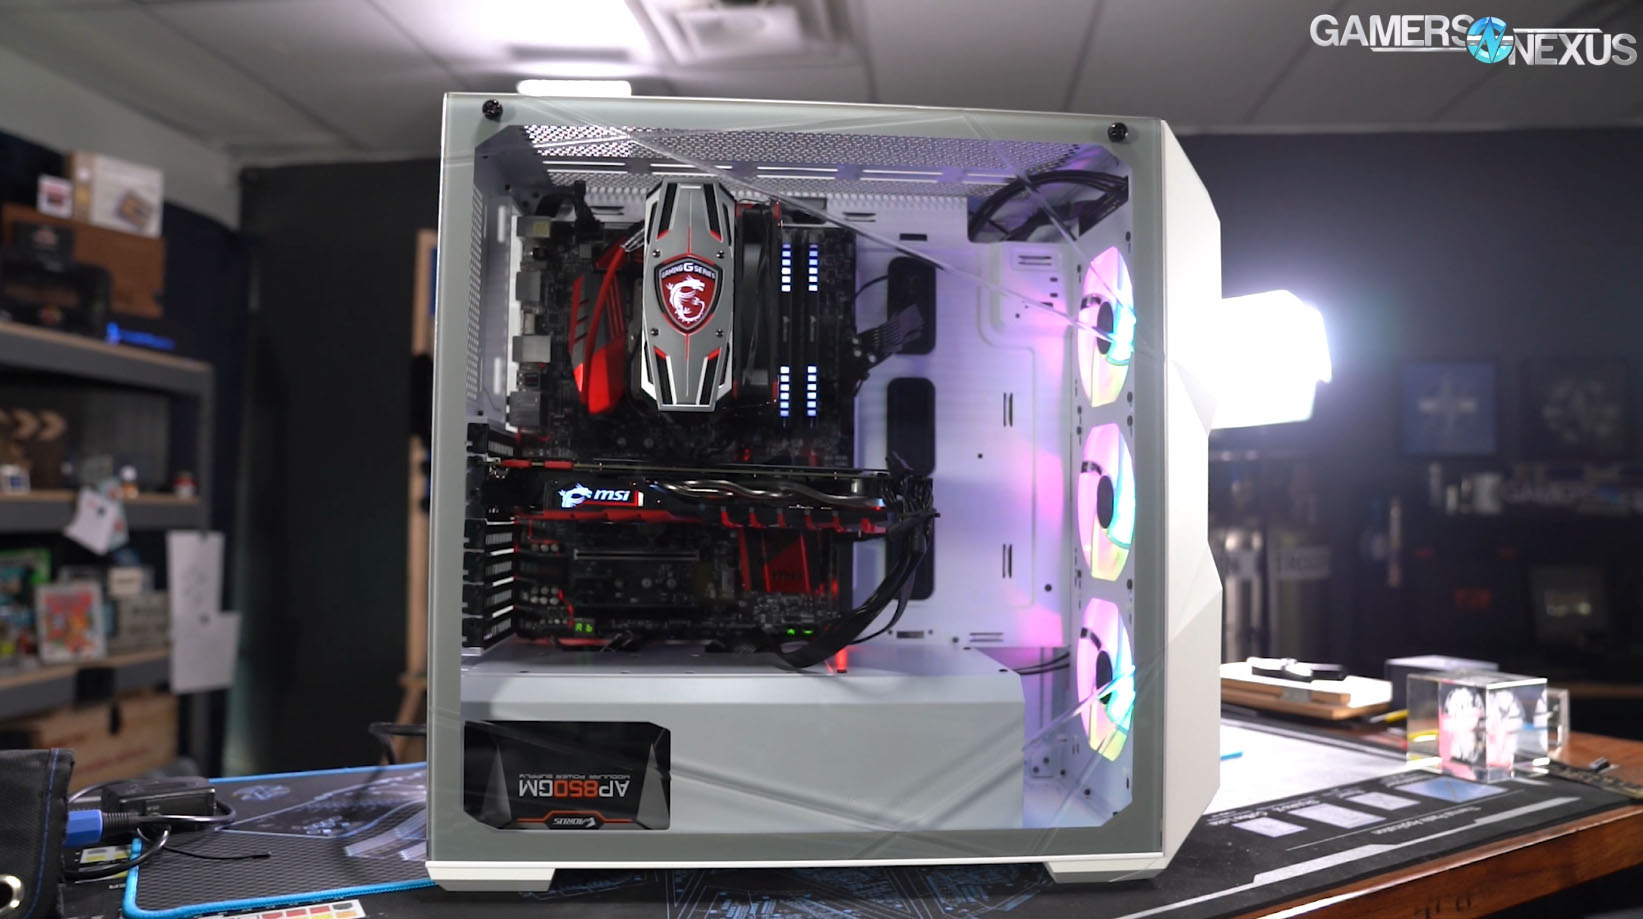
Cooler Master has yet to master its overwhelming instinct to put 500 in the name of cases. This latest offering is the Masterbox TD500 Mesh, a mesh-ified version of an existing acrylic-fronted case. Apparently they’ve gotten so tired of us drilling holes in their cases that they’ve started doing it for us. The TD500 Mesh is a mid tower with three ARGB fans, good ventilation, and an MSRP of $100, and based on our review of the Phanteks P400A, that’s a good place to be right now.
Appearances were a top priority in the design of the TD500 Mesh: there are some areas where pennies have been pinched, and other areas where those pennies have been reinvested. We’ll start with the cost savings for contrast. The chassis itself is a design intended for reuse, which isn’t unusual or even bad, but it’s easy to tell from the vestigial remains of a 5.25” bay at the front of the case. We confirmed with Cooler Master that this body was an original creation for the TD500; the chassis will be reused for future cases, some of which may have ODD support--optical drives remain popular in the Japanese market, for example.
Cooler Master MasterBox TD500 Mesh Specs
Size | Mid Tower |
Available Color(s) | Black, White |
Materials | Steel, Plastic, Tempered Glass, Mesh |
Dimensions (L x W x H) | 493 x 217 x 469mm (incl. Protrusions), 429.5 x 205x 447mm (excl. Protrusions) |
Weight | 6.95 kg |
Motherboard Support | Mini ITX, Micro ATX, ATX, SSI CEB, E-ATX*, (*support for up to 12" x 10.7", will limit cable management features) |
Expansion Slots | 7 |
2.5" / 3.5" Drive Bays (combo) | 2 |
2.5" Drive Bays | 4 (2+2 combo) |
I/O Panel | 2x USB 3.2 Gen 1 (formerly USB 3.0), 1x 3.5mm Audio Jack, 1x 3.5mm Mic Jack, 1x ARGB Controller (only for the S01 versions), 1x ARGB 2-to-3 splitter |
Pre-installed Fans - Front | 3x 120mm ARGB Fans |
Fan Support - Top | 3x 120mm, 2x 140mm |
Fan Support - Front | 3x 120mm, 2x 140mm |
Fan Support - Rear | 1x 120mm |
Radiator Support - Top | 120mm, 240mm, 360mm, (44mm max motherboard component height) |
Radiator Support - Front | 120mm, 140mm, 240mm, 280mm, 360mm |
Radiator Support - Rear | 120mm |
Clearance - CPU Cooler | 165mm/6.49" |
Clearance - PSU | 180mm/7.08", 295mm/11.61" (w/ HDD cage removed) |
Clearance - GFX | 410mm/16.1" |
Cable Routing | 19mm/0.74" |
Dust Filters | Top, Bottom, Front |
Power Supply Support | Bottom mount, ATX |
*specs table taken directly from Cooler Master product page
The Build
Tooling up for a fully new case is a huge expense, and designing chassis to be reusable is a way to offset that expense. Just ask DIYPC. One side of the HDD cage underneath the PSU shroud is removable to make more room for power cables if no 3.5” drives are needed, but the other less-important side of the cage is riveted. There are no USB-C ports built into the case. The bottom PSU filter is just a square of mesh clipped onto the case, with no frame or handle. None of these features are deal breakers (although the PSU filter isn’t good), they’re just indicators of the effort it took to hit the $100 price point.
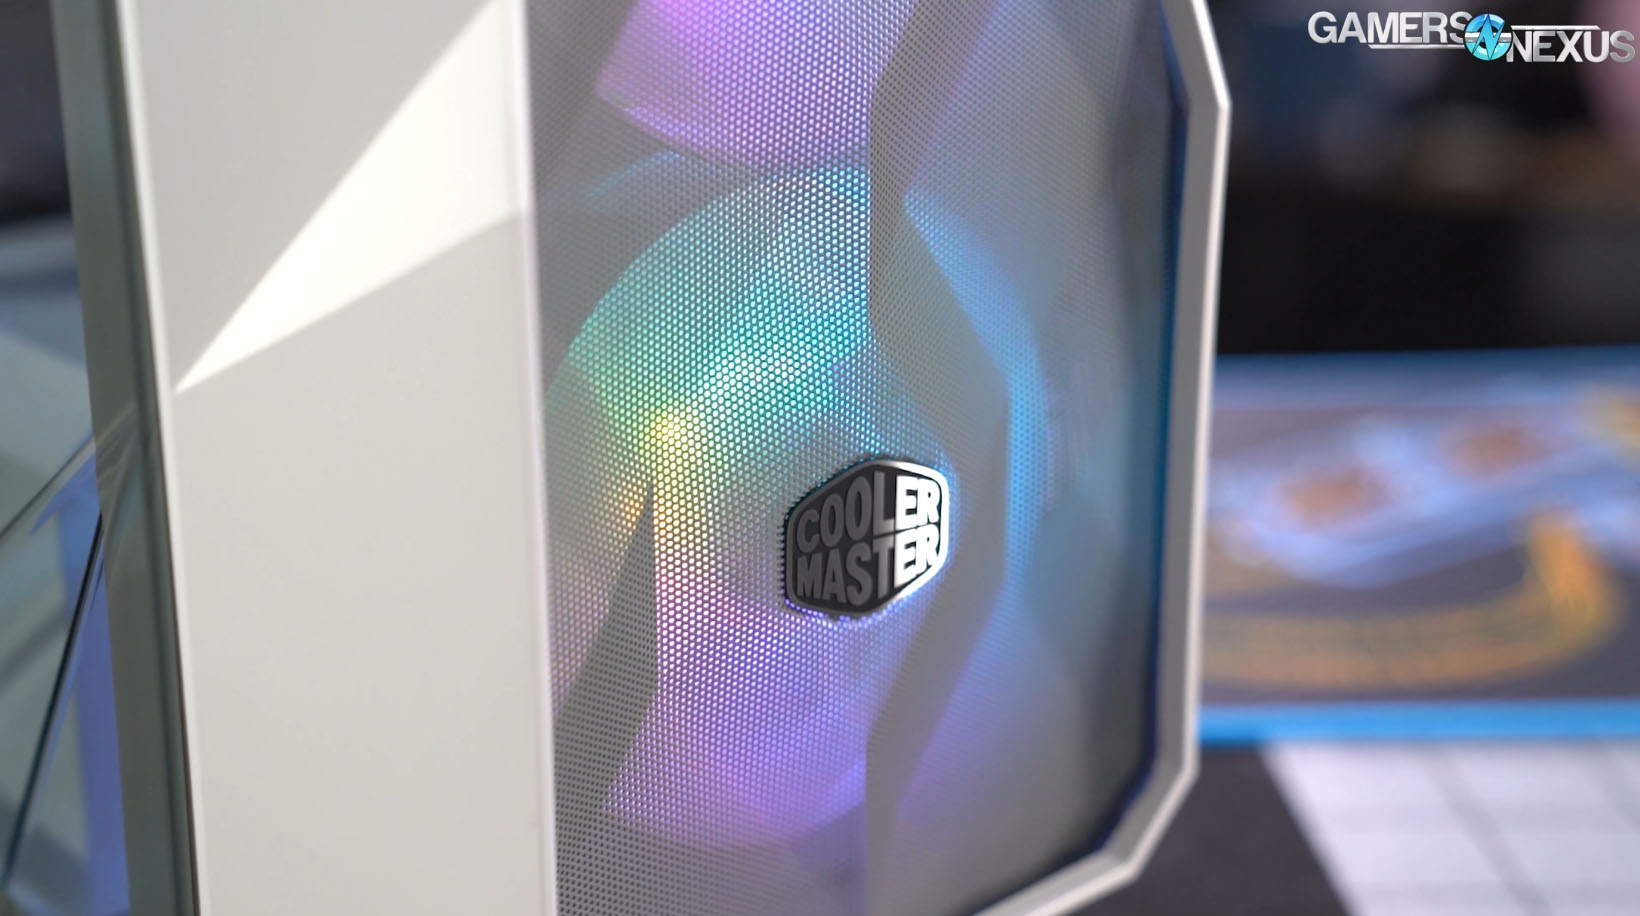
Money saved elsewhere in the case went towards appearances, starting with the front panel. The fine metal mesh of the panel is shaped into facets similar to Fractal’s Meshify cases, but symmetrical rather than random. It’s clearly inspired, in the very least, by Fractal’s design. The mesh is painted a light grey and blocks different amounts of light from the three ARGB front fans at different angles, creating an interesting effect. The top filter is the same shade of grey, but it doesn’t always look like it, since the large holes in the filter leave the black and white interior of the case visible unless viewed at a steep angle. Even the PSU filter we criticized earlier is made of white mesh to match the chassis. The faceted design extends to the white plastic frame of the panel, which in turn lines up with a pattern pressed into the tempered glass side panel. Cooler Master continues to pioneer new ways to work with tempered glass, a material that’s notoriously difficult to work with. We showed some of these efforts when we toured Cooler Master’s third-party glass supplier, a company which allowed us to film nearly every single process in the factory except those relating to custom glass bending. The TD500’s glass panel and the design on it must be a significant part of the cost of the case, so it’s a pity that the design doesn’t quite line-up as it should with the front panel.
The front panel is like that of Phanteks’ P400A,in that it has no additional filter layer, just mesh and nothing else. This is the approach we prefer. One layer of ultra-fine filtration will inevitably let more dust through than two layers, but doing normal system maintenance is a small price to pay for good cooling. Wipe the front down once you start seeing dust build-up. The panel itself is lightweight and thin to the point of being fragile--it’s easy enough to take off, but it takes a little more care to line it up and snap back into place. The way the plastic frame appears to wrap around the mesh like a loose hood is an intentional illusion, and the mesh is in fact flush with the frame around the edges, leaving no air gaps.
Side panel mounting is adequate, but again indicative of cost savings. The steel side panel is the same age-old design that hooks on with metal tabs and takes four arms to keep all the edges pressed down while sliding it into place. At least the thumbscrews are captive. The two thumbscrews on the glass panel are captive as well, which is a neat trick to pull off with a screw that goes through glass. At the bottom edge, the panel is held into place with a metal strip adhered to the glass, which allows the panel to hinge out a little from the body of the case without falling off. It’s a good balance between inexpensive and functional.
One aesthetic choice that we’re conflicted on is the use of plastic pins rather than normal fan screws to hold the bottom-most front fan. The fans are all attached to the outside of the metal chassis, meaning the fans are screwed into place from the inside, meaning it’s difficult to screw the lowest fan in place without a very short screwdriver that can clear the PSU shroud. As an alternative, Cooler Master chose to attach the bottom fans with pins inserted from the outside of the case. The major advantage of using pins instead of long radiator screws as they’ve done in past H500 cases is that the pins can be colored white and blend in with the white chassis and white fan, making them invisible through the front panel. This is good, and we can appreciate the thought Cooler Master has put into this very fine attention to detail. Unfortunately, there are some disadvantages as well. Firstly, the plastic pins are tricky to put back in place and less tight than normal screws would be. Secondly, the pins Cooler Master uses are slightly smaller in diameter than fan screws, so their mounting holes are also smaller, meaning some of the holes in the front panel are just slightly too small for fan screws. There are correctly-sized holes right next to them, but come on.
RGB and ARGB are very low on our list of priorities for PC cases, but we’ve become intimately familiar with some of the frustrations of ARGB as a result of our recent Cyberpunk 2077 case mod. Cooler Master’s 3-pin ARGB headers may be physically the same as the 3-pin headers that ASUS, MSI, ASRock, and other companies have settled on, but they’re not electrically compatible. Corsair’s should be, at least as far as we can tell, but they use a proprietary connector just to annoy everyone else, and NZXT’s 4-pin ARGB headers are another frustration entirely. The one uniting factor among all competing RGB systems is that the software sucks; NZXT’s CAM is one of the more usable interfaces, and given our opinions on CAM, that’s saying something. We mention all this because Cooler Master has gone out of their way to make the TD500 Mesh’s lighting effects widely compatible. The control cables include a converter module that takes two common types of ARGB header and splits them into three Cooler Master headers for the three front fans. There’s also an optional dongle with baked-in lighting patterns that can be hooked up to the reset button for lighting effects completely independent of software. We received one of these with an InWin case some time ago and it’s been extraordinarily useful for controlling ARGB lighting effects without building an entire PC and installing terrible bloatware.
The included fans aren’t particularly fast for 120mm, topping out between 1200 and 1300RPM, but they are ARGB. For us, the most important feature is that Cooler Master separates out the fan headers into a normal 3-pin fan connector and a separate LED connector, rather than mashing them together into some unusable proprietary mess. Despite the narrow appearance of the front panel, it does support 140mm fans, even mounted to the outside of the chassis inside the front panel. For better or worse, Cooler Master has gone to lengths to minimize holes and black marks that might be visible through the front panel: the cutouts in the front of the chassis are three 120mm circles, and there are exactly two sets of mounting holes for 140mm fans, one in the middle of the panel and one at the bottom. It’s unlikely users will want to replace or move the stock ARGB fans, but it could easily be more flexible. Claimed radiator support for the front of the case is up to 360mm, but we’d say it’s more like 240mm max, since both 360mm and 280mm radiators would fall below the level of the PSU shroud and make tube routing difficult. Remember, CLC radiators should be oriented tubes-down.
Radiator support at the top of the case is better, with 120mm and 140mm mounts extending the whole length of the case. Clearance from the top edge of the motherboard to the top of the case is just 3cm, but the radiator/fan mounts are offset a bit towards the side of the case away from the motherboard. The distance from the motherboard tray to the 140mm mounting location is approximately 4cm, and that makes the distance to the 120mm mounting location approximately 6cm.
Cooler Master says motherboard support goes up to “12" x 10.7", will limit cable management features” and uses the almost meaningless term “E-ATX,” but they hedge this by using the more specific term SSI CEB as well. In fact, there’s nothing to stop much wider motherboards from being installed other than a lack of cable cutouts and threaded holes for standoffs. The motherboard tray is flat and open across the whole 13” width of a true EEB motherboard, and this case could support one with some modding.
Cable management space is tight behind the motherboard tray. Cooler Master lists clearance as 1.9mm, but that’s the maximum depth, and in some locations clearance shrinks towards 1.5mm. The tie points next to the cable cutouts and the space under the PSU shroud make management possible, but the small amount of clearance combined with the already difficult-to-wrangle steel side panel aren’t fun to deal with.
The listed specs for drive mounting are somewhat misleading. For 2.5” drives, Cooler Master has included a set of rubber stoppers and metal posts that allow drives to be pressed into place without being screwed down. We’ve seen this system in past cases, and we like it. The misleading part is that the spec sheet implies that there are only two 2.5” mounting locations outside of the HDD cage, but what it actually means is that there are only two sets of stoppers and posts. There are four mounting locations, two on top of the shroud and two behind the motherboard tray.
GN Case Testing Bench
| Component | Courtesy Of | |
| Video Card | MSI GTX 1080 Gaming X (OC Mode) | MSI |
| CPU | Intel i7-6700K @ 4.4GHz | GamersNexus |
| CPU Cooler | MSI Core Frozr L | MSI |
| Motherboard | MSI Z170A Gaming M7 | MSI |
| Memory | Corsair Vengeance LED 32GB 3200MHz | Corsair |
| SSD | Samsung 850 EVO 120GB | Samsung |
| PSU | Corsair RM650x | Corsair |
| Cables | CableMod Pro Mesh Cables | CableMod |
| Case | This is what we're testing! | - |
The video card is configured to run at 55% fan speed at all times.
Prior to load testing, we collect idle temperature results for ten minutes to determine the unloaded cooling performance of a case's fans and air channels. Thermal benchmarking is conducted for 1400 seconds (23 minutes), a period we've determined sufficient for achieving equilibrium. The over-time data is aggregated and will occasionally be compiled into charts, if interesting or relevant. The equilibrium performance is averaged to create the below charts.
Load testing is conducted using Prime95 LFFTs and Kombustor “FurMark” stress testing simultaneously. Testing is completely automated using in-house scripting, and executes with perfect accuracy on every run.
Find our noise normalized & fan normalized testing methodology here: https://www.gamersnexus.net/guides/3477-case-fan-standardization-tests-noise-normalized-thermals
Thermals & Noise
We did our standard test suite for the TD500 mesh, which has grown to include a 100% load torture test, one CPU-exclusive Blender render test and one GPU accelerated, a Firestrike Extreme stress test, and three further torture tests, one with the front panel removed, one with the stock fans normalized to a 36dBA noise threshold, and one using a standardized set of fans to replace the stock fans. This time, we did one more torture test with the stock layout plus a cheap 120mm fan added to the rear exhaust mount. For the standardized fan test, we mounted the two 140mm intake fans to the inside of the chassis as dictated in the manual, in contrast to the stock fans which are mounted to the outside of the chassis.
Torture CPU
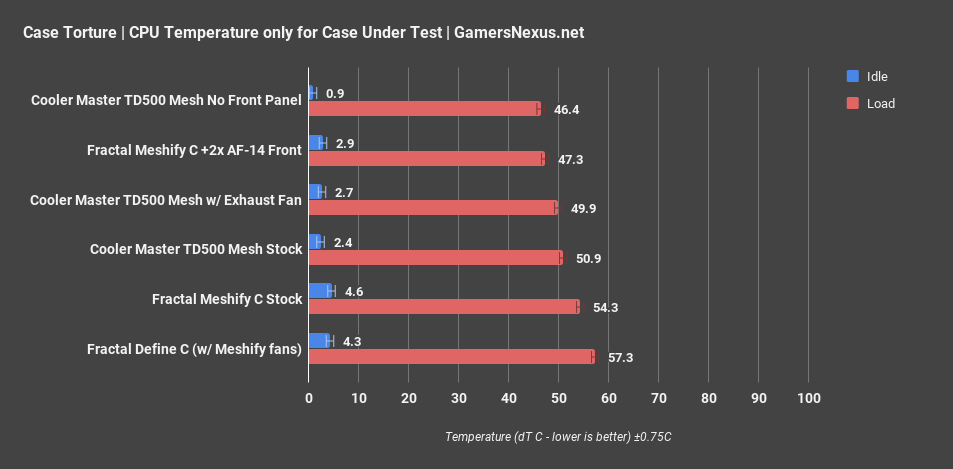
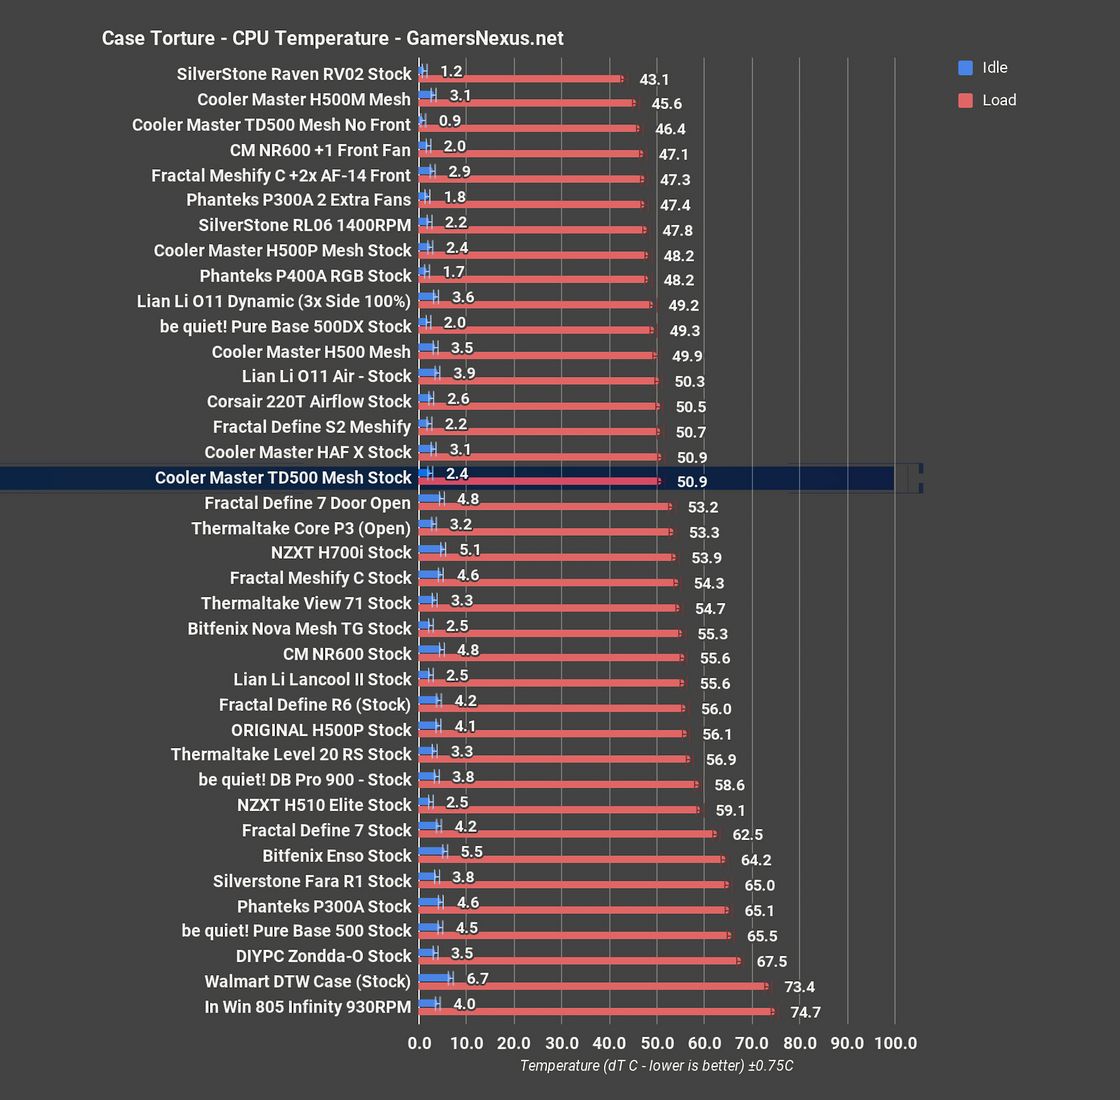
We’ll start case torture thermals with just the Cooler Master TD500 Mesh and some other immediately relevant comparisons, like some Meshify cases. Baseline CPU temperature in the torture test was 51 degrees Celsius delta T over ambient, promisingly close to the average CPU dT of 46C with no front panel. Adding an exhaust fan directly behind the CPU cooler may have helped a little with a resulting CPU dT of 50C, but the un-rounded temperature averages are within one degree of each other, which we generally consider margin of error or test variance. This is a good start for the TD500 Mesh, though: if adding an exhaust fan doesn’t really help this configuration, and if even taking the front panel off only reduces temperatures by 4-5 degrees, it indicates that the stock fan configuration is close to optimal for an air cooler setup. For reference, the Meshify C really needs some fans to be any good. It’s capable, as illustrated by the configuration with two 140mm Noctua front fans, but its stock performance at 54C drags behind as a result of the barebones approach. That’s fine as long as the buyer is aware that just mesh isn’t good enough alone.
Compared to the rest of our chart, a 51-degree Celsius over ambient result for stock positions the TD500 Mesh where it should be: alongside the HAF X, Define S2 Meshify, and 220T Airflow. Our most exceptional cases usually score in the 47-48C dT range, so this falls just short of that. That range of exceptional performers includes the P400A RGB, measuring at 48C, and be quiet!’s 500DX measured at 49C. Cooler Master’s case may not exceed the others in this category, but all three of the cases mentioned are very well-cooled with stock fans that can take advantage of the front panel designs.
Torture GPU
GPU torture results are next, again starting only with the TD500 and Meshify C, then adding the others. GPU temperature in the same test as previously is 50 degrees Celsius over ambient, which dropped to 47C with the front panel removed. Adding an exhaust fan didn’t hurt, but the average dT remained within margin of error of the stock result, rounding to 50C. We frequently run into scenarios where stock case configurations allow the GPU to pull in air through empty PCIe slots, meaning that adding fans to force a more “normal” airflow pattern ends up hurting GPU thermals. That’s not the case here, and it wasn’t with the P400A RGB either, since both cases have a stock configuration which pushes air directly from the front of the case to the back. As for the Meshify C, it’s decidedly behind in this set of tests because we’re looking at a one-off where we added two 140mm fans. More fully populating the front of the case would help its performance a bit more.
We have to truncate our 270 rows of data a lot to fit in a chart for video, but here’s a shorter list. 50C dT is a more favorable temperature for the GPU in the comparative sense. The TD500 Mesh is still a bit warmer than the P400A RGB at 49C dT, but it beats the 500DX’s average of 52C dT in this test. There’s no secret technique to these temperatures: the case has a vent in the front and Cooler Master stuck a bunch of fans behind it; sometimes, that’s all it takes. The 220T also ends up behind the TD500, and as for Cooler Master’s other 500-named cases, the H500 blank Mesh -- the one that launched at $100 originally -- is at about 48.5 degrees, so ahead of the TD.
Blender
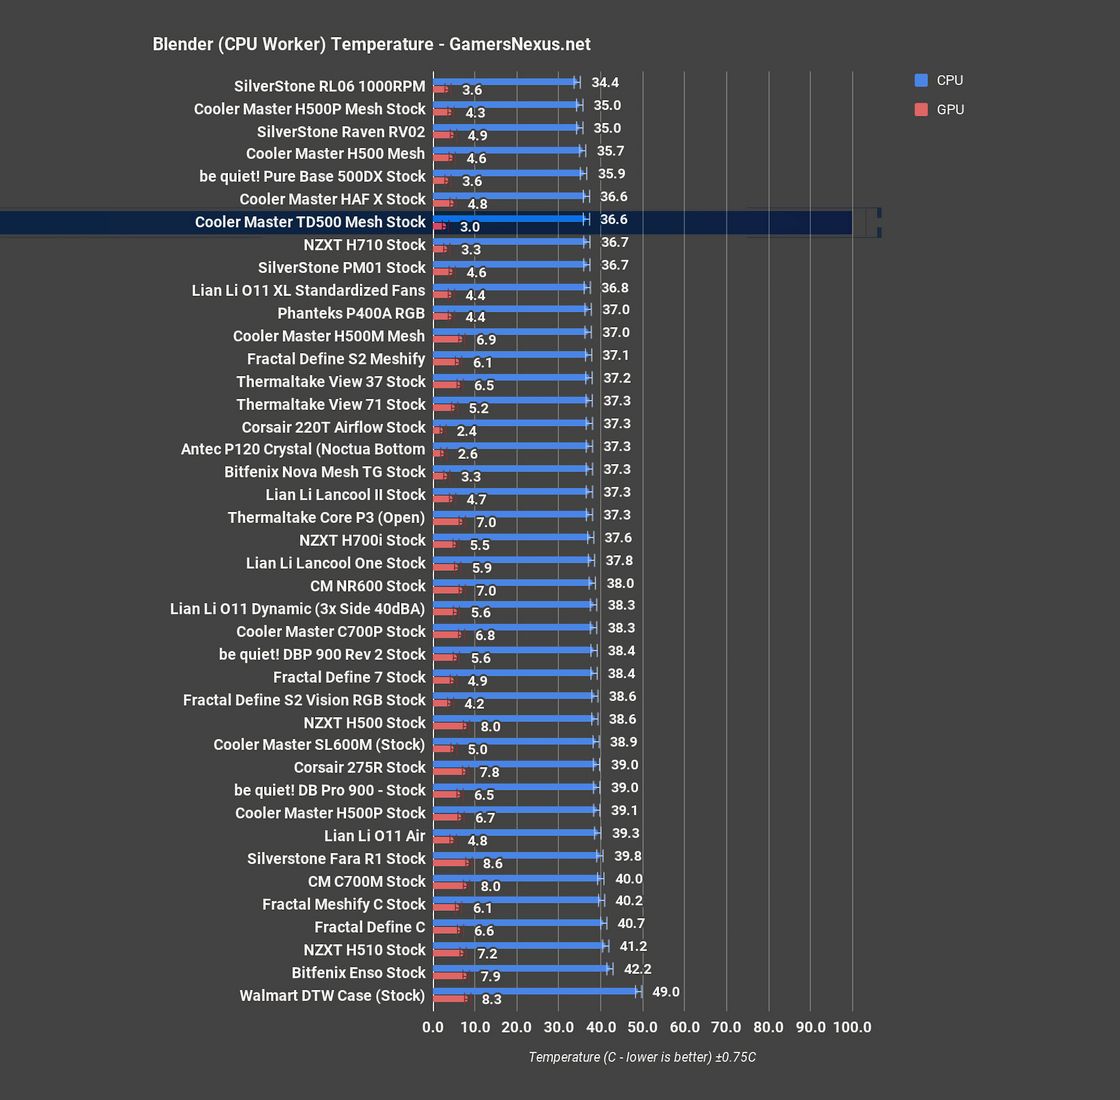
Our first Blender test is with a CPU-only render. This marked CPU temperature at 37 degrees Celsius over ambient, tying it with the P400A RGB and putting it a degree above the 500DX’s 36C dT average. At this point, this result functions mostly as a sanity check for the torture test results--there are only so many ways we can point out that it’s a well-ventilated case.
With the GPU loaded instead, GPU temperature reached 22 degrees over ambient. This is tied with the SL600M and Lian Li O11 XL for best GPU temperature overall on the whole chart, both of which were tested with bottom intake fans pointed directly into the GPU. Without the full-system load of the torture test, GPU cooling is especiallly good, which is promising for the Firestrike Extreme result.
Firestrike
Firestrike is next, our gaming stand-in. The TD500 Mesh isn’t at the absolute top of the chart here, but it’s pretty close. 49C dT ties it with the P400A Mesh and gets it pretty close to the O11 XL again, although the larger temperature range reveals the SL600M’s advantage with an average of 46C dT. The 500DX averaged 53C dT in this test, giving the TD500 Mesh a slightly larger advantage than it had in the torture results.
Standardized Fans
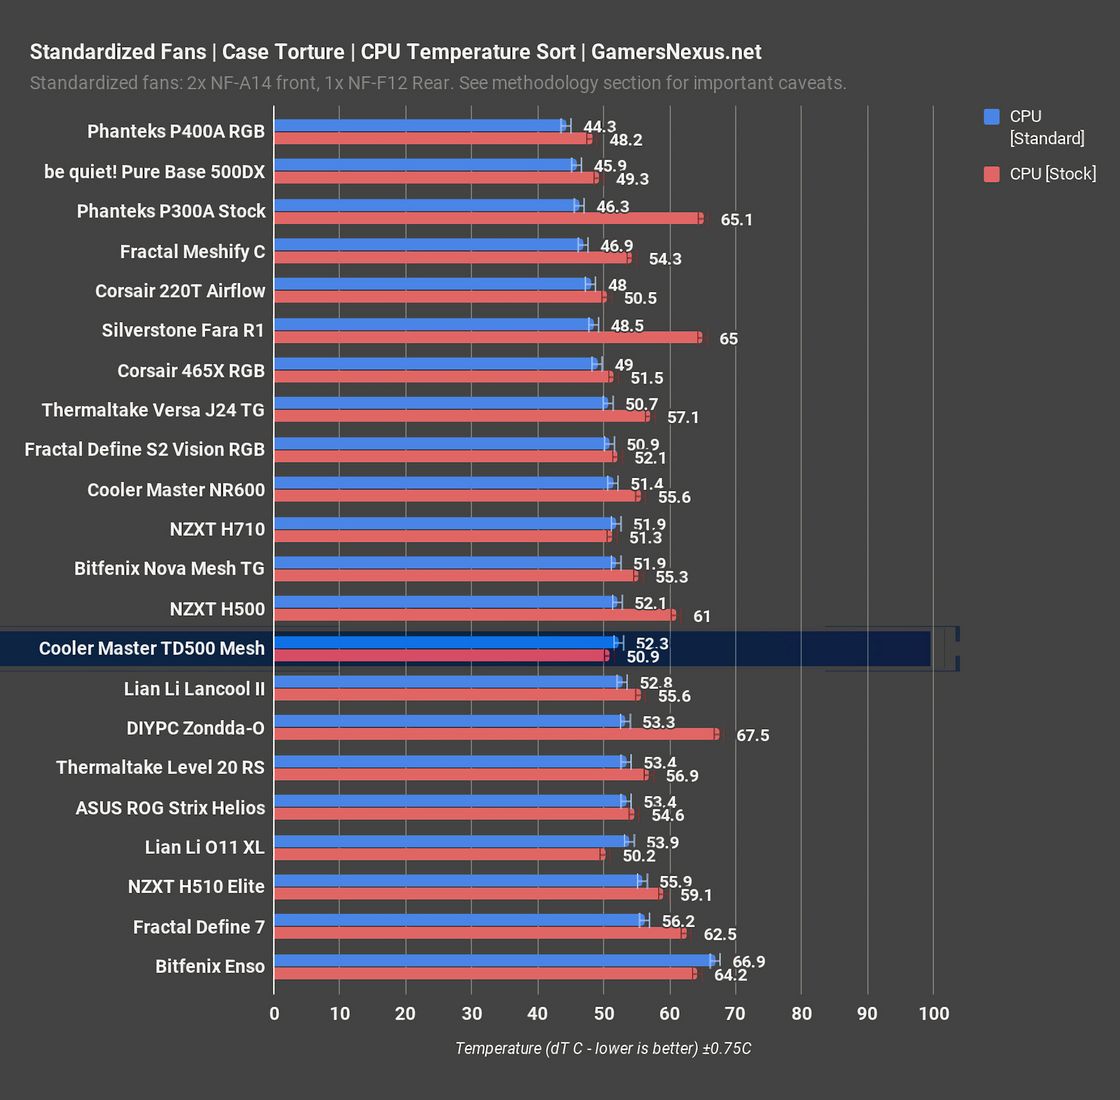
The standardized fan test is most useful in cases that only come with a few case fans, since there it allows us to see how a case will perform against others when it has a proper set of fans added. Its utility is limited here, since it’s unlikely that many people buying the TD500 Mesh are doing so with the intention of replacing the ARGB fans. CPU dT averaged 52C, a couple degrees warmer than the stock result, which makes sense since the 140mm intake fans we installed could only be mounted at the bottom of the front panel below the level of the CPU cooler. That’s a mediocre result, on par with the H710 or Bitfenix Nova Mesh, which just highlights how important the three stock fans are. They aren’t the best fans in the world, but they’re a significant part of the value of the case, and it makes no sense to pay for them and replace them.
GPU dT was 47C, a few degrees below baseline, again because we were forced to mount our 140mm fans as low as possible in the case by the lack of mounting locations. This is a much more competitive result, comparable to the Lian Li O11 XL with bottom-intake fans and significantly cooler than both the 500DX and P400A RGB, but our point still stands: the stock fans are a large part of the reason for buying this case. Either use them or find a cheaper case that doesn’t come with fans.
Noise & Noise Normalized
With all stock fans at 100% speed around 1200-1300RPM, we recorded a noise level of 39.7dBA. This isn’t audibly louder than the P400A’s noise level of 38.6dBA at 20”, but that’s enough of a difference that the TD500 Mesh may need a steeper fan speed reduction to hit our noise normalized threshold.
We noise normalize the stock fans to a threshold of 36dBA for this test, which for the TD500 Mesh meant setting the case fans to 75% for a reported speed just over 1000RPM, which works out to basically the same percent/RPM reduction as the P400A required. CPU dT with this fan speed rounded to 56C, definitely warmer than baseline but still under control. This puts it between the NR600 and Meshify C in performance, but well behind the P400A’s 51C dT average. This is still good performance, slightly cooler than the Meshify C’s average, but it seems that Cooler Master’s case doesn’t excel with CPU temperatures at this noise level in the same way that the 500DX and P400A do.
Here’s the same chart, except sorted by GPU temperature. The GPU averaged 52C dT in this test with the TD500 Mesh, keeping with the trend of more favorable GPU temperatures than CPU. Here, the TD500 beats everything except the Lian Li O11 XL and Zondda-O, both of which have direct GPU cooling, and ties the P400A RGB. The 500DX falls behind with an average of 54C dT. Given that Cooler Master’s case ties the P400A for GPU thermals and was beaten by it for CPU thermals in this test, the P400A still “wins,” but the TD500 Mesh’s overall performance is strong here and confirms the idea that a sealed-off case will be outperformed by a mesh-fronted case with the fans turned down to reach the same noise level.
Conclusion: Best $100 PC Cases for Airflow
The P400A Digital is currently within $10 of the TD500 Mesh, while the TD500 Mesh seems like it goes for $100-$105 when it’s in stock. In a straight performance-per-dollar competition, the P400A Digital wins. For anyone trying to minmax their PC build down to the cent, the P400A-D is the correct choice between these two. Both of these cases have a focus on appearance, however, and the Cooler Master TD500 Mesh may have an advantage in that category based on personal preferences. The TD500 Mesh is a good case and it isn’t exorbitantly priced, so nobody needs to feel guilty about choosing it over another just because of how it looks. In the same vein, the be quiet! Pure Base 500DX remains a strong competitor at around $100 when it’s in stock.
Editorial, Testing: Patrick Lathan
Test Lead, Host: Steve Burke
Video: Keegan Gallick, Andrew Coleman
