We made it through the C700P, H500P, Dark Base Pro 900, and Core G21, but cases we saw at Computex 2017 are still rolling in for review. This week, we’re examining the Bitfenix Enso, a budget case that hits both the tempered glass and RGB trends. It’s a pleasant change from the streak of ultra-heavy cases we’ve been reviewing, but as anyone who watched Steve’s recent address to case manufacturers will know, the Enso is far from perfect.
Our Bitfenix Enso review takes the case to task for thermals, alongside the usual acoustics and build quality testing. Our first look at the Enso (back at Computex) highlighted the case in a “needs work” category, calling out its extremely competitive price target and feature set, but also calling attention to concerns of ventilation. We’re back to see if Bitfenix has improved the case in the six months since.
Bitfenix Enso Specs
Material | Steel │ Plastic │ Tempered Glass |
Motherboard Support | Mini-ITX, MicroATX, ATX, E-ATX up to 272mm |
Maximum GPU Length | 340mm |
Maximum CPU Cooler Height | 160mm |
Expansion Slots (PCI-E) | 7 |
Front I/O Ports | 2 x USB 3.0, 1 x Audio/Mic |
2.5" Drive Bay | 3 |
3.5" Drive Bay | 2 (Usable as 2.5" bay) |
Fan Support(Front) | 2 x 140mm or 2 x 120mm |
Fan Support(Top) | 2 x 120mm |
Fan Support(Rear) | 1x 120mm |
Included Fans(Front) | 1 x 120mm Fan (Black) |
Included Fans(Rear) | 1 x 120mm Fan (Static RGB) |
Radiator Support(Front) | 1 x 240mm or 280mm (35mm thickness) |
Radiator Support(Rear) | 1 x 120mm |
Power Supply | ATX & Standard / up to 160mm |
Dimensions (W x H x D) | 210mm x 489mm x 454mm |
Weight | 7kg |
Build Quality & Appearance
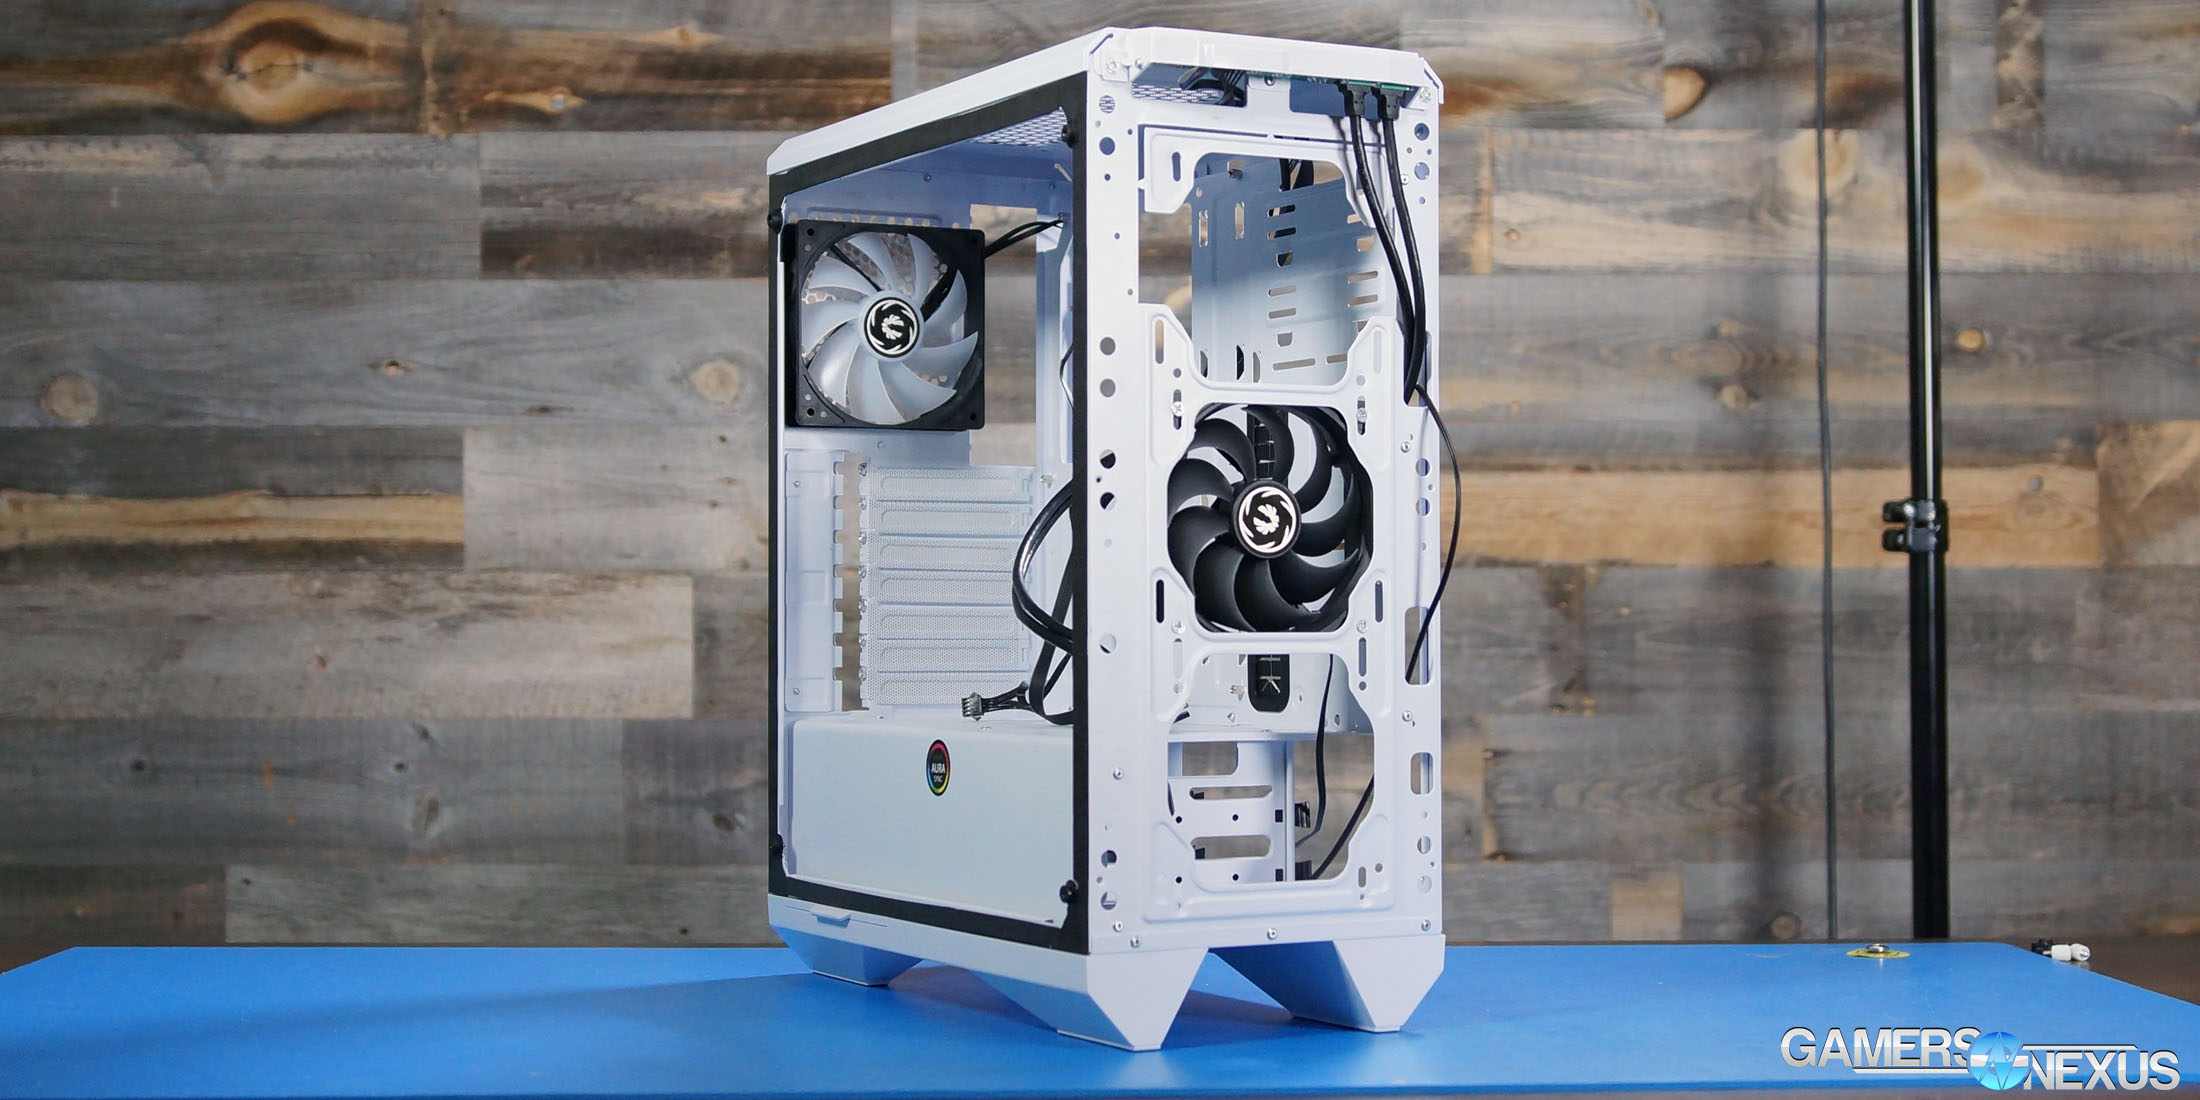
Our review sample is nearly pure white, including filters and PCIe covers, with four LED strips that form a ring on the front panel, matched by an RGB fan in the rear. LEDs are connected to a tiny but versatile controller behind the motherboard with a few baked-in colors and rainbow patterns. The rear fan is translucent and fully changes colors with different lighting, but it’s most effective with static colors--the rippling rainbow effects work better on the front panel. Adapters are included so that the controller can be bypassed and all LEDs can be controlled with standard 4 pin RGB cables (a prominent sticker in the middle of the shroud helpfully notes that this is ASUS AURA SYNC). Overall, the RGB illumination is handled better and seems much less tacked-on than it did in the Shogun.
The exterior is simple and symmetrical, with the exception of three filter handles jutting out from the sides. To be incredibly nitpicky, the front I/O ports aren’t quite in a straight line (so that they’ll fit the curve of the front panel), and the power and HDD LEDs don’t completely line up with their holes. The top of the case can optionally be covered with a magnetic mesh filter or a solid cover, similar to the Define C, but the cover isn’t precisely color matched and the filter looks better. These are minor points on an otherwise good-looking case and it’s clear that Bitfenix really put some effort into making the various fittings all white, except for the cable grommets.
There’s no special hinge or mechanism holding the glass on, just four screws at the corners (as expected for a budget case). A single tinted pane fully covers the side, and the other side panel is standard slide-off steel sheet, which got a bit stuck on our sample and difficult to slide it into place or remove. Our glass was slightly chipped at one corner, but it’s very possible that this was done in shipping.
The front panel is a mess of filters, LEDs, wires, plastic reinforcement, and steel. It’s surprisingly heavy for an otherwise lightweight case, and it’s certainly sturdy, bordering on overbuilt--there’s even a thick reinforcing frame of plastic behind the steel. In other words, the front panel has had a lot of design work and presumably money put into it, but somehow nobody thought to put a vent in. We’ll elaborate more on this in the thermal section, but this is where the Enso’s problems really begin. The front panel was nearly impossible to pry off the first time, but we can’t complain TOO much about that after what we said about the H500P--and at least Bitfenix had the decency not to wire anything but LEDs directly into it, unlike some cases we could mention. The I/O panel could use more than two USB ports, but it’s functional.
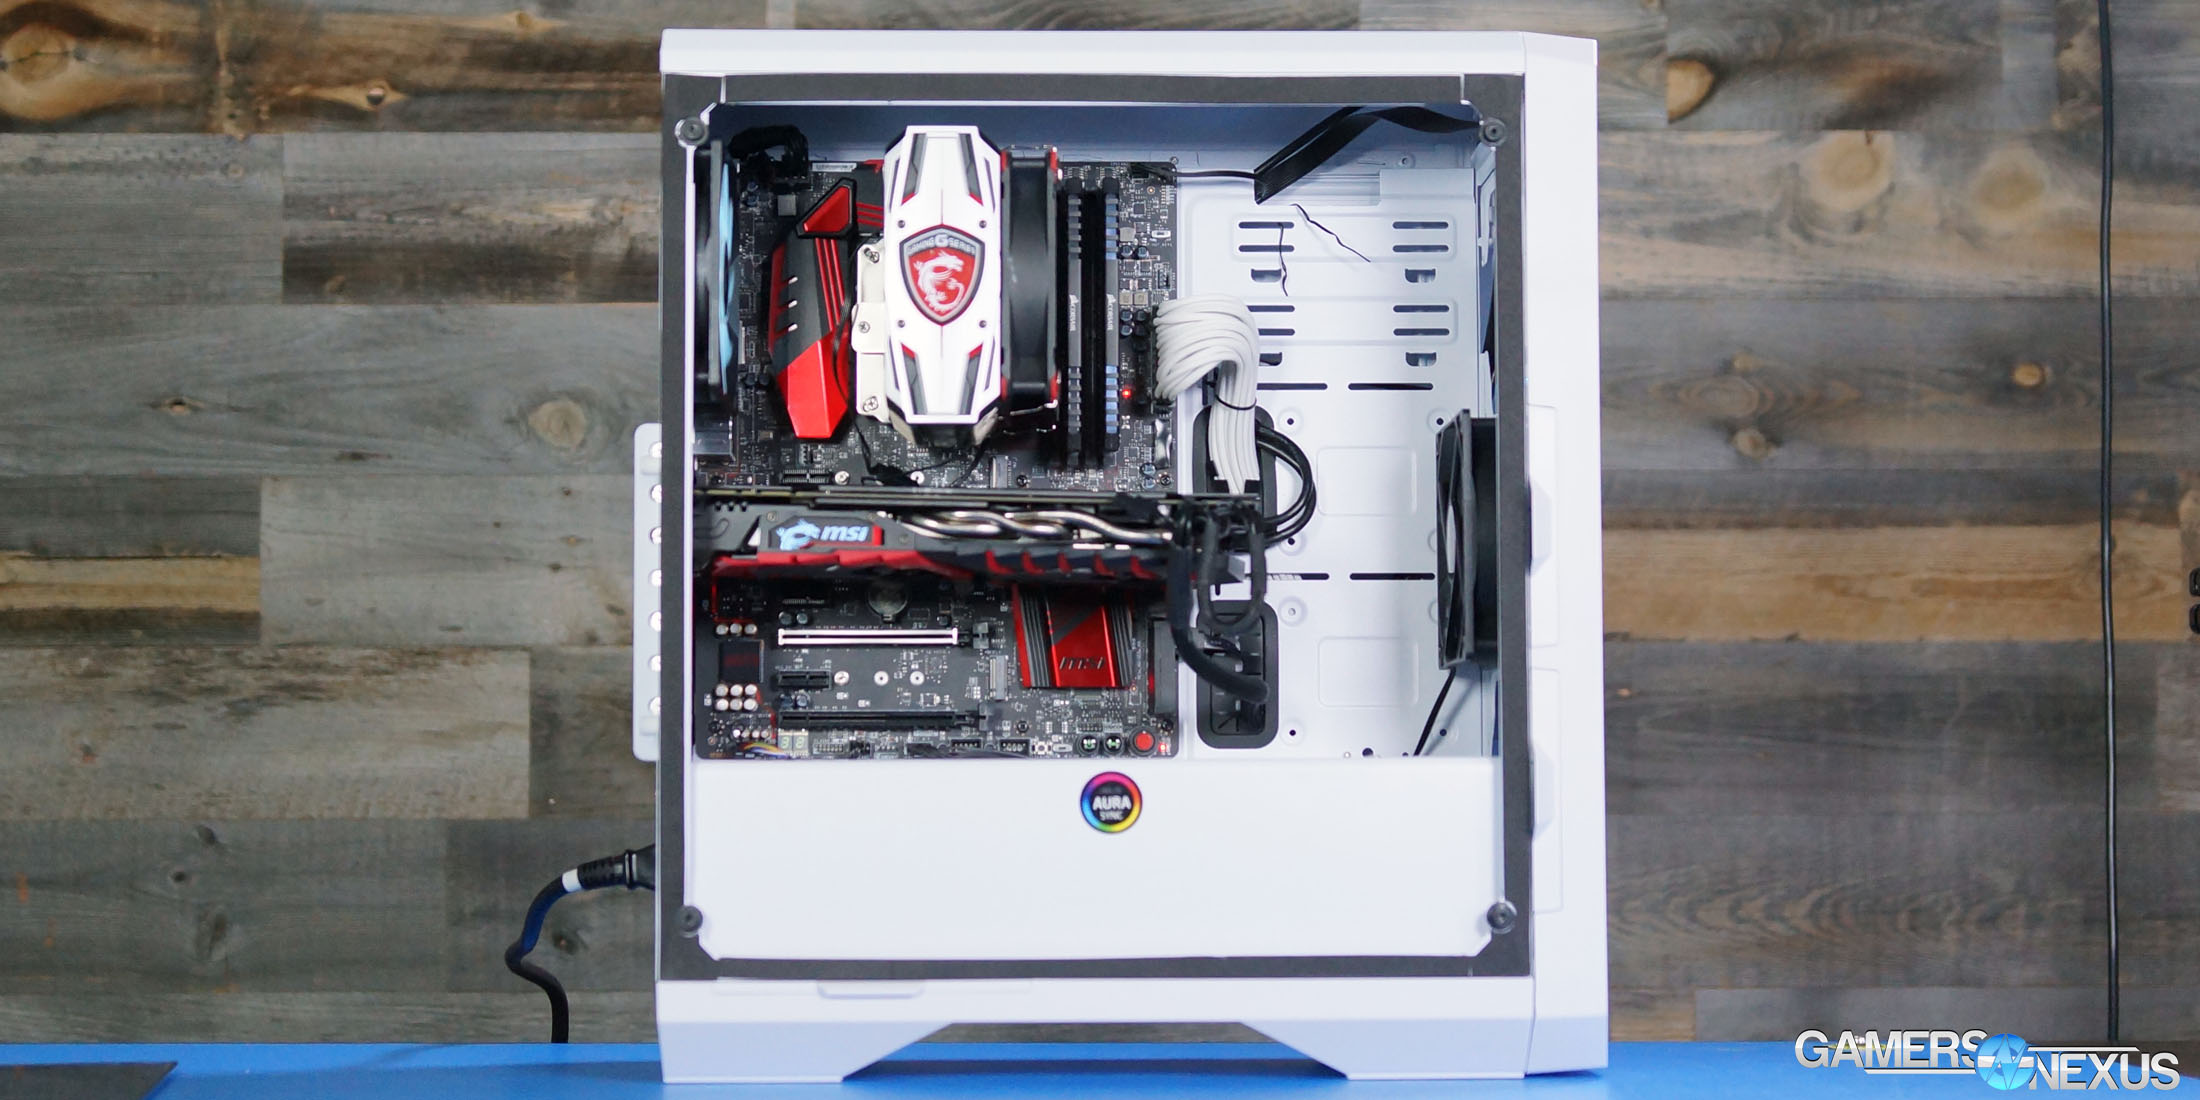
Installing the motherboard was easy enough, but the power supply presented difficulties. The Enso’s 3.5” drive cage is in an increasingly common style: it hides beneath the shroud, it fits two drives, and it can be moved forwards for additional PSU cable clearance or taken out. Or it could be, if it wasn’t riveted into place. The screw holes for shifting the cage forwards are still there, but the cage itself is permanently stuck in a position that bent our power cables sharply, and the small cutouts in the shroud are poorly placed to provide relief. The large cutout at the front is permanently open, without the removable cover seen in cases like the Define C. The PSU has to be inserted from the side, not the back, which made the cage’s placement even more inconvenient. If they haven’t already, Bitfenix undoubtedly plans to use this chassis as the basis for more enclosures, which is fine--but it’s frustrating to see evidence of missing features like this.
Cable management was acceptable outside of the shroud, but there sure are a lot of cables to manage. The RGB controller is small but it has a confusing array of adapters plugged into it, despite being connected to just two items, but it does a good job of ensuring that everyone who uses this case will be able to make use of the RGB features in some capacity.
Case Testing Methodogy
We tested using our new Skylake case test bench, detailed in the table below. This particular configuration is brand new with the launch of the 570X & 270R. Results on this test platform cannot be compared to previous case benchmark results, as the platform has completely changed.
Conducting thermal tests requires careful measurement of temperatures in the surrounding environment. We control for ambient by constantly measuring temperatures with thermocouples and laser readers. We then produce charts using a Delta T(emperature) over Ambient value. This value subtracts the thermo-logged ambient value from the measured diode temperatures, producing a delta report of thermals. AIDA64 is used for logging thermals of silicon components, including the GPU diode.
All case fans are manually configured to their maximum throughput using BIOS, then we configure to an RPM closer to 1050 for a universal "quiet" testing. If a fan controller is present, we opt-in and test on multiple settings. This forces testing of case fan performance in addition to the case's air channeling and airstream design. This also ensures minimal variance when testing, as automatically controlled fan speeds can reduce reliability of benchmarking. The CPU fan is set to 1100RPM (constant) for consistency, and the CPU is overclocked to 4.4GHz with a vCore of 1.272V (constant). C-States and power saving states are disabled.
| Component | Courtesy Of | Price | |
| Video Card | MSI GTX 1080 Gaming X (OC Mode) | MSI | $640 |
| CPU | Intel i7-6700K @ 4.4GHz | GamersNexus | $300 |
| CPU Cooler | MSI Core Frozr L | MSI | TBD |
| Motherboard | MSI Z170A Gaming M7 | MSI | $180 |
| Memory | Corsair Vengeance LED 32GB 3200MHz | Corsair | $200 |
| SSD | Samsung 850 EVO 120GB | Samsung | N/A |
| PSU | Corsair RM650x | Corsair | $100 |
| Case | This is what we're testing! | - | - |
The video card is configured to run at 55% fan speed at all times.
Prior to load testing, we collect idle temperature results for ten minutes to determine the unloaded cooling performance of a case's fans and air channels. Thermal benchmarking is conducted for 1400 seconds (23 minutes), a period we've determined sufficient for achieving equilibrium. The over-time data is aggregated and will occasionally be compiled into charts, if interesting or relevant. The equilibrium performance is averaged to create the below charts.
Load testing is conducted using Prime95 LFFTs and Kombustor “FurMark” stress testing simultaneously. Testing is completely automated using in-house scripting, and executes with perfect accuracy on every run.
We recently validated our test methodology using a thermal chamber, finding our approach to be nearly perfectly accurate. Learn more here.
THERMALS
We put the Enso in a “needs work” category when we saw it at Computex this year, specifically because it had no front intake. Air is intended to flow between the front legs of the case, up through the front panel, and in through a filter, pulled by a single 120mm fan. This stock fan is installed in the middle of the front panel, with the theoretical possibility of adding additional 120mm fans above and below it. The filters only partially cover the intake path. We criticized the H500P pretty heavily for some of the same reasons that we’re now criticizing the Enso, but it did at least have some mesh over each intended intake vent, including a little mesh apron under the case that they added post-Computex. The Enso doesn’t even get that far.
One potential problem with the stock configuration is that it’s easier for the intake fan to pull hot air from inside the case than to pull cool air from outside: there are big, empty fan bays immediately above and below it, while the “real” vent is relatively small and far away, and partially obstructed by a superfluous lower filter. The filters and their slots are completely removable, but doing so leaves holes in the case. Normally the solution to these problems would be to put more fans in, but the top slot has no filter (the manual doesn’t even acknowledge a fan could be installed there) and the bottom slot points into the PSU shroud. Using two 140mm fans instead of three 120mm ones would encounter the same issues.
For additional testing this time, we tried five different ways of forcing some air into the Enso. With the stock fan configuration, we tried taking the front panel off (as usual) to see how much airflow it obstructs, sealing the top fan bay, and sealing the top and bottom fan bays. We then tried adding an additional 120mm intake fan, first in the front of the case and then in the top. We also tested in the stock configuration with the solid cover on top of the case; the magnetic mesh filter was used in all other tests.
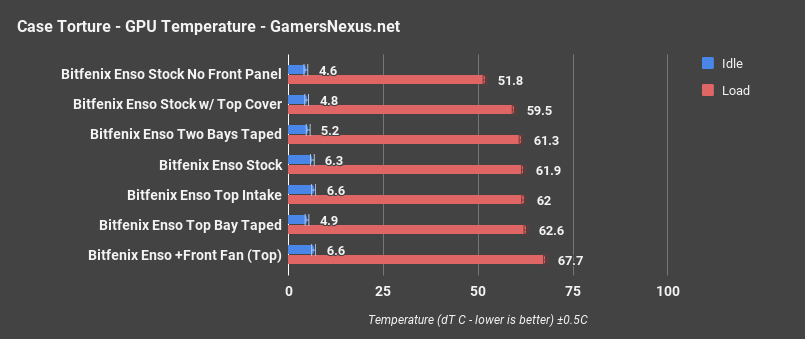
CPU Torture - Enso
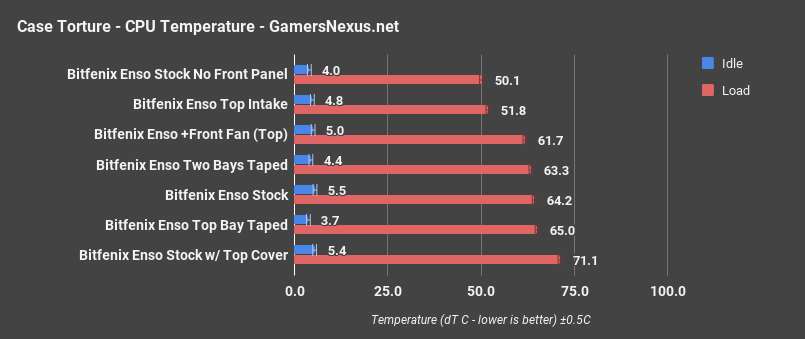
This testing initiates with only the Enso; we’ll add comparative data in a moment. Our standard torture test raised the CPU to 64.2 degrees above ambient, with the CPU temperature peaking 10C away from TjMax. CPU temperature usually doesn’t matter much in our testing, but it does here, because putting the non-mesh cover on top of the case caused the CPU to hit TjMax (100C) during peak load and begin throttling. In the Pure Base 600, another warm case we’ve tested, opening the top vent didn’t contribute much to CPU cooling as the air actively blows front-to-back. With the Enso, though, so much heat builds up in the case that it can be felt rising passively from the CPU cooler and out of the top vent. The solid cover resulted in a 71.1dT final score, but that would have continued to climb had throttling not occurred.
Taking the front panel completely off dramatically swung results in the other direction with one of the largest temperature drops we’ve seen: down 14.1 degrees (from stock), to 50.1C dT. We tried to claw back some of that 14.1-degree gap with the front panel actually installed, first by sealing fan bays and then by adding fans. Sealing the top fan bay caused no improvement and may have made less air available to the intake fan: recycling hot air is better than nothing, though. Sealing both empty fan bays didn’t hurt performance, but improvement still wasn’t outside the range of variance. Even adding a Noctua 120mm fan to the front pointed directly at the heatsink, normally a surefire way of dropping CPU temps, scored a paltry 2.5C lower than stock. That’s because it simply cannot breathe. There is zero air access in that top slot. The only truly effective configuration we tested was adding an intake fan to the top of the case pointing downwards, which scored 51.8C dT, just slightly warmer than what removing the front panel accomplished. If nothing else, CPU thermals benefit tremendously from top intake with this case.
CPU Torture - Comparative
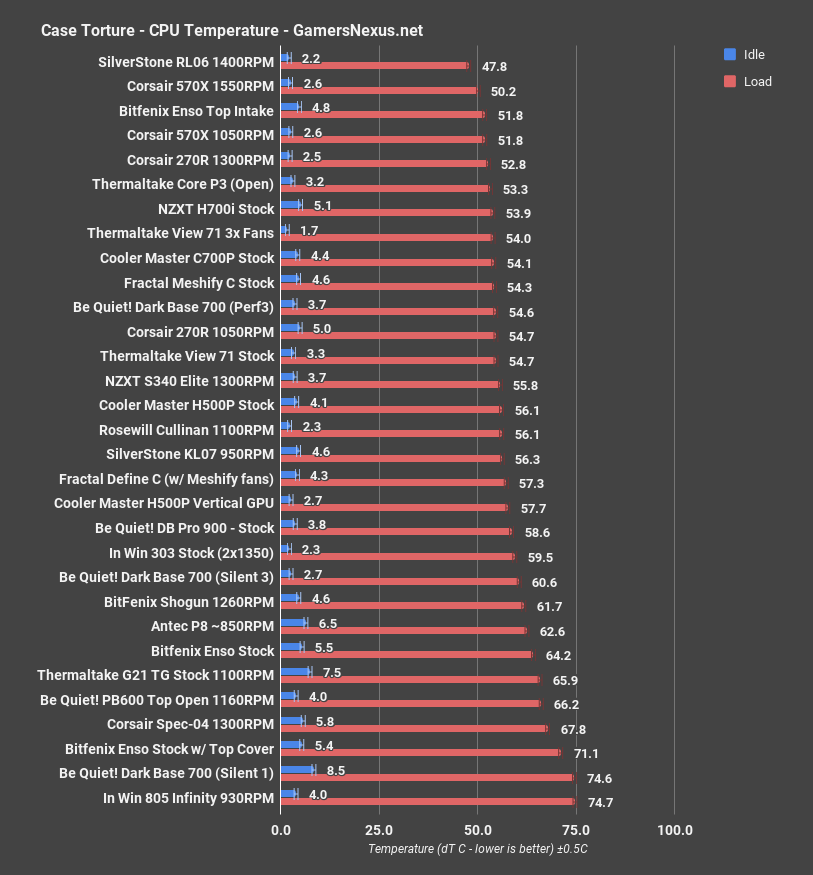
Despite all that talk about the Enso’s front panel, it’s still not the worst case for CPU temps that we’ve tested. The In-Win 805, Corsair Spec-04, Be Quiet! Pure Base 600, and Thermaltake G21 all had abysmal CPU cooling and higher deltas. The tragedy of the Enso is that it can’t really be improved, not even by sticking extra fans into it. Top intake does make CPU temperatures impressively low, in the Corsair 570X range, but that only really benefits the CPU. We need to check the GPU section, up next, to see if there’s negative impact from pushing that warmed air into the GPU backside.
GPU Torture - Enso
With the Enso only on the screen right now, GPU dT was 61.9 stock, warm enough to lock the clock speed down to 1708 MHz, with another dramatic drop from front panel removal--10.1 degrees this time. Again, any positive effects from taping off the fan bays were cancelled out by the lower overall volume of air moved. The oddest result was the GPU temperature with an additional front fan: instead of lowering, the GPU dT went up several degrees to 67.7C. It’s odd, but not impossible--the extra fan changed the airflow pattern, apparently in a way that negatively affected the GPU. This was repeatable and verified with other logged data. Adding a fan to the top of the case had even less effect on the GPU than taping the fan bays, resulting in functionally the same GPU temperature as the stock configuration.
GPU Torture - Comparative

Again, we’ve tested cases with worse stock deltas, but even the Antec P8 was capable of showing improvement with extra fans. The Enso doesn’t have this headroom, and as a result it’s stuck performing little better than the stock Spec-04 at GPU cooling, a case that came with only one fan and retails for $50. Both cases try to use a single intake fan to direct air both below the GPU and above it into the CPU cooler, and both fail.
3DMark Stress Test
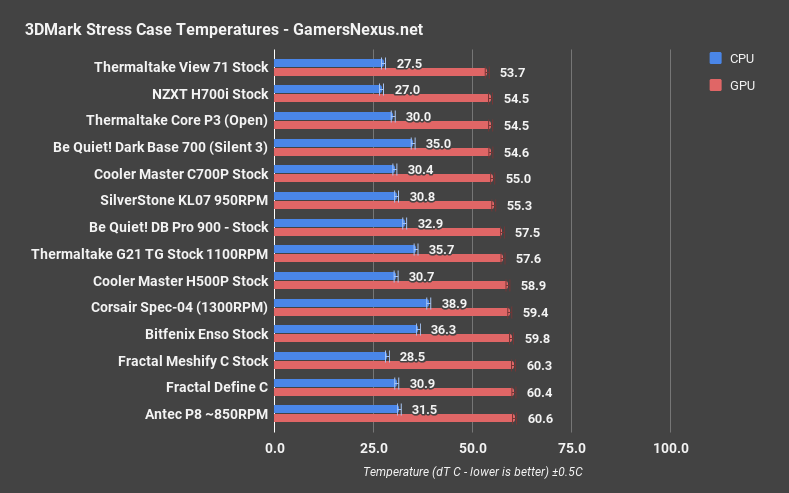
GPU dT during the looping Firestrike Extreme stress test was 59.8, just above the Spec-04 and again on par with other mediocre results like the stock Define C, stock Meshify C, and Antec P8 (all with shrouds limiting airflow at the bottom of the case). This is a real world gaming workload, and temperatures this high can definitely cause dropped clock speeds on GPUs, as adding ambient back in would get us to around 82C, or throttle point on the Pascal cards.
Blender - CPU Worker
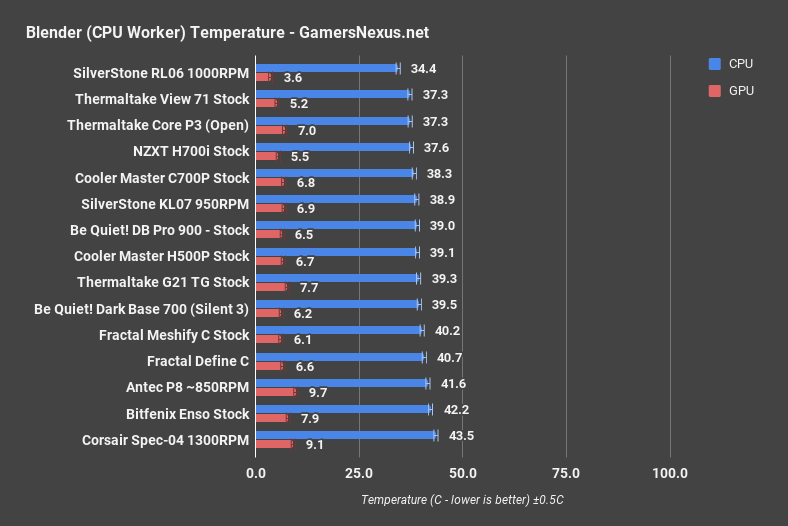
Our Blender test is a realistic production workload that avoids some of the potential pitfalls of the torture test, like runaway thermals or throttling to stay under 100C. In this scenario, the Enso’s 42.2C dT is right between the Antec P8 and the Corsair Spec 04 at the top of the chart when rendering on the CPU.
Blender - GPU Worker

GPU dT in the blender test was actually below the P8 and effectively tied with the Define C, but still at the high end of the scale. Without the heat caused by an intense workload like Furmark or Firestrike, GPU clock speed remained just under 2000MHz for the duration of the render.
Noise
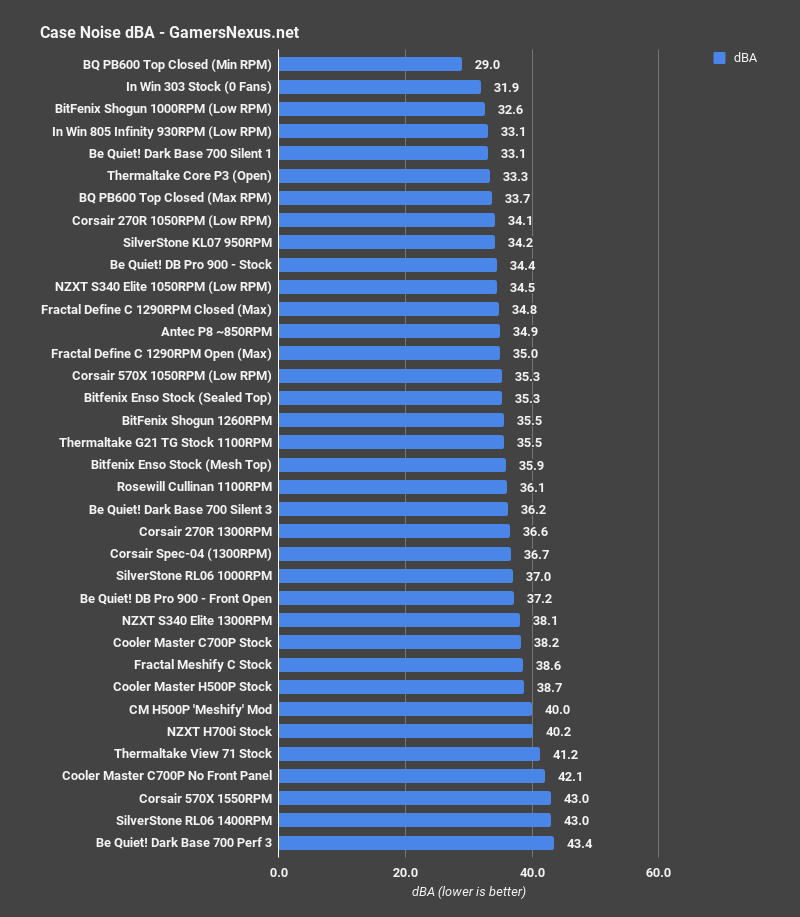
The Enso isn’t a noise-suppressing case by any means, but its noise output is just about average--the one benefit of completely sealing the front panel is that very little sound reaches our dB meter. 35.9 dBA is equivalent to the Shogun or the Rosewill Cullinan, both of which have three 120mm stock fans. Putting the magnetic cover on the top of the case instead of the breathable filter caused only an imperceptible improvement, and we’d recommend against using it given the amount of heat that can pool at the top of the case. During the “top intake” test, the mesh filter did muffle a loud humming caused by air rushing into the case.
Normalizing for noise would have just about every other case ahead of this one.
Bitfenix Enso Review Conclusion

We’ve had concerns about the Enso for as long as we’ve been aware of it, but we were told that the version shown at Computex wasn’t necessarily final and that additional ventilation was being considered. We were also initially told that Bitfenix was shooting for a $60-70 price, which would be competitive even for a complete lemon. Instead, the Enso followed the exact trajectory of the Antec P8, another budget tempered glass case that we were told would cost $70, released at $90, had poor ventilation, and felt very much budget-tier. In fact, the P8 came with three (admittedly ineffective) fans and had a trickle of airflow, which could be increased by adding higher-quality fans. The Enso’s unique selling points are addressable RGB, glass, and a nicely done white paint job, which covers looks and nothing else. Even in that regard the Enso is pedestrian next to Bitfenix’s unique-looking Portal, Shogun, or Aurora cases.
We look forward to seeing more Bitfenix products in the future, and we hope Bitfenix either reworks the Enso or makes another attempt at creating a budget tempered glass case. In the meantime, we can recommend the Meshify C as a tempered glass mid tower that specifically solves the Enso’s problems, and we’ll be publishing another roundup of quality cases in the near future.
Editorial, Testing: Patrick Lathan
Host, Test Lead: Steve Burke
Video: Andrew Coleman