Thermaltake has released its Core G21 TG (tempered glass) Edition case, and it’s only $70 -- more proof that glass panels don’t need to be expensive. Despite the name, there’s no product listing for a non-TG Edition G21, although the View 21-TG that was displayed alongside it at Computex shares the same tooling with a different front panel.
Today’s review looks at the Thermaltake Core G21 TG case for build quality, thermals, and acoustics, with additional testing on optimal fan placement and fan configurations.
Thermaltake Core G21 Appearance
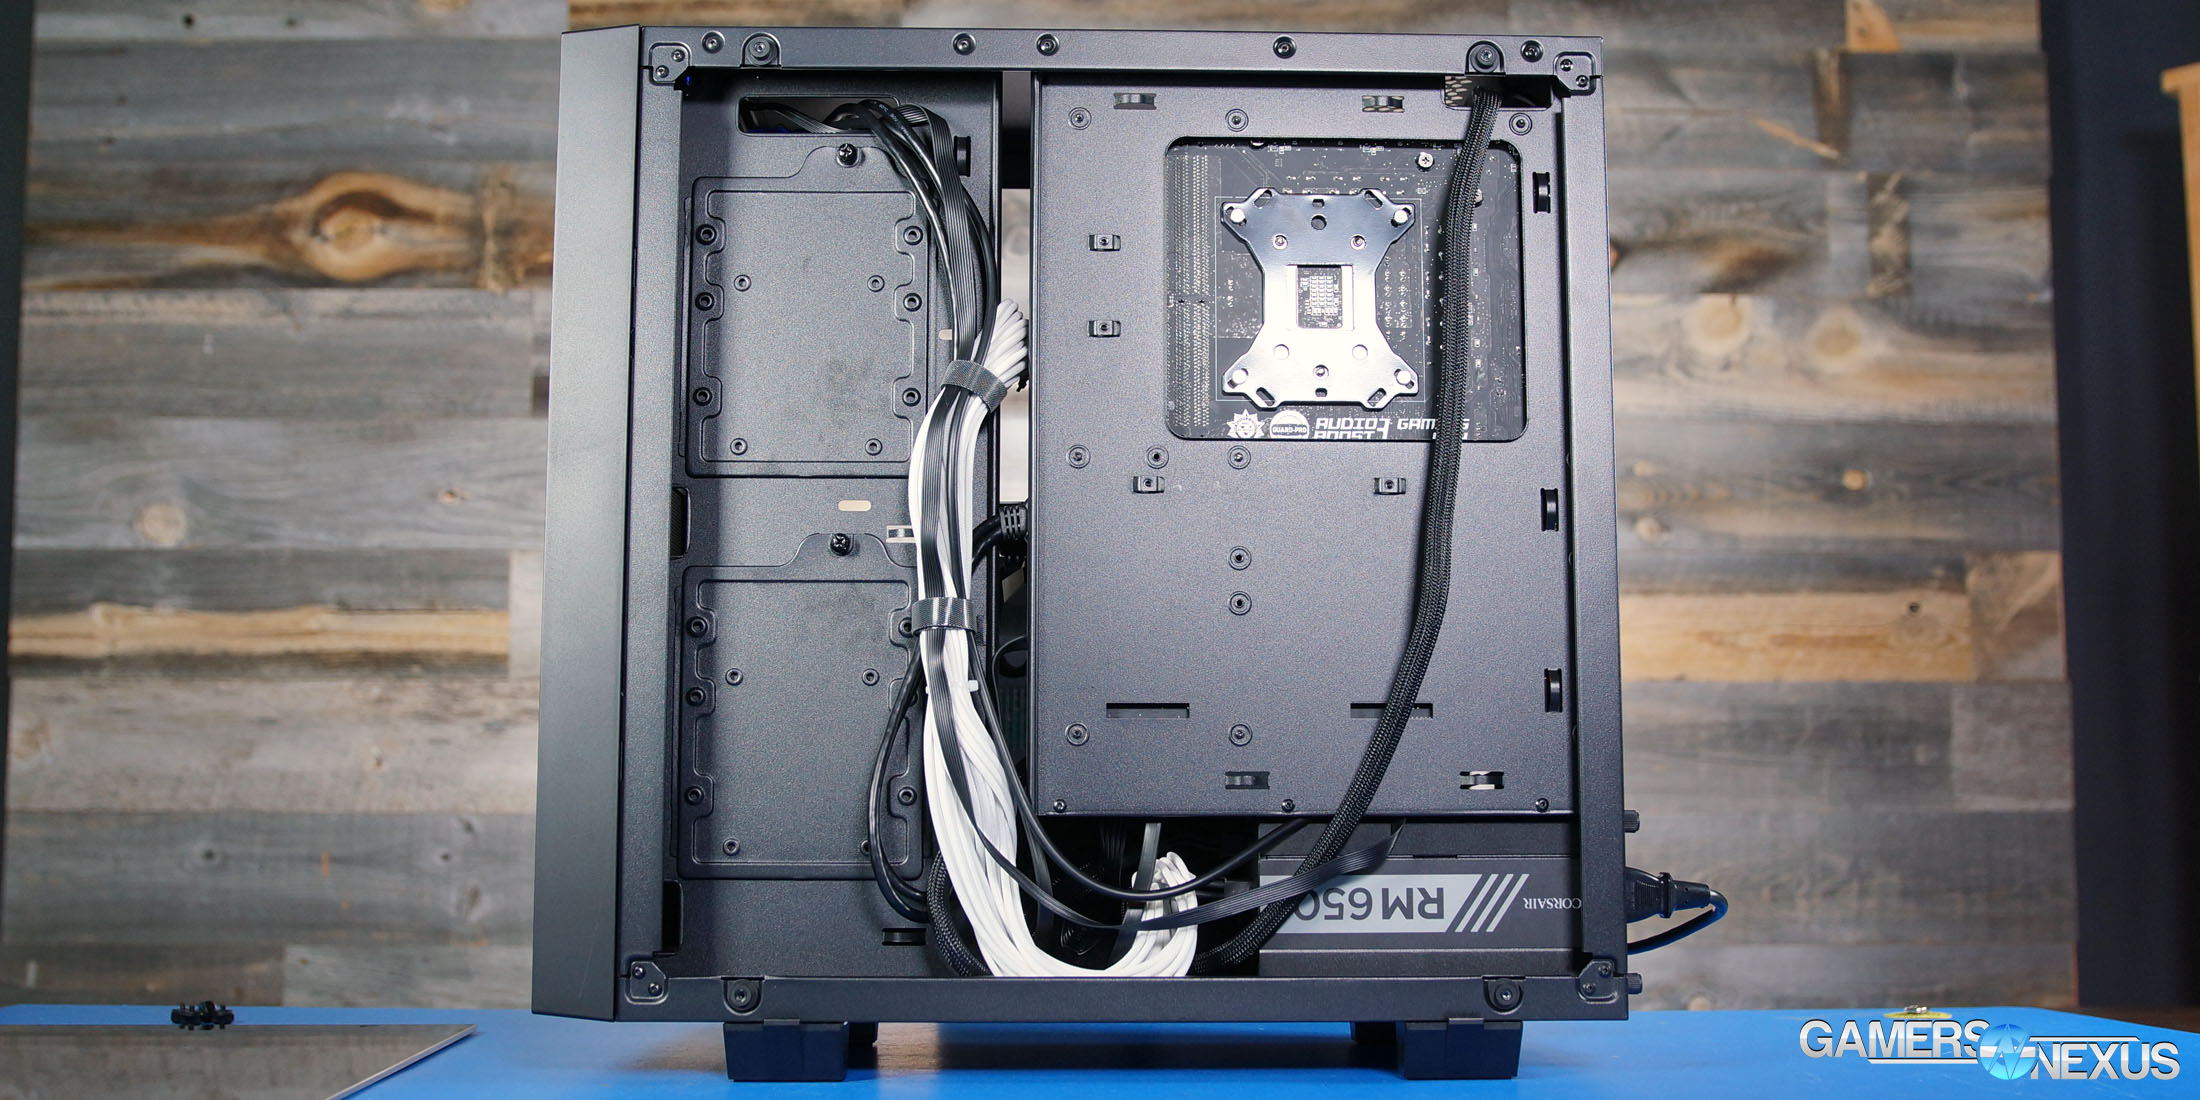
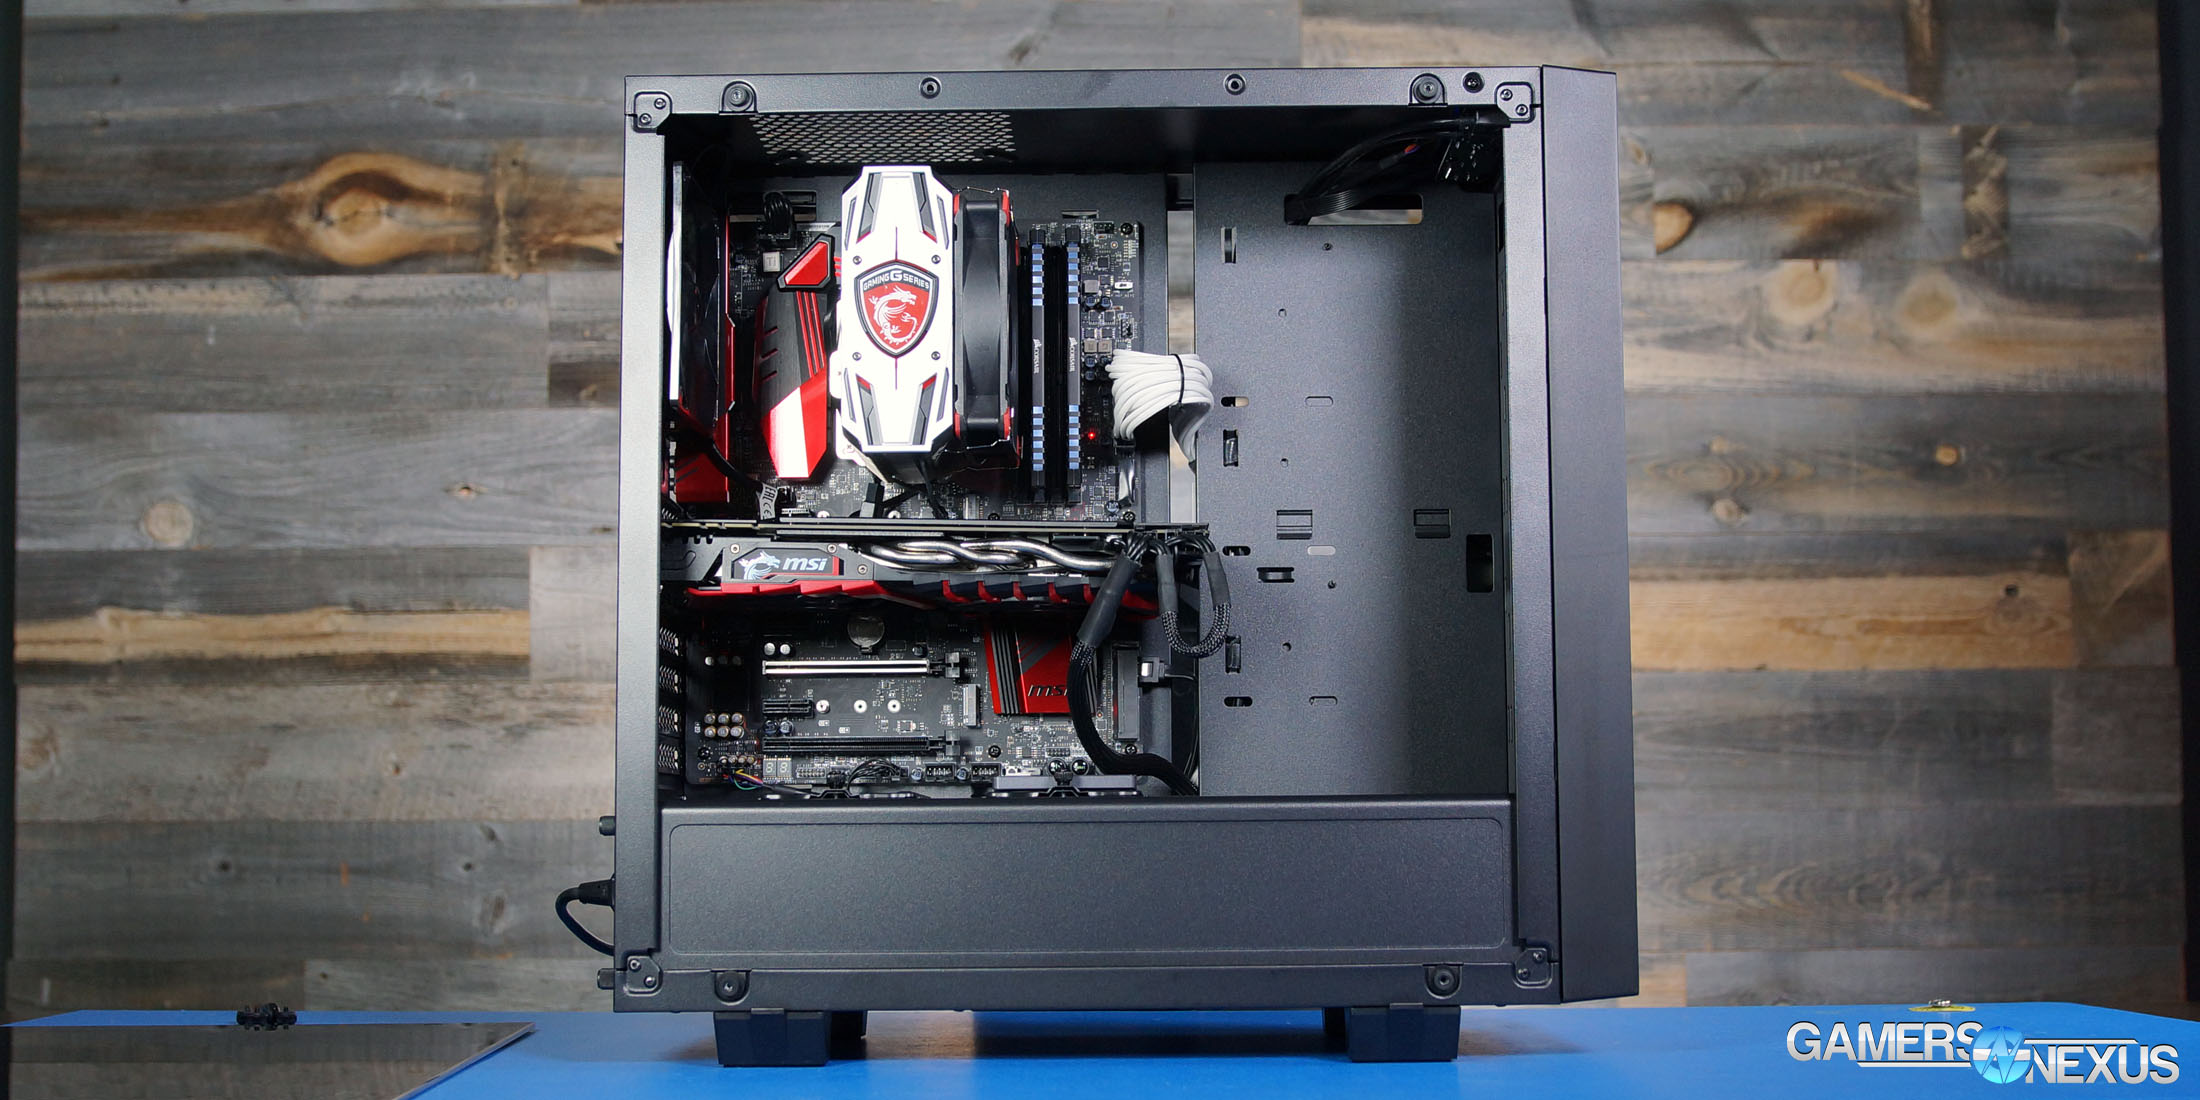
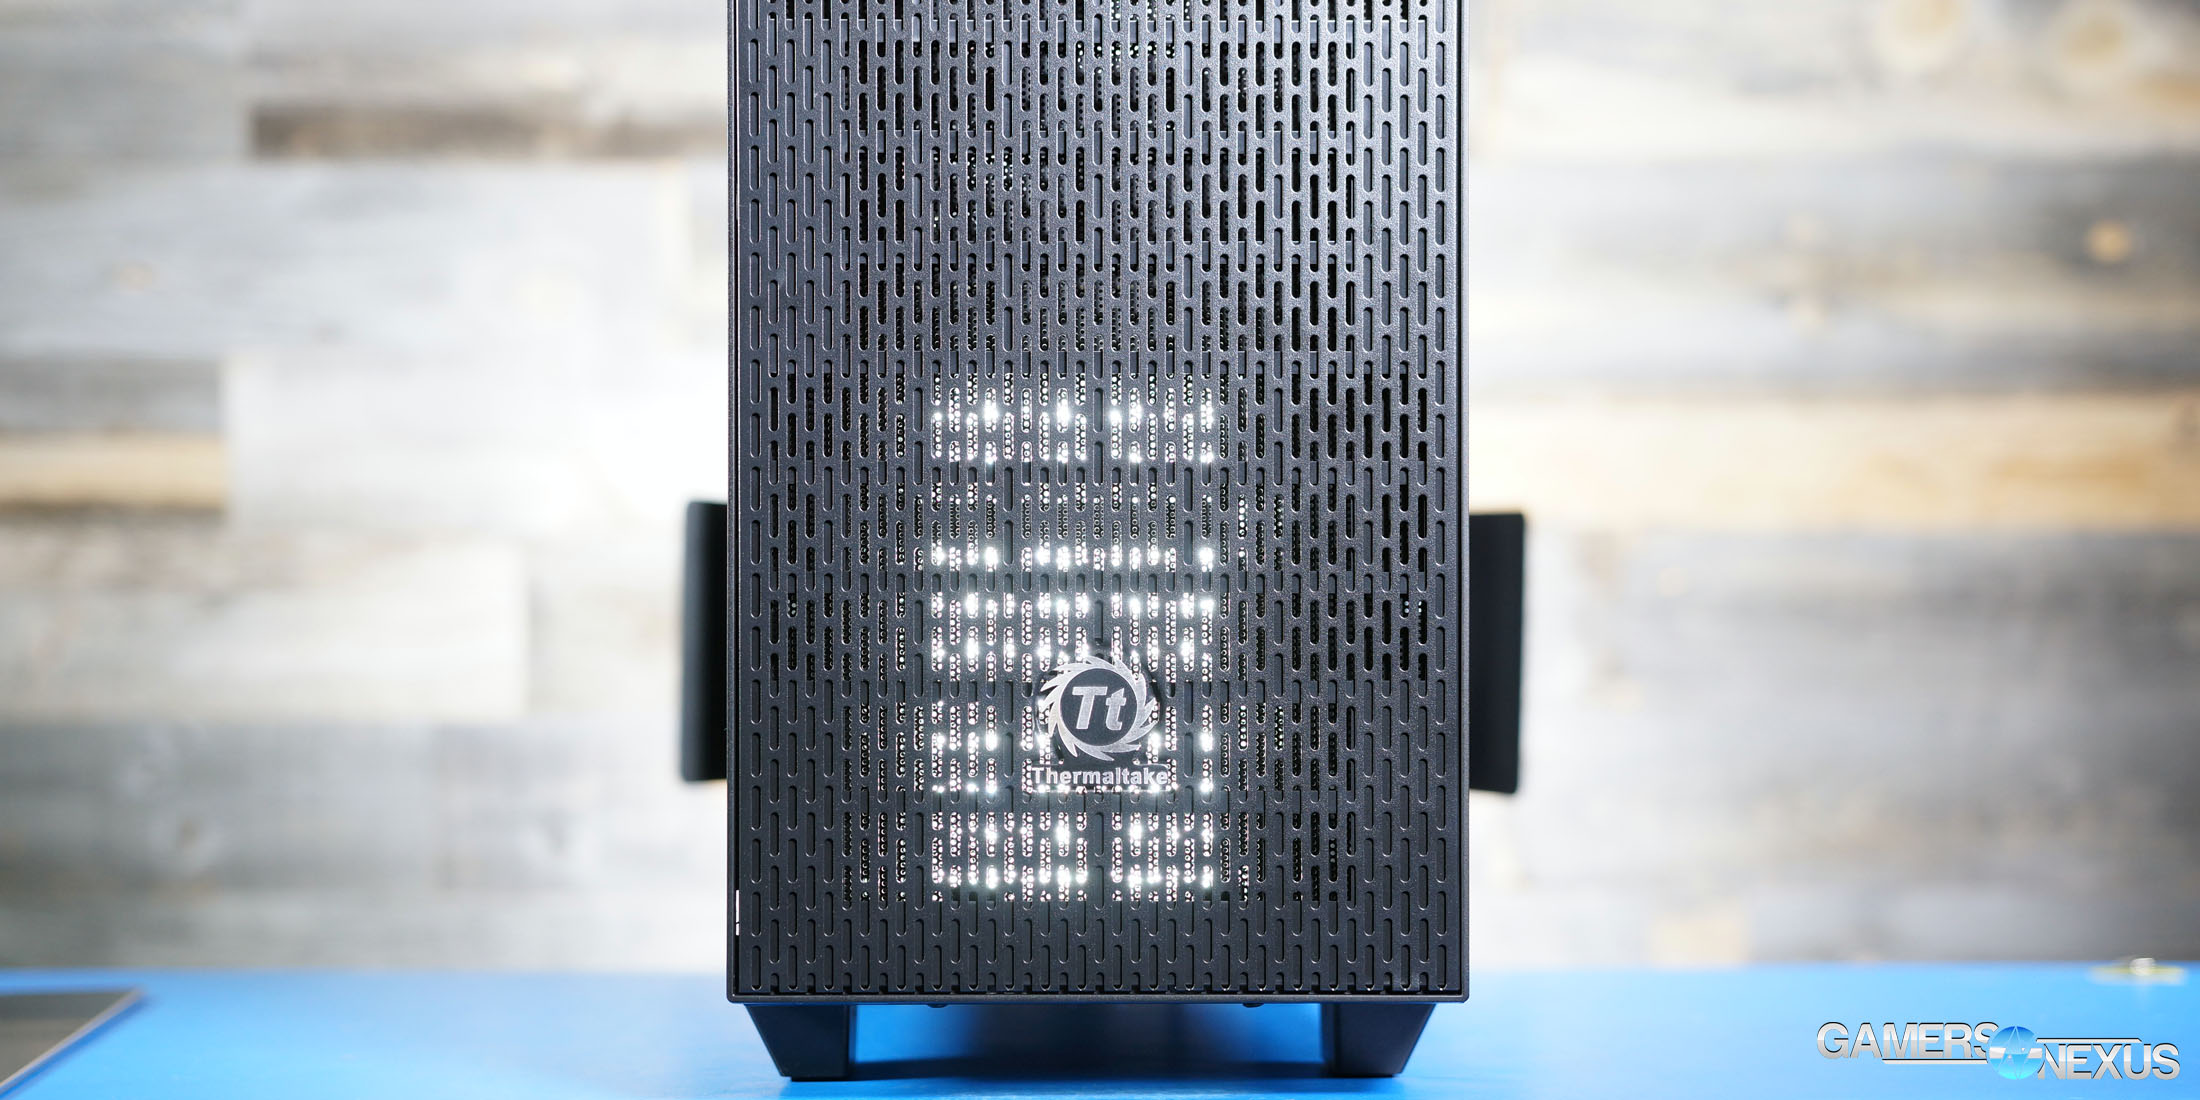
The full glass panels, sharp angles, and sort-of-full shroud put the G21 in the same visual category as the NZXT S340 Elite, although the mesh front panel and prominent Thermaltake badge detract from the sleekness somewhat. Narrow black borders on the tempered glass side panel leave every part of the interior visible, and both the border and screw holes are conveniently symmetrical so that the panel can’t accidentally be installed upside down. Oddly, the back side panel is also translucent, although tinted a darker shade. This means that cables and drives tucked behind the motherboard are visible from outside, especially if they’re white. Despite Thermaltake’s charming description of this decision on the Newegg page (“two-toned tinted glass for the look up front, while keeping business in the back”), this puts much more pressure on the user to bundle cables neatly.
Core G21 Build Process
Right away, Thermaltake deserves praise for putting catches below their side panels. Working on the S340 Elite and the Bitfenix Shogun required constant vigilance to avoid dropping heavy panels while removing them, as they can easily slip off their mounts and bang on the table. That’s not enough to be dangerous, but it scares Senior AMD Analyst Snowflake, so this was a marked improvement. Thermaltake’s panels are secured by the catches until they’re hinged out to about 45 degrees. They can also provide extra leverage for pressing the glass down on bulky cables, although “glass” and “leverage” aren’t necessarily concepts that should be put together.
That’s fine, though, because there’s plenty of space for managing cables in the G21. We’ve praised cases like the Fractal Define C for allowing space for a couple drives as well as the inevitable bundle of front panel, power, and SATA cables in front of the motherboard in the space that would have been occupied by optical drives in the past. The G21 goes a step beyond in functionality (and quality) by using two separate sheets of metal for this forward section and the rear part where the motherboard is mounted, leaving a large gap between the two. Some might prefer cutouts for cable routing, but a big gap like the one behind the S340’s cable management bar is much easier to work with. With convenient cable tie points and a shroud to cover up any stray wires, it was no trouble to keep things looking tidy in spite of the transparent side panel.
Whereas most cases just provide a couple 2.5” mounts behind the motherboard, here there are two 3.5” hard drive sleds hidden in the back. There’s no way for cool air to circulate around them, but it’s a great option for HDDs that aren’t working constantly.
Front I/O is completely normal except for the fact that the reset and power switches share a single button. This didn’t cause any problems, but is an interesting and different choice.
The front panel is one thing (other than the glass) that really makes the G21 stand out: it’s all mesh, and as the SilverStone RL06 proved, that allows for serious airflow. Unfortunately, Thermaltake falls short on execution.
There’s only one fan shipped with the G21, and it looks and feels cheap. If a reasonably-priced tempered glass case that cuts its MSRP by excluding fans sounds familiar, it might be because if our In Win 303 review, where our review sample was shipped with 0 fans. Fans are one of the best places to cut costs in enclosures, since rather than forcing the customer to pay for cheap fans that they’ll have to replace, the customer can save their money and buy the fans they want. On the other hand, shipping a case with no fans means that some customers will feel cheated, and at least one will accidentally cook their PC.
This is a tremendous oversight by Thermaltake that mars the quality of an otherwise excellent case at the $70 price-point. In the very least, get a slightly better fan and put it in the front of the case, splitting intake between the GPU and CPU. There’s so much potential here in this mesh paneling, and Thermaltake manages to let it slip through their grasp.
We decided to move the fan to the front, attempting to push some cool air over the CPU and GPU, but after that things got a little wild. We added one 140mm fan, then two, then took the filter off, then the front panel, then both, then switched back to the standard configuration and did a couple more tests.
Case Test Methodology
We tested using our new Skylake case test bench, detailed in the table below. This particular configuration is brand new with the launch of the 570X & 270R. Results on this test platform cannot be compared to previous case benchmark results, as the platform has completely changed.
Conducting thermal tests requires careful measurement of temperatures in the surrounding environment. We control for ambient by constantly measuring temperatures with thermocouples and laser readers. We then produce charts using a Delta T(emperature) over Ambient value. This value subtracts the thermo-logged ambient value from the measured diode temperatures, producing a delta report of thermals. AIDA64 is used for logging thermals of silicon components, including the GPU diode.
All case fans are manually configured to their maximum throughput using BIOS, then we configure to an RPM closer to 1050 for a universal "quiet" testing. If a fan controller is present, we opt-in and test on multiple settings. This forces testing of case fan performance in addition to the case's air channeling and airstream design. This also ensures minimal variance when testing, as automatically controlled fan speeds can reduce reliability of benchmarking. The CPU fan is set to 1100RPM (constant) for consistency, and the CPU is overclocked to 4.4GHz with a vCore of 1.272V (constant). C-States and power saving states are disabled.
| Component | Courtesy Of | Price | |
| Video Card | MSI GTX 1080 Gaming X (OC Mode) | MSI | $640 |
| CPU | Intel i7-6700K @ 4.4GHz | GamersNexus | $300 |
| CPU Cooler | MSI Core Frozr L | MSI | TBD |
| Motherboard | MSI Z170A Gaming M7 | MSI | $180 |
| Memory | Corsair Vengeance LED 32GB 3200MHz | Corsair | $200 |
| SSD | Samsung 850 EVO 120GB | Samsung | N/A |
| PSU | Corsair RM650x | Corsair | $100 |
| Case | This is what we're testing! | - | - |
The video card is configured to run at 55% fan speed at all times.
Prior to load testing, we collect idle temperature results for ten minutes to determine the unloaded cooling performance of a case's fans and air channels. Thermal benchmarking is conducted for 1400 seconds (23 minutes), a period we've determined sufficient for achieving equilibrium. The over-time data is aggregated and will occasionally be compiled into charts, if interesting or relevant. The equilibrium performance is averaged to create the below charts.
Load testing is conducted using Prime95 LFFTs and Kombustor “FurMark” stress testing simultaneously. Testing is completely automated using in-house scripting, and executes with perfect accuracy on every run.
We recently validated our test methodology using a thermal chamber, finding our approach to be nearly perfectly accurate. Learn more here.
Continue to the next page for thermals, noise, & the conclusion.
Thermaltake Core G21 Fan Placement Tests
We first wanted to establish an understanding for how the Thermaltake Core G21 TG performs standalone; after initial torture tests, we ran additional configurations that involved new fans, removal of dust filters, and reconfiguration of the front of the case. We’ll get to comparative benchmark results next.
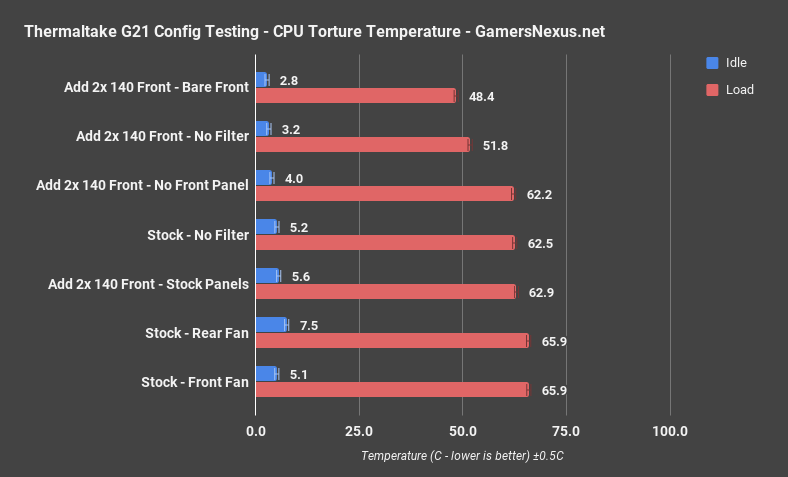
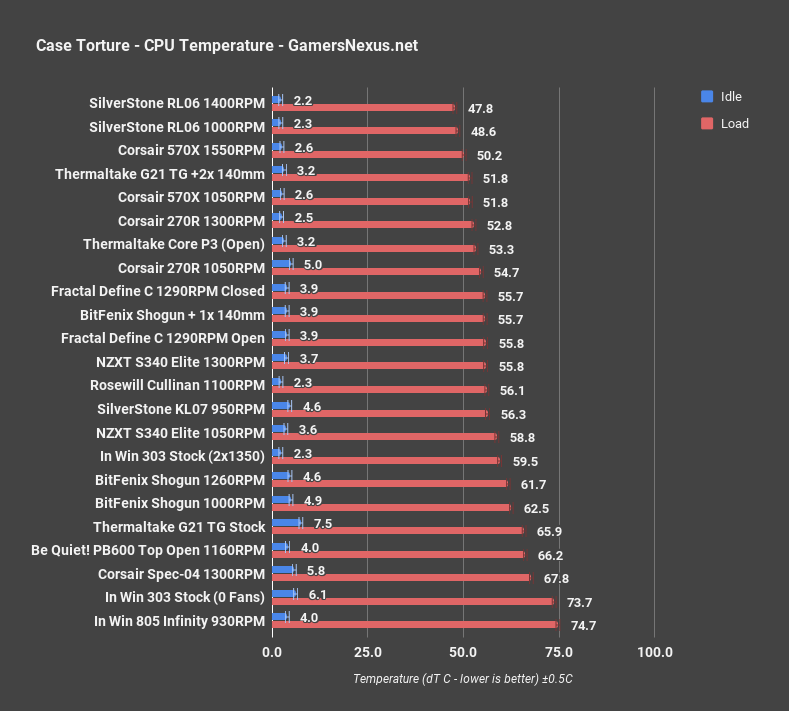
During our torture workload that burns the CPU and GPU simultaneously, the stock configuration of the case with a single rear fan and both front dust filters produced a load temperature of 65.9C delta T over ambient. Idle rested at 7.5C delta T. With an ambient of about 23-24C, that puts you just under a CPU temperature of 90C on our test bench. Definitely a bit warm.
In an effort to understand why temperatures were so high on a case that has good ventilation, we next added two AF140 Corsair front fans alongside the rear exhaust fan. The result wasn’t much better – we only improved our CPU load temperature by 3C, with idle improved by about 2C.
This puzzled us, and so we set forth on a mission to perform far more tests than we’ll ever get ROI for on this review. Removing the front panel was next, which improved our temperatures by 3C to 62.5 in the stock single-fan configuration, and barely changed anything in the dual-intake configuration. We next removed the magnetic dust filter behind the front panel, then put the front panel back on – finally, the root cause of the issue. Removing the magnetic dust filter improved our CPU thermals from 62.9C delta T with the dual-intake configuration to 51.8C delta T. That’s a massive jump of 11C, and is one we were able to validate repeatedly. For the stock configuration with only one exhaust fan, we saw a change from 65.9C to 62.5C – still an improvement, but given that there are no intake fans to choke, the change is less significant.
Removing both the filter and front panel gives us our bare front configuration, which still sees a boost – but not enough of one to be worth removing the somewhat required front panel. Removing the optional dust filter is absolutely worthwhile, though.
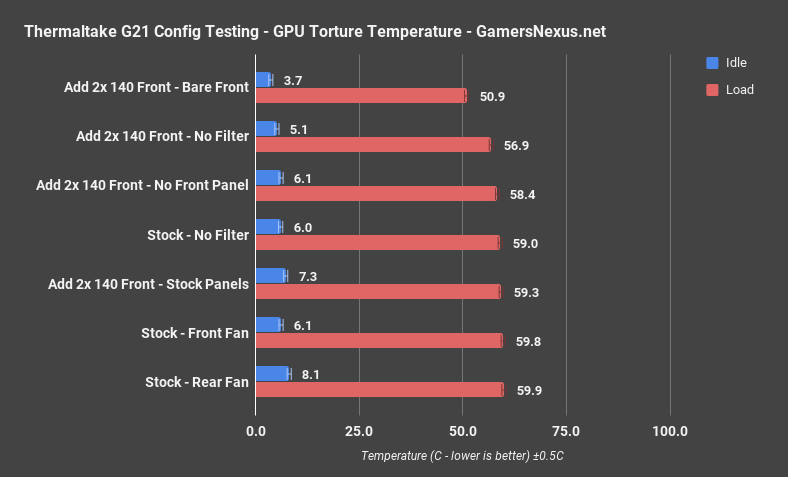
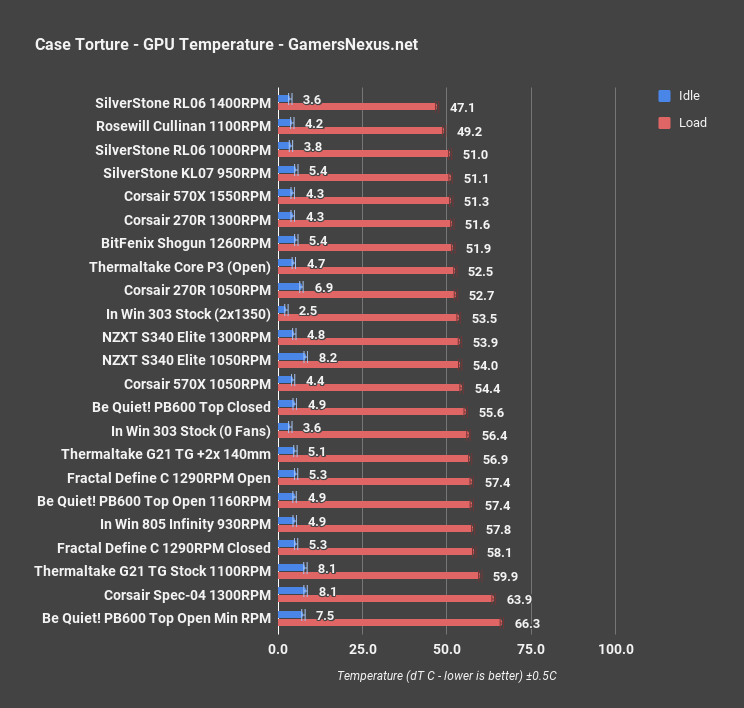
GPU thermals improved similarly. We were throttling hard in most of these test configurations, as the throttle point is 82-84C, and we were at 59C delta T. That’s the choke point. It wasn’t until we removed the magnetic dust filter and added some fans that the GPU was able to cool itself down in this torture workload. Once we got rid of the front filter, it performed to spec and stayed below throttle territory.
When we asked Thermaltake about this and validated our testing results, the company noted that they’d rather include extra dust filters that are removable, as it’s harder for the end-user to source an appropriately-sized dust filter than to remove one. Although this is a marketing response, it’s at least one that makes sense -- the decision just becomes a question of “why include a dust filter if the intended use is its permanent removal?”
Comparative Testing: G21 Torture Thermals (CPU)
Our comparative testing starts with torture workloads, then moves on to Blender and 3DMark for realistic workloads.
With a torture load on the CPU and GPU, the Thermaltake Core G21 TG stock case performs about where the Be Quiet Pure Base 600 did – but the Be Quiet! case is the most noise-suppressed we’ve tested, so that’s not a linear comparison. We’re between the Shogun and the Spec-04, ultimately. Adding two fans and removing the dust filter really shows the potential, bringing us up to 51.8C dT, or on-par with a $180 Corsair 570X case that includes three front fans. Not bad for the $70 unit, though cost goes up about $15 once we account for the fans added. We’re also near the 270R, a price-competitive case that forgoes the tempered glass, and Thermaltake’s open-air Core P3.
The G21 really has serious potential to be competitive on the cooling front, it’s just stifled by its stock configuration. Minimally, this lends hope that, given the case’s already strong feature set, some extra purchases can help resolve a critical error on Thermaltake’s part. Just account for this mentally by adding $15-$20 to the case’s cost to resolve its thermal limitations.
Comparative Testing: G21 Torture Thermals (GPU)
Looking at GPU comparative temperatures, the Thermaltake Core G21 ends up slightly less bad than the Corsair Spec-04, and about on-par with Fractal’s Define C case – another warm case on the bench when in stock configuration. Removing the dust filter and adding fans doesn’t help as much here, bringing us down to 56.9C dT, but it’s a start. These thermals could be brought down further by manually configuring a GPU fan curve that’s more aggressive and slightly louder.
Thermaltake Core G21 Noise Testing
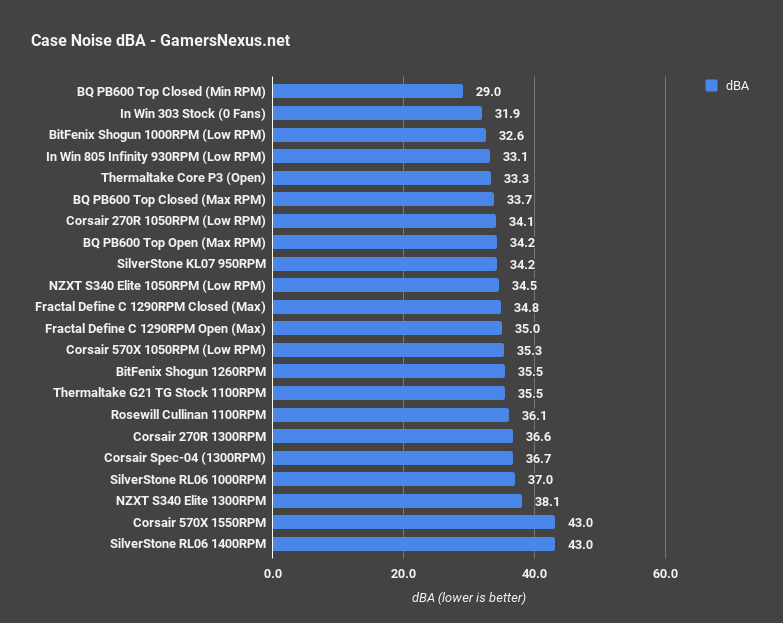
Speaking of, here’s what the noise levels look like: We’re at about 35.5dBA in the stock configuration which, albeit warm, isn’t too bad on the noise scale. This puts the case near the Corsair 270R and Fractal Define C with max RPMs and an open top.
Comparative Testing: G21 Blender Workload (CPU)
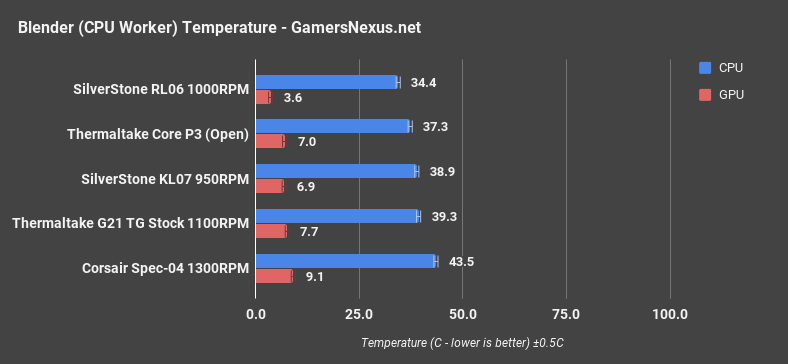
Back to thermals and frequency for a few more charts, a CPU Blender workload gives us a realistic scenario with no load on the GPU. Here, we’re running a CPU dT of 39.3C, which sits the case near the KL07 and well ahead of the Corsair Spec-04 $50 case.
Comparative Testing: G21 Blender Workload (GPU)
A Blender GPU workload pins the GPU at 32.5C dT, which isn’t throttling, at least. It’s also not great, sitting between the KL07 and Spec-04. Lots of room to improve here for Thermaltake.
Comparative Testing: G21 FireStrike
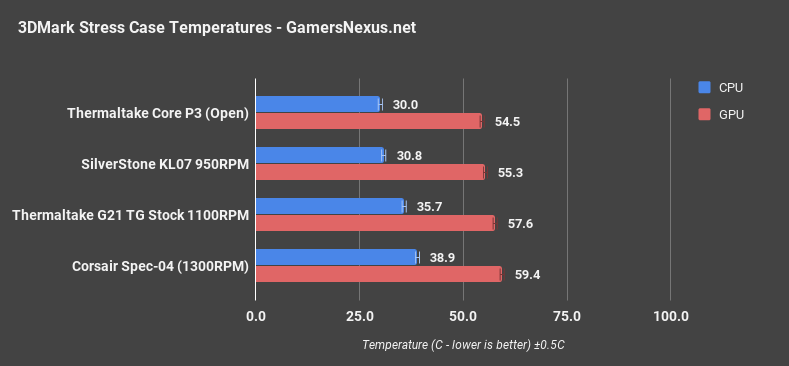
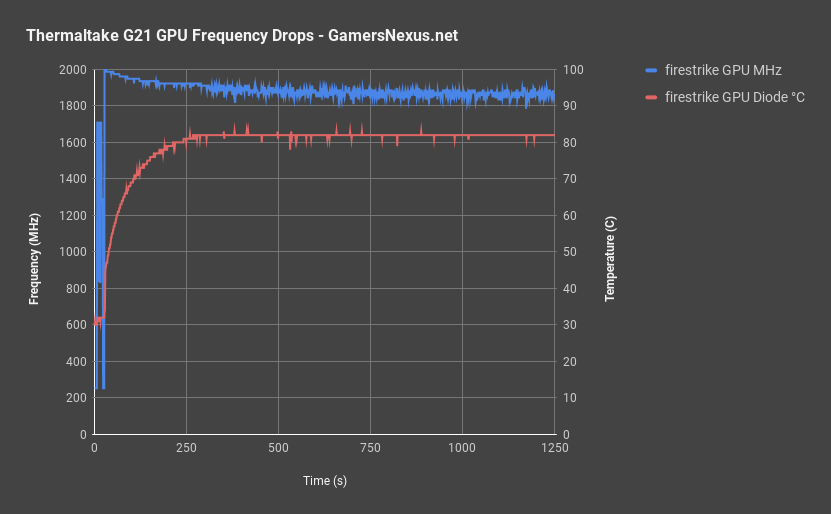
Finally, looking at 3DMark, we’re not hitting CPU issues at all with a 35.7C dT output – though it’s warmer than the KL07 by a good bit – but GPU temperatures are around throttling point once again. We can show a frequency plot to illustrate the clock decay over time as the case permits temperature to warm up to 82C on the GPU, resulting in noticeable clock drops that would impact FPS.
Conclusion: Thermaltake Core G21
Thermaltake’s Core G21 enclosure is a mix of good chassis design and bad thermal engineering. The case hosts excellent cable management features -- some of the best in its price category -- and even manages to stick two tempered glass side panels on there. Say what you will about the TG trend, getting two panels on a $70 enclosure is one of the next big things in case design, and Thermaltake is among the first to do it. The mesh front also aids with airflow, and is a rarity among modern cases.
But Thermaltake completely botches the thermals. The presence of 2.5 dust filters eats away all of the cooling potential from additional intake fans, to the point that we strongly recommend removing the magnetic dust filter upon purchasing the case. The case also includes just one fan -- which is potentially fine -- that happens to be extraordinarily cheap and, for some reason, is positioned as rear exhaust.
Noise is actually pretty good. The enclosure as a whole, actually, is pretty good. This one aspect just sort of ruins an otherwise clean record. We can recommend the case partially, and with these conditions: (1) Remove the magnetic dust filter immediately for noticeable performance improvement, (2) add a fan to the front to get some air into the thing -- Thermaltake has all this mesh real estate, a real advantage, and doesn’t use it. Very strange decisions.
But it’s structurally good, so at least these are things that users can resolve. And Thermaltake, for that matter. We hope the company considers this criticism as constructive rather than destructive, and makes moves to improve on one of their best chassis designs in years. There’s potential -- it just slipped through the grasp.
Test Lead, Editorial: Steve Burke
Editorial: Patrick Lathan
Video: Andrew Coleman
