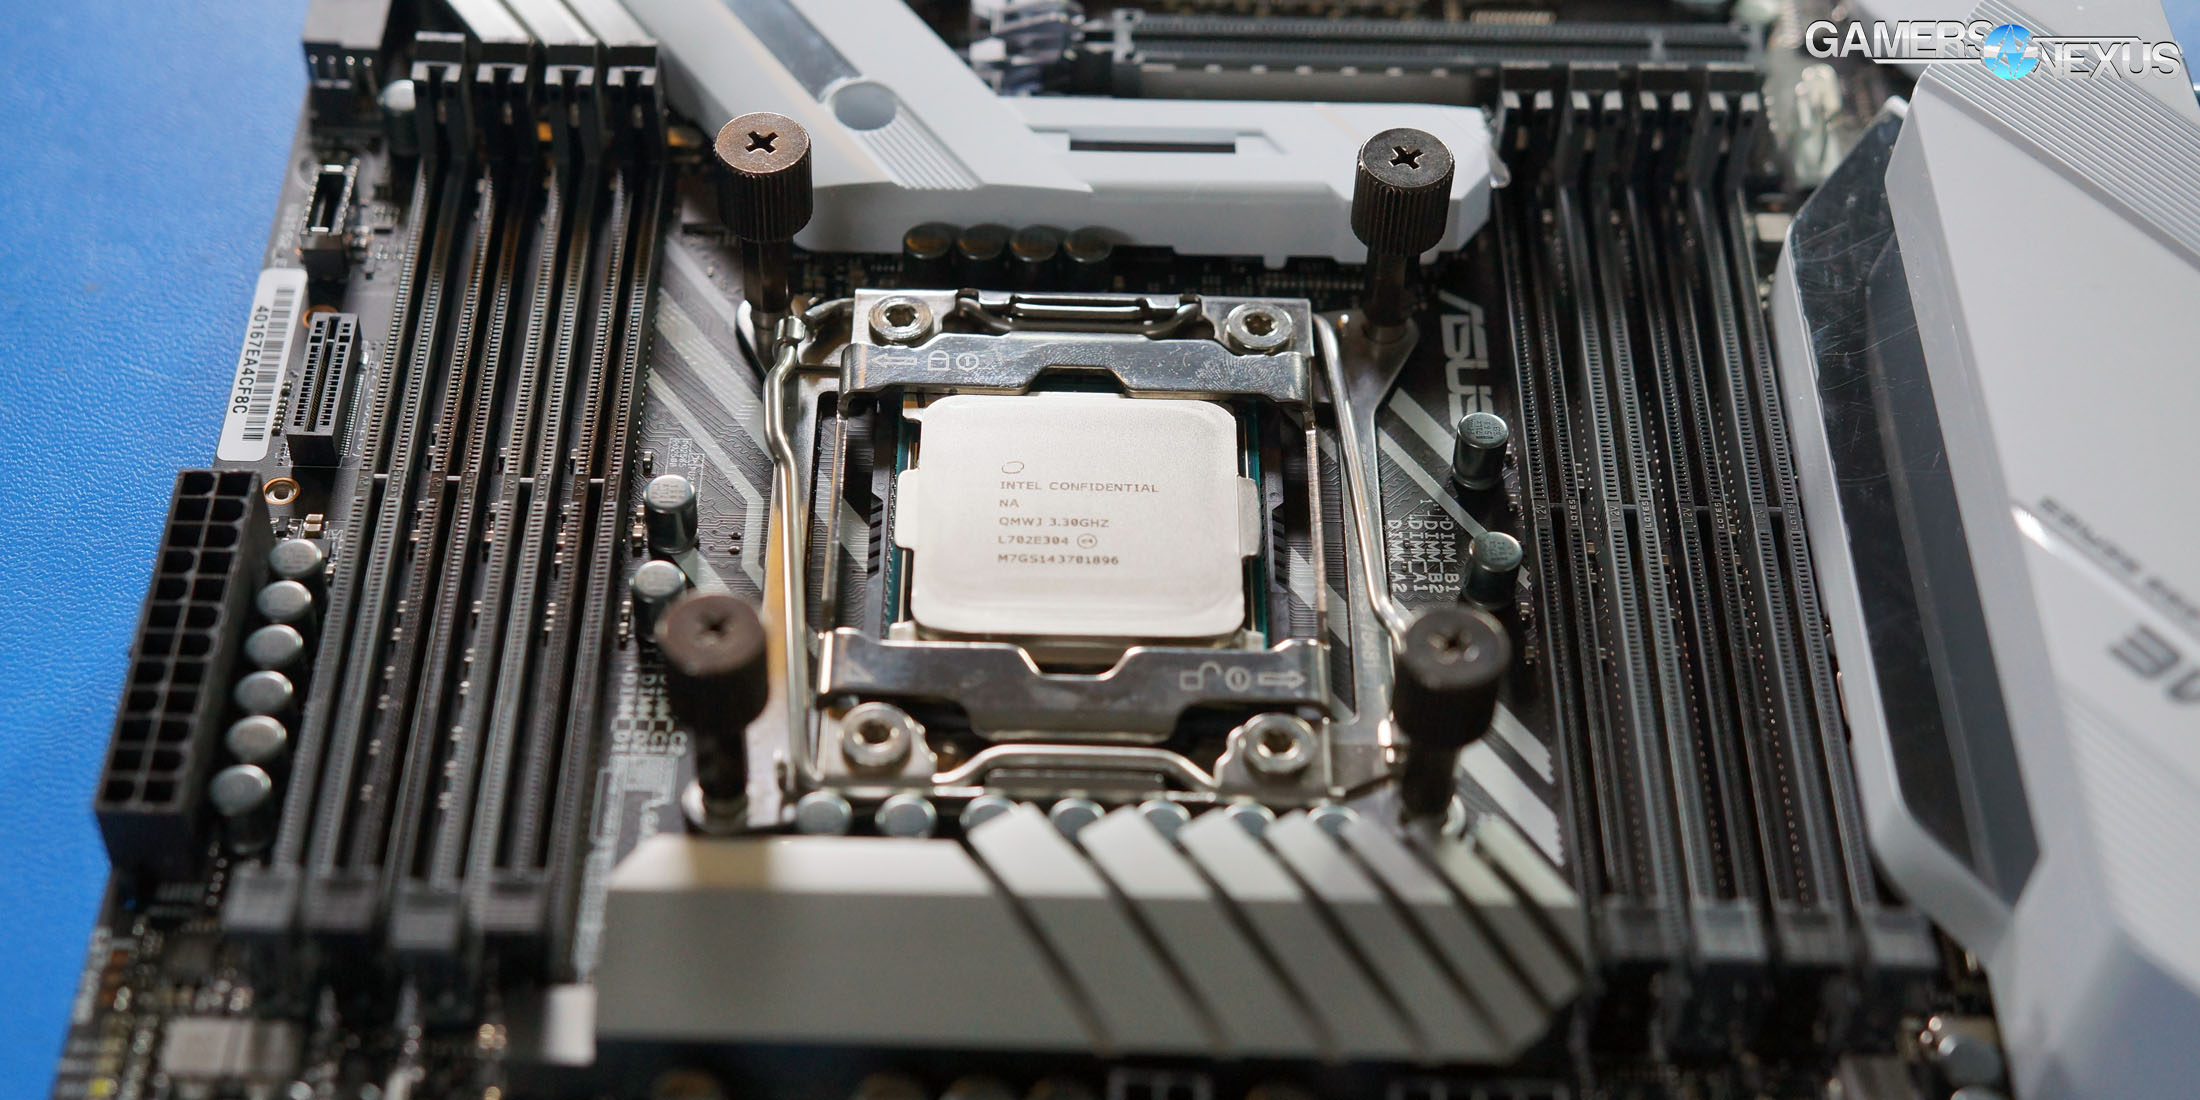
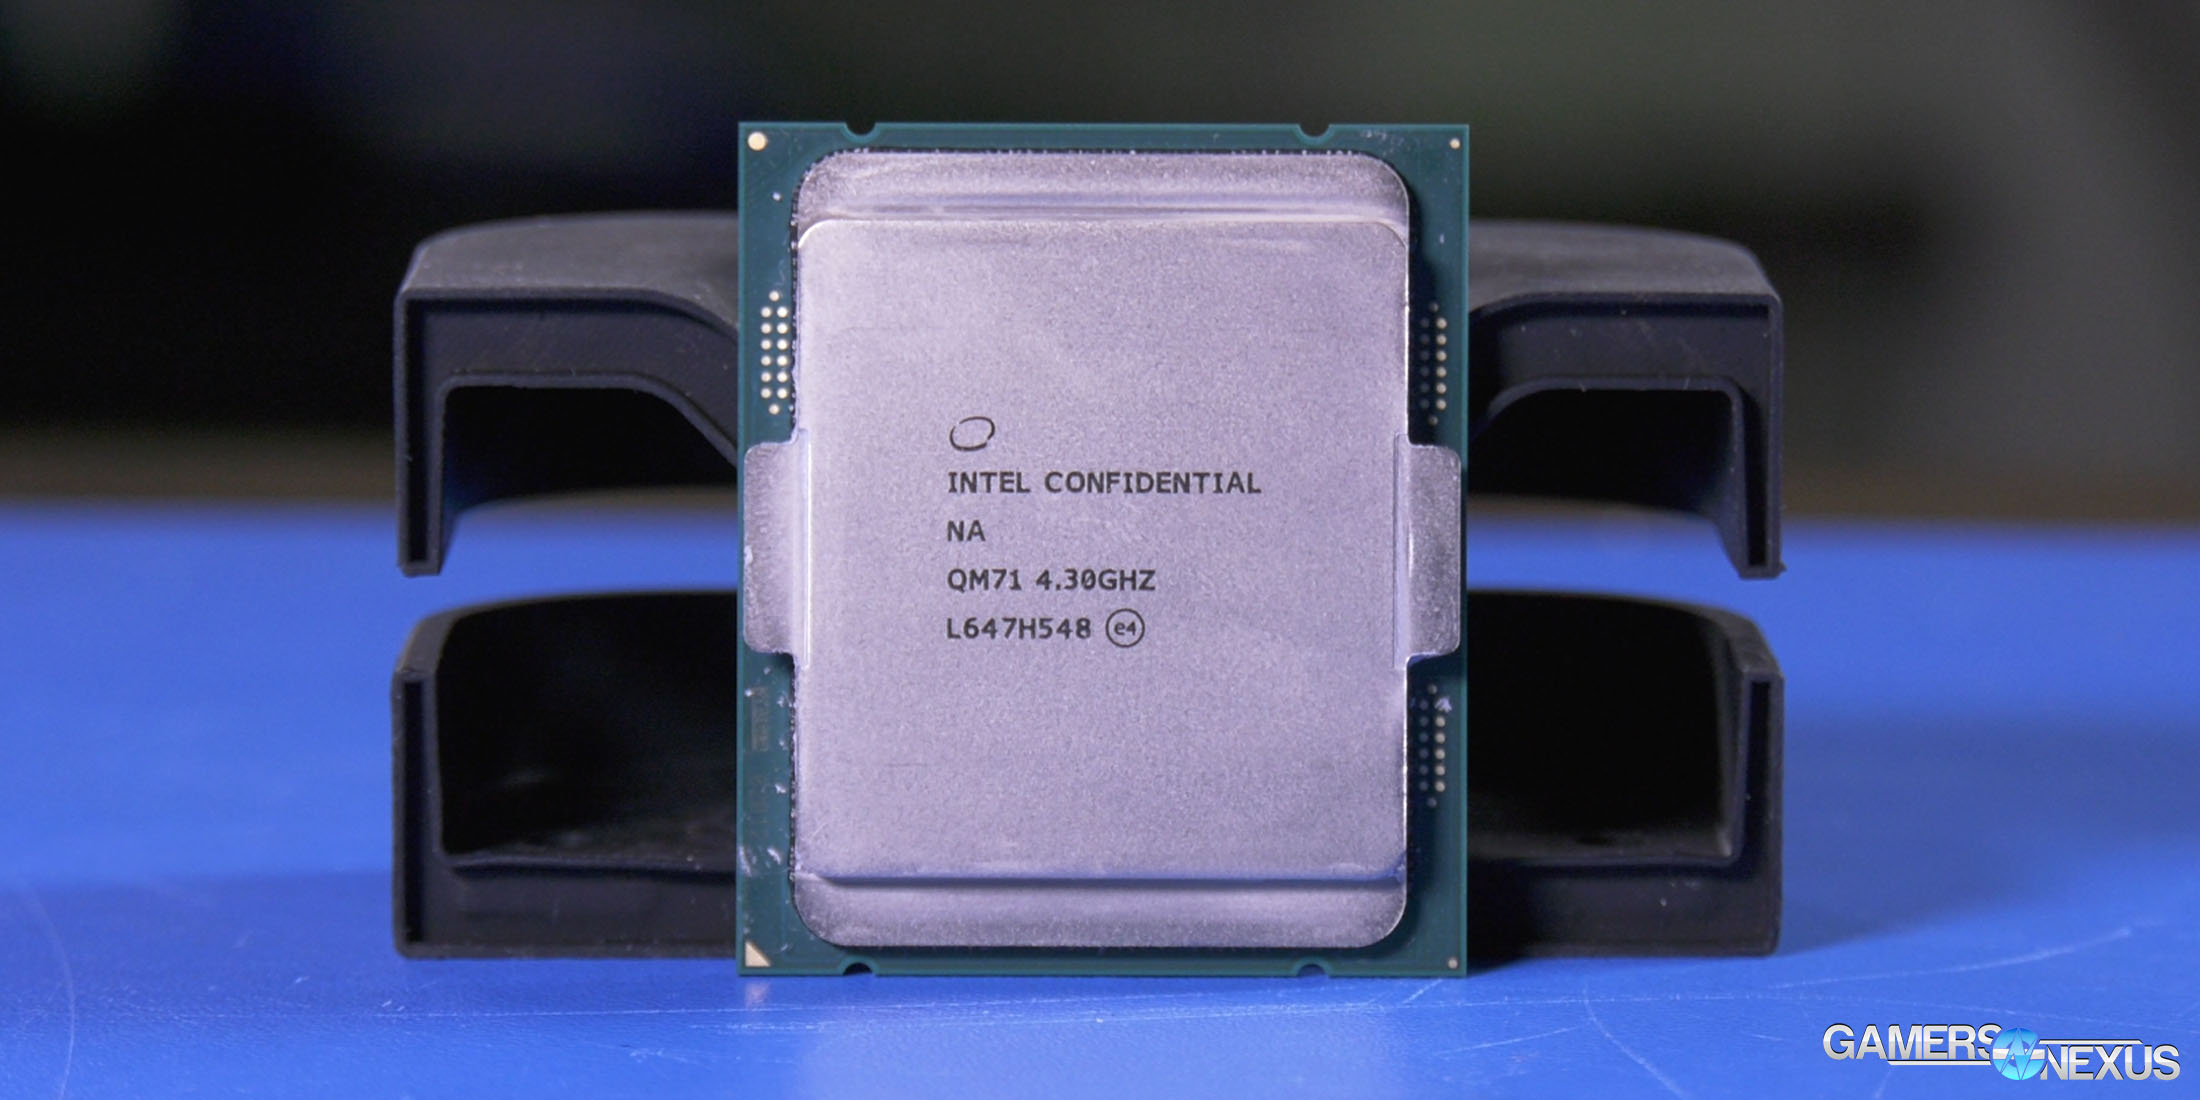
We asked Intel why Kaby Lake-X exists at its recent press day, challenging that the refreshed 7700 & 7600 CPUs can’t be used on LGA1151 sockets, that they aren’t significantly different from the predecessors, and that LGA2066 boards are way more expensive. The socket and chipset alone have a higher BOM cost for manufacturers than 200-series boards, and that cost is passed on to consumers. That’s not free. The consumer also pays for the components that won’t go unused, like the trace routing for half of the DIMMs (and the physical slots).
But Intel gave us an answer to that query.
Why Does Kaby Lake-X Exist?
Getting into this thing, Intel’s answer to our query of why Kaby Lake-X exists was this: Kaby Lake X, Intel said, allows consumers to get into the Extreme Series platform at a lower price and use it as an entry-level. Someone could buy the i7-7740X ($350) or i5-7640X and then upgrade it later to one of the Skylake X CPUs.
That’s their answer.
We think this is a little misguided in its reasoning. Here’s the thing: If you’re spending $330 on a CPU anyway, and you’re spending just as much or more money on the motherboard, then there’s a problem if the ultimate goal is to replace the CPU later. Once you’re $600 into a build with just the board and CPU, you really might as well stop pretending and just go properly high-end or get a Z-series board. This isn’t even a mid-step – it’s high-end boards all the way down, and then this weird CPU that, on an HEDT platform, is considered low-end. Relative to the motherboard, that’s how it’d look. That’s especially true for the i5, which plainly shouldn’t exist. The i7-7740X also is of questionable existential worth, as we’ll show today.
More realistically, we think that Intel is trying to work toward merging its high-end enthusiast products. By 8th generation, we wouldn’t be surprised if we see the 7700K ($330) equivalent chips move permanently to X-class hardware, at least, if there’s not enough push-back.
But that answers why Intel thinks Kaby Lake-X exists, and of course shows that we don’t necessarily agree, if only because it’s confusing for end users.
Intel i7-7700K vs. i7-7740X Specs Differences
As for the differences between the 7700K and 7740X, here’s a chart that shows them:
| i7-7700K | i7-7740X | |
| Socket Type | LGA1151 | LGA2066 |
| Cores | 4C/8T | 4C/8T |
| Base Frequency | 4.2GHz | 4.3GHz |
| Max Turbo Frequency | 4.5GHz | 4.5GHz |
| Cache | 8MB | 8MB |
| Bus Speed | 8GT/s | 8GT/s |
| TDP | 91W | 112W |
| IGP | HD630 | None |
| MSRP | $330 | ~$330-$350 |
Don’t look too hard. It’s the base frequency – the 7740X climbs to 4.3GHz from 4.2GHz, with boost at 4.5GHz on both. They’re still using a dual-channel memory controller, so only four DIMMs are usable on the board, and they’re still both limited to 16 PCIe lanes on the CPU itself.
The last major difference is the socket type changing, forcing potential 7740X users to spend more on X299 so that they can go on to use half of its features.
There’s one more big difference: the IGP is removed. An IGP on the i7 K-SKU CPUs has always been of questionable value, but it’s at least useful for troubleshooting. That’s about it. Here’s the thing, though – if it exists already on the 7700K silicon, which is clearly the same stuff used for the 7740X, there’s no reason to suddenly remove it. Besides, this counters Intel’s own argument. Their argument is that the 7740X is a CPU you buy to upgrade later. Well, if you’re already in the boat of being able to oddly afford an i7 and X299 board but not a Skylake X CPU, you might also be in the odd boat of using the IGP and upgrading the GPU later.
But you can’t do that here.
It’s not like we’re fans or users of the IGP, but if Intel is going to have it at all on the S-series i7s, we’d like them to be consistent with it.
X299: The Platform of Clarification
Because Intel is mixing what is effectively a K-SKU part with X-class HEDT parts, the platform gets confusing in its support. Half the DIMMs, for instance, cannot be used with the i7-7740X. Buying a motherboard with 8xDIMMs and installing an i5 or i7 KBL-X CPU will limit memory to two channels, which means four DIMMs.
PCIe lane limitations can also come into play, though the relevance of this hinges strongly on users with heavy IO use cases. The KBL-X CPUs still run x16 PCIe lanes directly, pushing the rest out via DMI and the PCH. This means that high drive-count configurations that lean on NVMe protocols or PCIe lanes will be limited sooner than Skylake-X.
If truly planning to upgrade from KBL-X to SKY-X, for some reason, it’d also be important to factor-in power consumption. SKY-X can push 1.8-1.9Vcore, whereas KBL-X draws closer to the 1.18-1.4 range (with OC & OV) of Kaby Lake. This means you’d want to be careful about power supply selection, as an overclocked SKY-X part will draw in the hundreds of watts. We have separate testing coming for that, though.
Regardless, let’s get into this review with thermals first, then gaming and synthetic tests.
Continue to the next page for CPU testing methodology.
Test Methodology: Standard & Gaming
Windows 10 b970 was used for testing. R7 CPUs have been retested; some i7 & i5 CPUs have been retested. Game settings were manually controlled for the DUT. All games were run at presets defined in their respective charts. All other game settings are defined in respective game benchmarks, which we publish separately from GPU and CPU reviews.
Average FPS, 1% low, and 0.1% low times are measured. We do not measure maximum or minimum FPS results as we consider these numbers to be pure outliers. Instead, we take an average of the lowest 1% of results (1% low) to show real-world, noticeable dips; we then take an average of the lowest 0.1% of results for severe spikes.
Hardware Used
Core Components (Unchanging)
- NZXT 1200W Hale90v2
- For DDR4 platforms: Corsair Vengeance LPX 32GB 3200MHz*
- ** For Initial Ryzen DDR4: Corsair Vengeance LPX 3000MHz clocked to 2933MHz (See Page 2)
- For Ryzen R5 CPUs, Retested R7 CPUs: GEIL EVO X 3200MHz memory (clocked to 3200MHz)
- Premiere & Blender tests do not exceed 8GB DRAM. Capacity is a non-issue for our testing, so long as it is >16GB
- For DDR3 platforms: HyperX Savage 32GB 2400MHz
- Intel 730 480GB SSD
- Open Air Test Bench
- Cooler #1 (Air): Be Quiet! Dark Rock 3
- Cooler #2 (Cheap liquid): Asetek 570LC w/ Gentle Typhoon fan
- Cooler #3 (High-end): Kraken X62
- EVGA GTX 1080 FTW1
Note: fan and pump settings are configured on a per-test basis.
X299 Platform:
- ASUS X299 Prime Deluxe with latest EFI (0402)
- Corsair Vengeance LPX 3200MHz
AM4 Platform:
- GEIL X 3200MHz CL16 (R5s, R7 1700, R7 1800X)
- GSkill Trident Z 3200MHz CL14 (R7 1700X)
Used for R7 1800X, R7 1700X, R7 1700.
Z270 Platforms:
- Gigabyte Aorus Gaming 7 (primary)
- MSI Gaming Pro Carbon (secondary - for thermal validation)
- i7-7700K (x2) samples from motherboard vendors
Both used for the 7700K.
Z170 Platform:
- MSI Gaming M7
- i7-6700K retail
Z97 Platform:
- Gigabyte Z97X G1 WIFI-BK
- i7-4790K
Z77 Platform:
- MSI GD65 Z77
- i7-2600K
Dx12 games are benchmarked using PresentMon onPresent, with further data analysis from GN-made tools.
Note: We'd like to add the i5, i3, and FX CPUs, but this was enough for now. We'll add those as we expand into coverage of Zen or i5 Kaby Lake products.
Thermal Test Methodology
Thermal measurement on Ryzen is not necessarily trivial, as most software is incorrect or inaccurate in these early days. See this page from our 1800X review for further information, or AMD’s own statement.
Power testing is simply done at the wall. We do not presently tap into the rails, and openly identify this as our weakest point in current test methodology. This is something we will eventually work toward revamping. For now, we use wall meters to determine a power delta in A/B tests.
Test Methodology: VR Benchmarking
We previously ran an introductory piece to the behind-the-scenes process of trying to figure out VR testing, something we started in September. To go through some of the basics:
Two rigs are established. There is a game benchmark machine and a hardware capture machine, which must meet high specifications for storage and for incoming data from the split headsets. The configurations are as follows:
| Intel VR Game Test Bench | |||
| Component | Provided by | Price | |
| CPU | Intel i7-7700K | GamersNexus | $345 |
| Cooler | Asetek 570LC w/ Gentle Typhoon | Asetek GamersNexus | - |
| Motherboard | Gigabyte Z270 Gaming 7 | Gigabyte | $230 |
| RAM | Corsair Vengeance LPX 3200MHz | Corsair | $135 |
| GPU | GTX 1080 Ti Hybrid | NVIDIA | $700 |
| Storage 1 | Plextor M7V | Plextor | $96 |
| Storage 2 | Crucial MX300 1TB | GamersNexus | $280 |
| PSU | NZXT Hale90 v2 1200W | NZXT | $270 |
| Case | Open-air test bench | GamersNexus | - |
And for AMD:
| AMD VR Game Test Bench | |||
| Component | Provided by | Price | |
| CPU | AMD R7 1700 | AMD | $330 |
| Cooler | Asetek 570LC w/ Gentle Typhoon | Asetek GamersNexus | - |
| Motherboard | Gigabyte Gaming 5 X370 | Gigabyte | $213 |
| RAM | Corsair Vengeance LPX 3000MHz | AMD | $120 |
| GPU | GTX 1080 Ti Hybrid | NVIDIA | $700 |
| Storage 1 | Plextor M7V | Plextor | $96 |
| Storage 2 | Crucial MX300 1TB | GamersNexus | $280 |
| PSU | NZXT Hale90 v2 1200W | NZXT | $270 |
| Case | Open-air test bench | GamersNexus | - |
Our hardware capture system is as follows:
| Hardware Capture VR Test Bench | |||
| Component | Provided by | Price | |
| CPU | Intel i7-4790K | GamersNexus | $330 |
| Cooler | Stock | GamersNexus | - |
| Motherboard | Gigabyte Z97X Gaming 7 G1 BK | GamersNexus | $300 |
| RAM | HyperX Genesis 2400MHz | HyperX | - |
| GPU | ASUS GTX 960 Strix 4GB | ASUS | - |
| Storage 1 | Intel 750 SSD 1.2TB | BS Mods | $880 |
| Capture Card | Vision SC-HD4 | NVIDIA | $2,000 |
| PSU | Antec Edge 550W | Antec | - |
| Case | Open-air test bench | GamersNexus | $250 |
The hardware capture system is the most important. We need to sustain capability to process heavy IO, and so use an Intel 750 SSD 1.2TB SSD as provided by our friends at BS Mods. The 1.2TB capacity isn’t just for show, either: Our VR capture files can take upwards of 30-50GB per capture. GamersNexus uses an in-house made compression script (programmed by Patrick Lathan & Steve Burke) to compress our files into a playable format for YouTube, while also allowing us to retain the files without high archival storage requirements. The files compress down to around ~200~500MB, but do not perceptibly lose quality for YouTube playback.
Prior to compression, though, we analyze the files with an extractor tool, which looks at color overlays frame-by-frame to determine (1) if any frames were dropped by the capture machine (they never are, because our storage device is fast & $2000 capture card supports the throughput), and (2) if any frames were dropped by the game machine. The latter happens when the DUT cannot support fluid playback, e.g. if a low-end GPU or CPU gets hammered by the VR application in a way that causes drop frames, warp misses, or other unpleasant frame output.
The VR gaming machine spits out DisplayPort to our monitor, then HDMI to a splitter box. The splitter box feeds into the capture machine via a splitter cable, then into the capture card. The other output in the splitter box goes either to the headset or to the HTC Vive Link Box, which then goes to the headset & the game machine (USB, audio, display).
In total, it’s about ~10 cables in true octopus fashion to connect everything. The cables must be connected in the correct order to get everything working. No output will go to the HMD if they are connected out of sequence.
Data Interpretation: We’re Still Learning
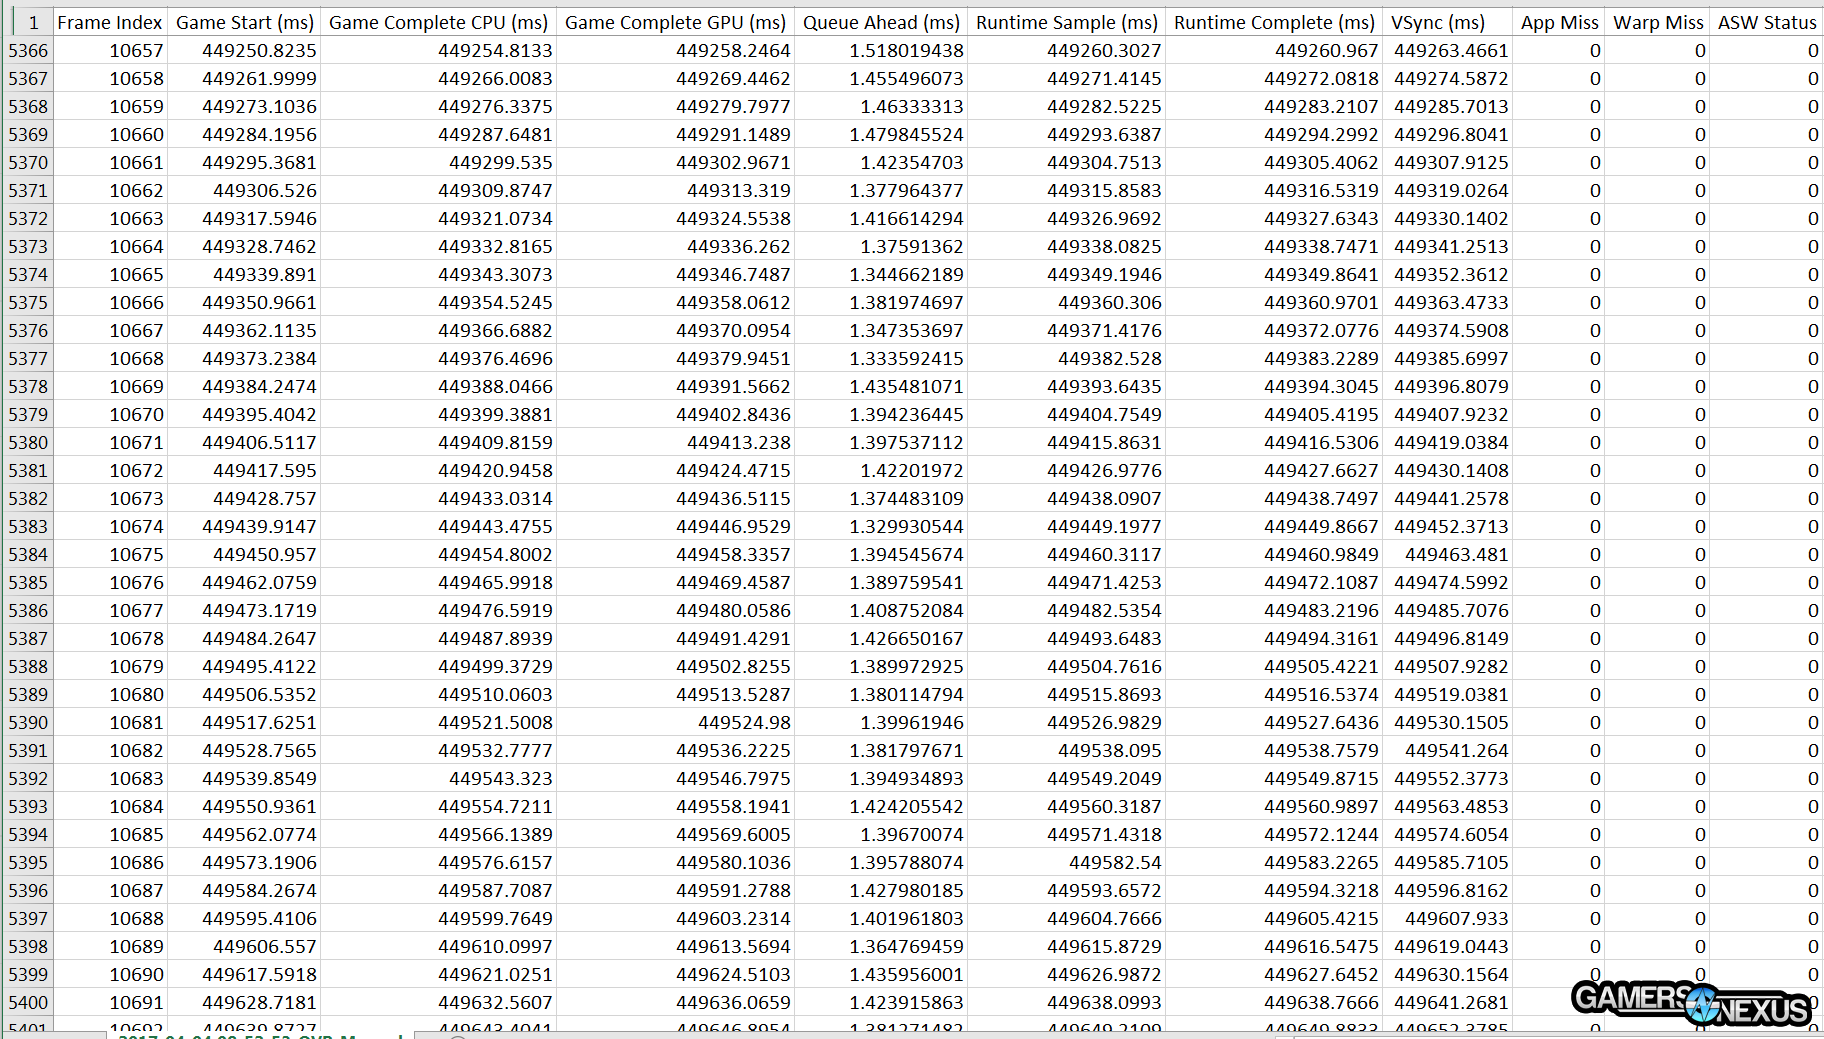
The gaming machine, meanwhile, is running FCAT VR software capture to intercept frame delivery at a software-level, which then generates files that look something like this:
Each file contains tens of thousands of cells of data. We feed this data into our own spreadsheets and into FCAT VR, then generate both chart types from that data. The hard part, it turns out, is still data interpretation. We can identify what a “good” and “really bad” experience is in VR, but identifying anything in between is still a challenge. You could drop 100/m frames on DUT A and 0 on DUT B, and the experience will be perceptibly/appreciably the same to the end-user. If you think about it, 100 dropped frames in a 5400-interval period is still about 1.85% of all intervals missed, which isn’t all that bad. Likely not noticeable, unless they’re all clumped together and dotted with warp misses.
Defining the Terminology
We still haven’t defined those terms, so let’s do that.
Drop Frame: When the VR runtime takes the prior frame and modifies it to institute the latest head position. The VR HMD is reprojecting or adjusting the prior frame, but failing to update animation in time for the next runtime hit. With regard to animation, this is a dropped frame. With regard to user experience, we are updating in a way that avoids inducing user sickness or discomfort (provided there aren’t too many in rapid succession). We can get synthesized frames out of this.
Warp Miss: The VR HMD has missed the refresh interval (90Hz, so every ~11ms +/- 2ms), and doesn’t have time to show a new frame. There is also not enough time to synthesize a new frame. We’ve instead replayed an old frame in its entirety, effectively equivalent to a “stutter” in regular nomenclature. Nothing moves. Animation does not update and head tracking does not update. This is a warp miss, which means that the runtime couldn’t get anything done in time, and so the video driver recasts an old frame with no updates.
Delivered Frame: A frame delivered to the headset successfully (see also: Delivered Synthesized Frame).
Unconstrained FPS: A convenient metric to help extrapolate theoretical performance of the DUT when ignoring the fixed refresh rate (90Hz effective v-sync) of the HMD. This helps bring VR benchmarks back into a realm of data presentation that people are familiar with for “standard” benchmarks, and aids in the transition process. It’s not a perfect metric, and we’re still in the air about how useful this is. For now, we’re showing it. Unconstrained FPS is a calculation of 1000ms/AVG frametime. This shows what our theoretical frame output would be, given no fixed refresh interval, and helps with the challenge of demonstrating high-end device advantages over DUTs which may otherwise appear equivalent in delivered frame output.
Average Frametime: The average time in milliseconds to generate a frame and send it to the HMD. We want this to be low; ideally, this is below 11ms.
Interval Plot: A type of chart we’re using to better visualize frame performance over the course of the headset’s refresh intervals. In a 60-second test, there are 5400 refresh intervals.
Warp misses are miserable experiences, particularly with multiple in a big clump. Warp misses intermixed with drop frames illustrate that the hardware cannot keep up with the game, and so the user experiences VR gameplay that could feel unpleasant physiologically in addition to mechanically.
Learn more about these definitions here, in our previous content. We also spoke with Tom Petersen about these terms.
Continue to the next page for i7-7740X thermal benchmarks.
Thermal Benchmarks – i7-7740X Stock Temperature Performance
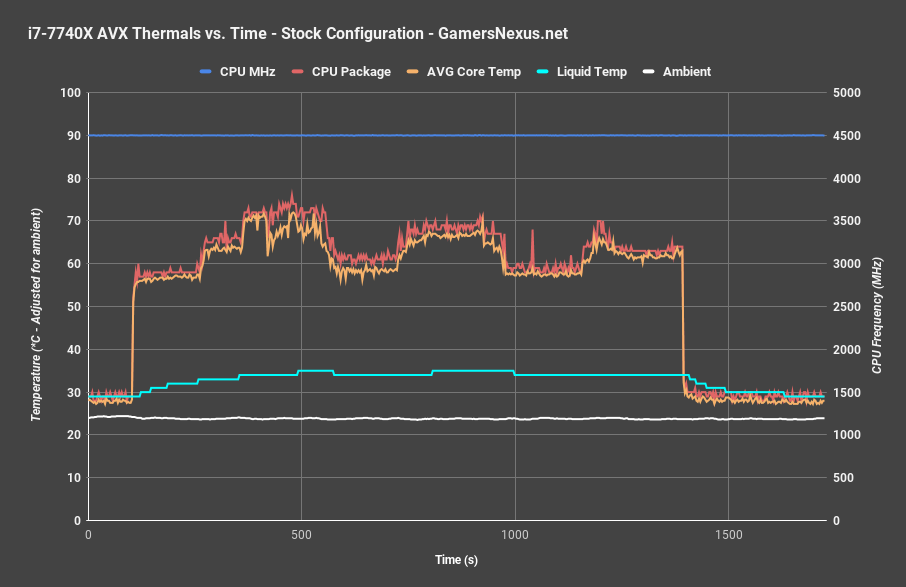
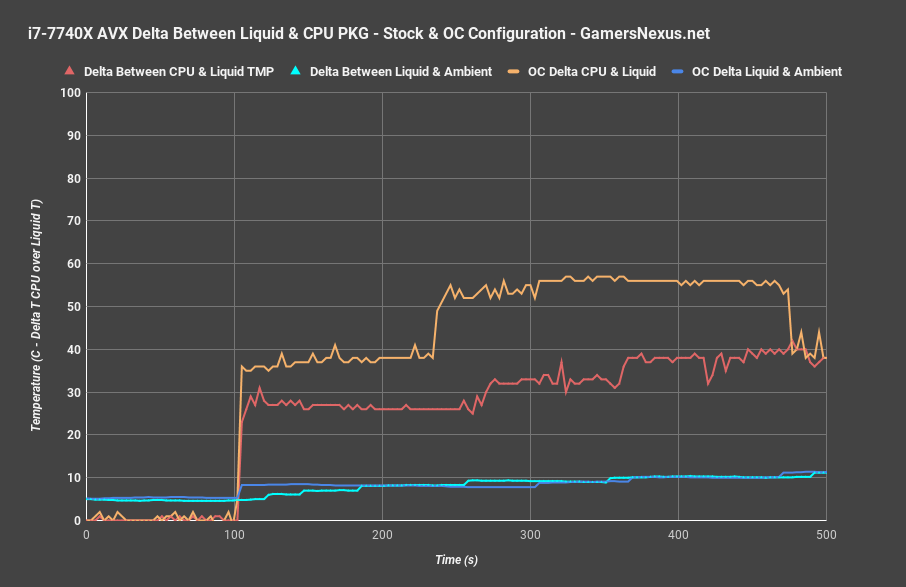
Starting with just the 7740X in its stock configuration with an AVX workload, we found that the CPU tended to operate at around 1.177 Vcore and with a CPU temperature peaking around 75-76C on the package, or about 74-75C for a peak averaged core temperature. In this time, our liquid temperature only increases from about 29C to about 35C, for a delta of 6C start-to-end of the test. The last time we showed this data was for the 7700K review, when we noted that the 7700K ($330) was running hot compared to its 6700K predecessor. Part of this seems to be that there’s poor transfer from the CPU die to the IHS and cooler, as the liquid temperature doesn’t move all that much.
And again, this is with a Kraken X62 with its fans and pump completely maxed-out, and we’re still around 74-75C. This CPU runs hot.
Intel i7-7740X Stock vs. Overclocked Temperatures
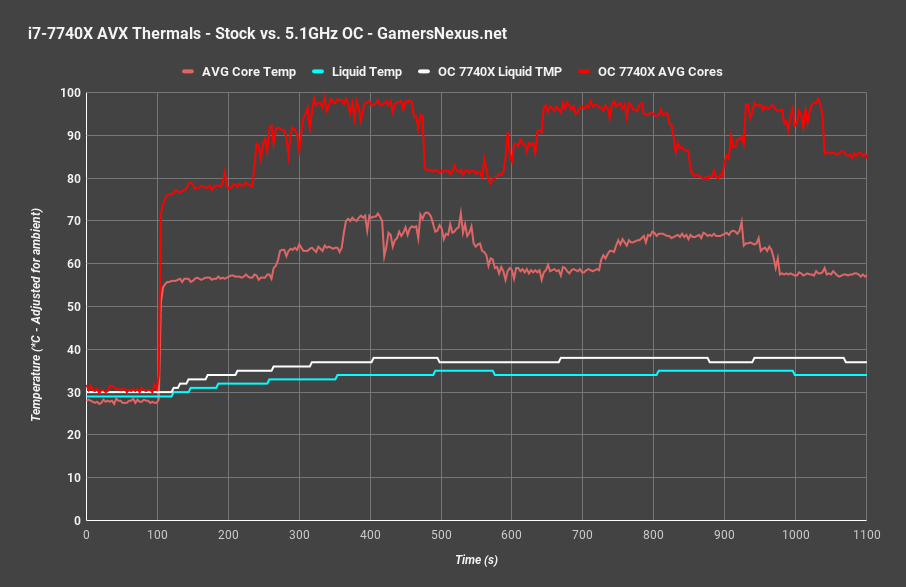
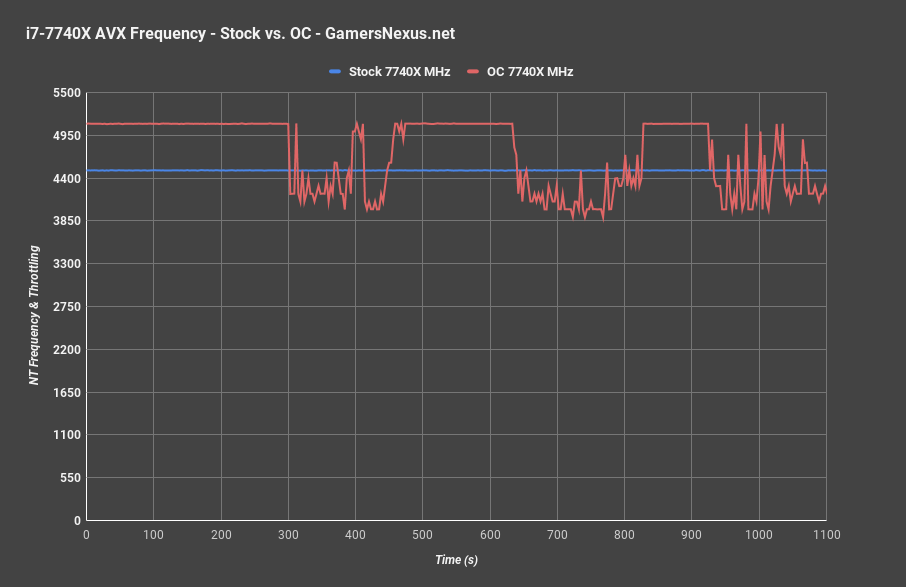
Compared to the overclocked CPU at 5.1GHz and with a Vcore of 1.37v, we’re looking at a temperature that’s bumping into the 100C TjMax, causing severe clock drops that bring down our OC. The chip can clearly handle it, but we need a lot more than a 280mm cooler with maxed out fan and pump RPMs, apparently. We just weren’t stable below 1.37v with this clock for AVX instructions, but we were stable at 1.35v for non-AVX instructions. With the non-AVX tests (not shown), we were hitting 97C at 1.35v, but maintaining the clock stability. Still kind of rough on the cooler.
Here’s a look at the delta in temperature between the CPU and the liquid, which helps us understand the cooling efficacy and potential for power leakage as both scale.
Here’s a frequency plot, showing the thermal impact to clock-rate stability over time. Although the CPU can handle our 5.1GHz overclock, the thermals do not permit it to hold. We drop lower than the boosted stock clock, requiring high-end cooling to get anywhere close to this 5.1GHz number. Even with non-AVX instructions, we still experience clock drops that impact performance.
Intel i7-7740X vs. i7-7700K Thermals at Fixed Vcore & Clocks
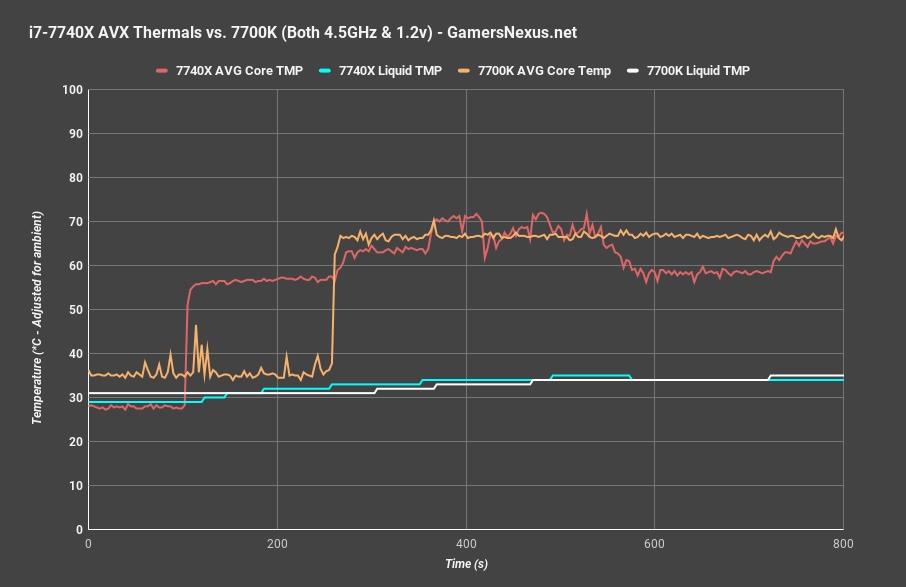
The next interesting comparison is between the 7700K and 7740X. This is the last one we’re publishing now, but we do have more data to dig into for some future content pieces. For this comparison, both CPUs are clocked to 4.5GHz with a 1.2v Vcore.
They’re roughly the same when at the same voltage, with about a 68-70C range. Most differences in thermals between the two CPUs can be attributed to motherboard changes, primarily motherboard Auto Vcore that might run a higher voltage on one socket than the other.
Continue to the next page for i7-7740X benchmarks.
Before We Start
Before getting into these FPS benchmarks, keep in mind that we basically already reviewed this CPU, and we’ve updated all the testing with our 7900X review and R5 1600X benchmarks. For those reasons, we will primarily compare the 7740X to the 7700K here, as we’ve already analyzed all the other numbers in previous reviews.
Blender Benchmarks – Intel i7-7740X
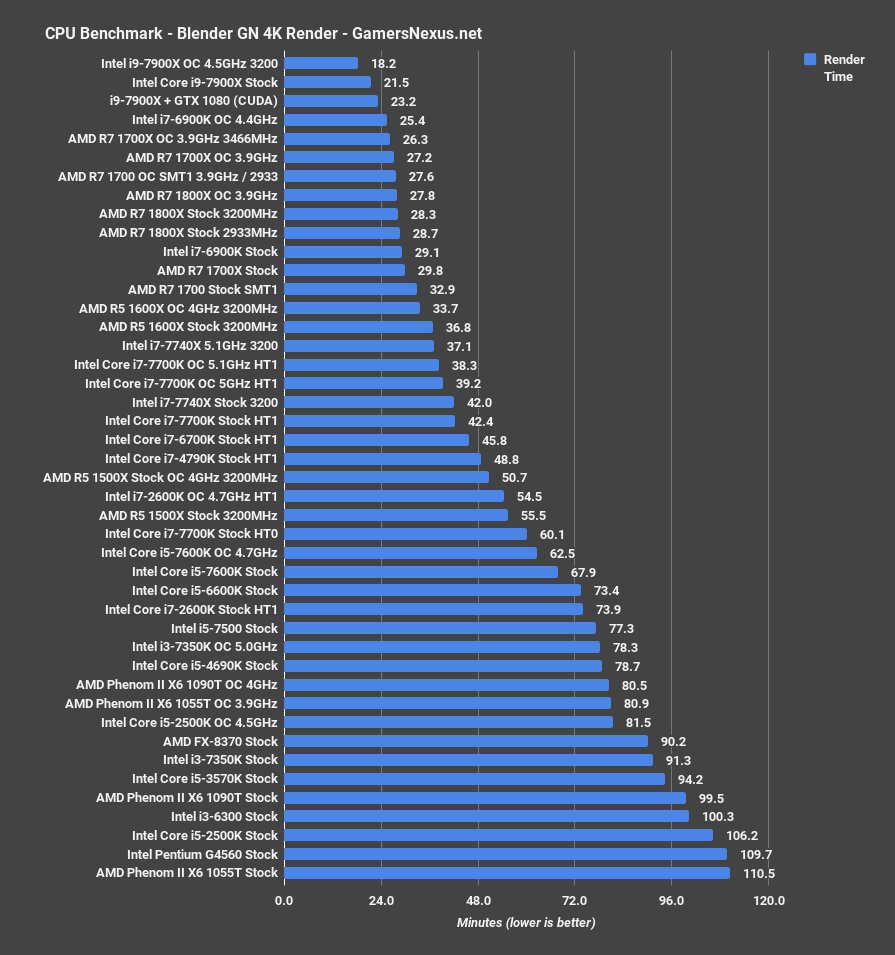
Let’s look at Blender next.
The i7-7740X stock CPU completes our scene render in 42 minutes, which is basically the same as the i7-7700K’s 42.4-minute result. Overclocking the 7740X gets us to 37.1 minutes, for an improvement in performance of about 13%. Then again, you shouldn’t buy either of these CPUs for Blender rendering – if that’s the primary goal, an R7 1700 would do significantly better at 33 minutes and would cost the same. Granted, the i7 series CPUs do tend to hold an advantage in gaming – we’ll get there.
FireStrike Benchmarks – Intel i7-7740X vs. 7700K
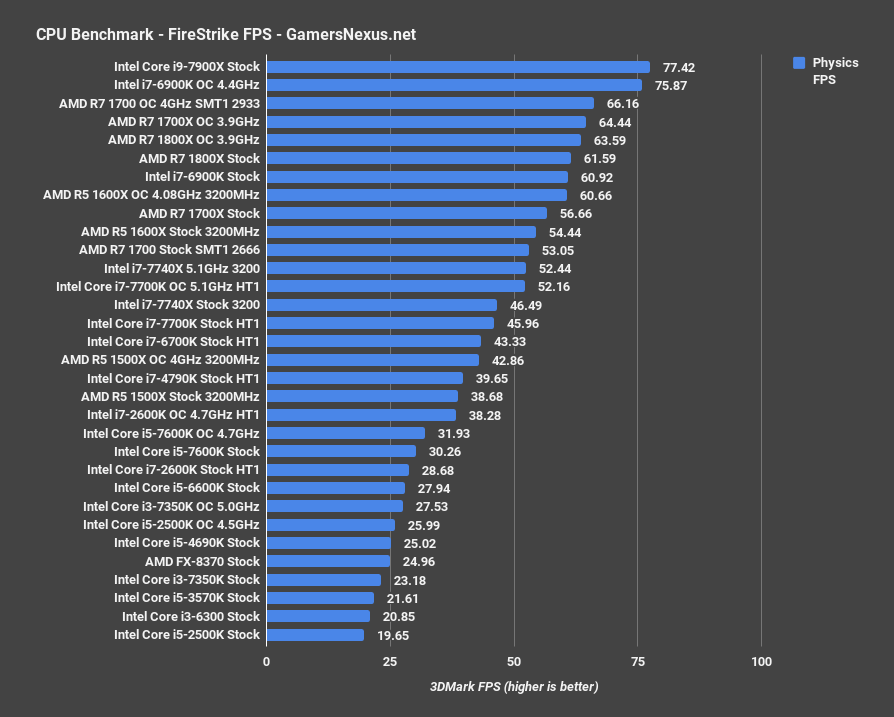
Looking at FireStrike next, the 7740X runs a physics framerate of 46.49FPS, with the 7700K stock CPU at 45.96FPS. This is within test to test variance, actually, and isn’t really a significant difference. Overclocking gets us to 52.44FPS on the 7740X and 52.16FPS on the 7700K, with both at 5.1GHz.
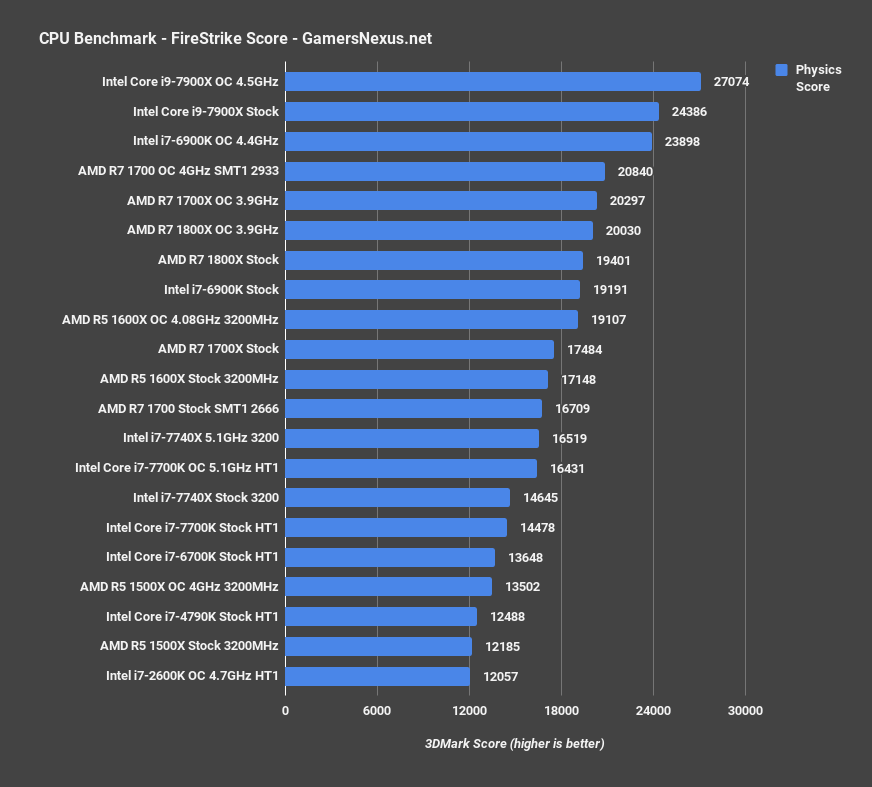
Sorting by physics scores instead shows us the same thing: The 7740X, with its 14,645-physics score, is about 1.2% ahead of the 7700K.
TimeSpy Benchmarks – Intel i7-7740X vs. 7700K
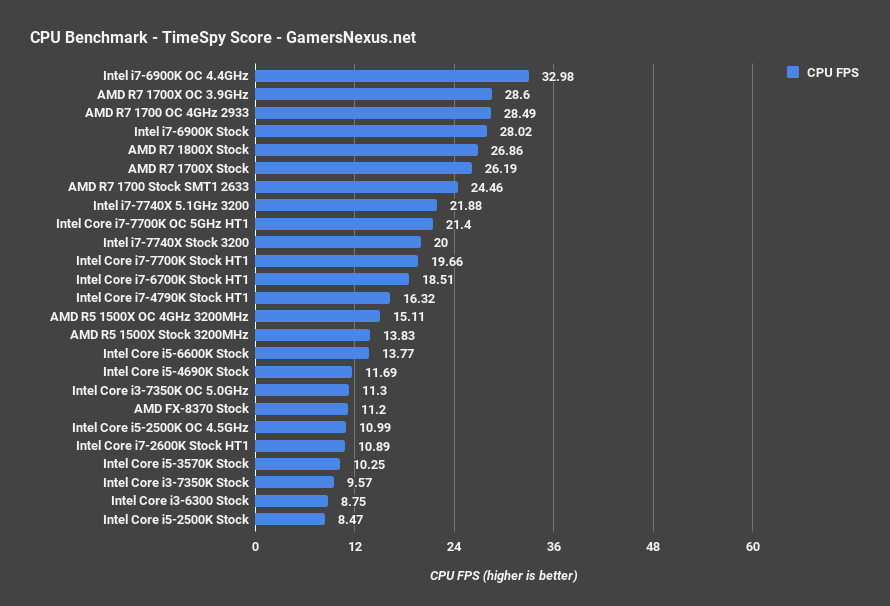
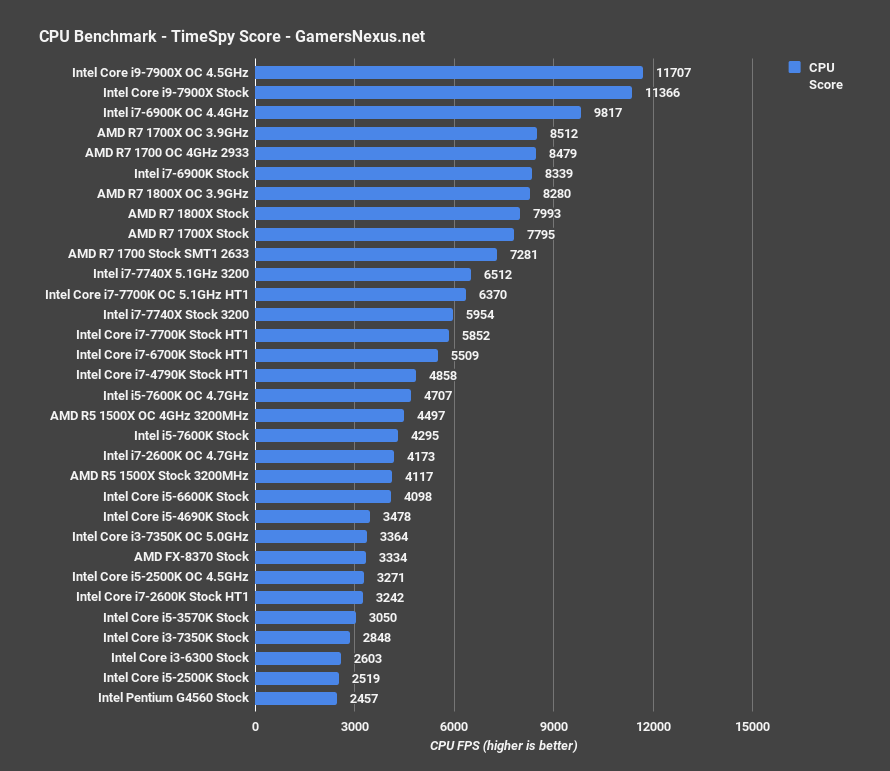
With TimeSpy, it’s more of the same. The 7740X stock CPU runs a CPU framerate of 20FPS, with the 7700K stock CPU at 19.66FPS for the same test. That’s a 1.7% difference. Overclocking gets us to 21.88FPS versus 21.4FPS of the 7700K OC CPU.
Ashes of the Singularity – Intel i7-7740X vs. 7700K
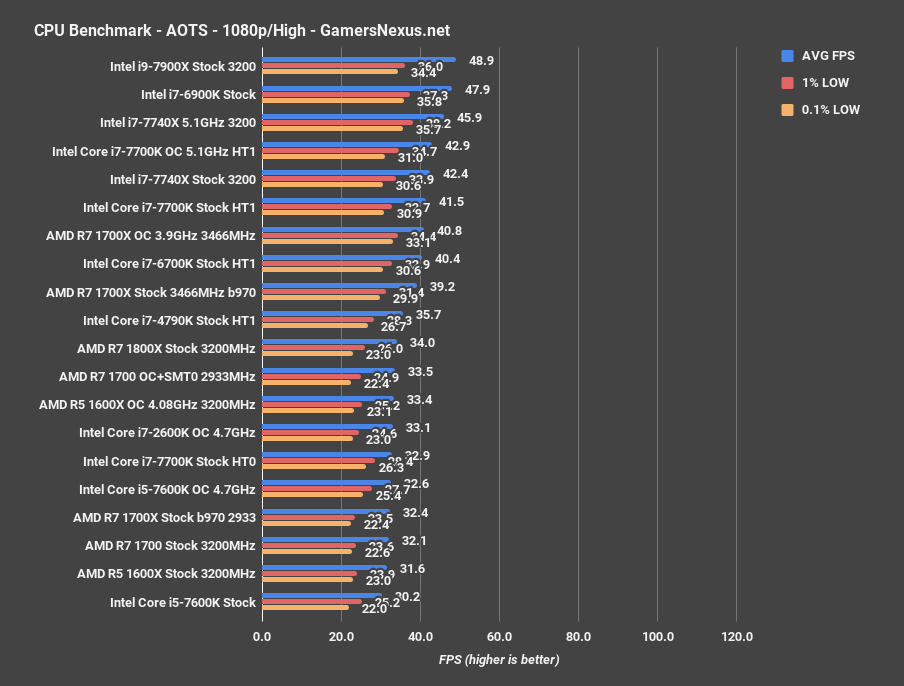
Ashes of the Singularity with Dx12 puts the 7740X stock CPU at 42.4FPS for our 1080p/High test, with lows at 33.9 and 31FPS 0.1%. The 7700K runs its average at 41.5, lows at 32.7 and 30.9. That puts the 7740X at 2% ahead of the 7700K CPU, a little bit boring.
Ashes: Escalation – Intel i7-7740X vs. 7700K
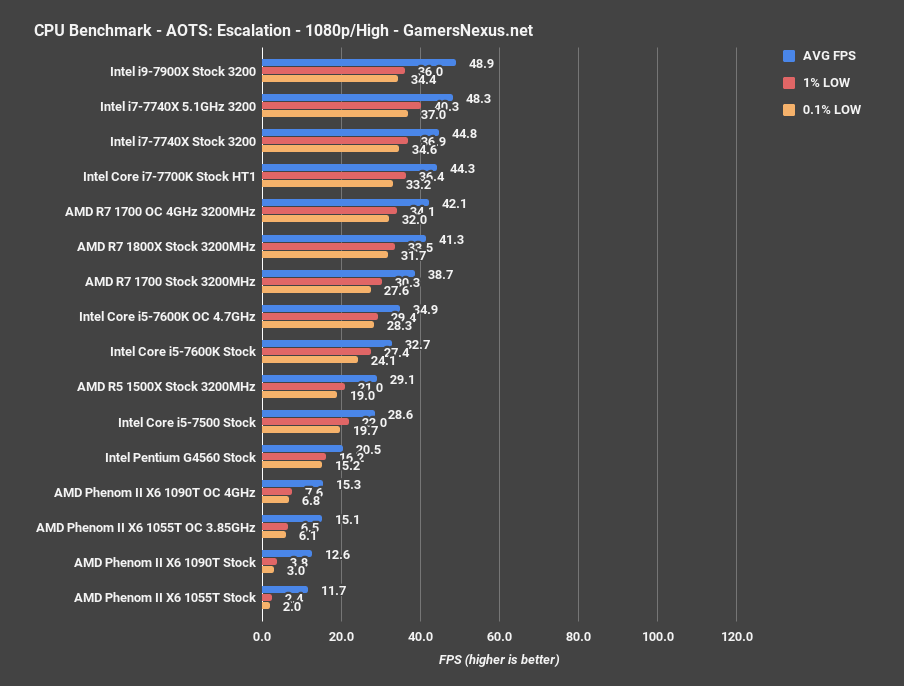
Ashes Escalation, which we haven’t fully updated with all our CPUs yet, ranks the 7700K stock CPU at 44.3FPS AVG, 36.4FPS 1% lows, and 33.2FPS 0.1% lows. The 7740X is measurably but imperceptibly better, at 44.8FPS AVG, or 1.1% faster. This change, like all the others, could largely be chalked-up to even just the motherboard differences.
GTA V – Intel i7-7740X vs. 7700K
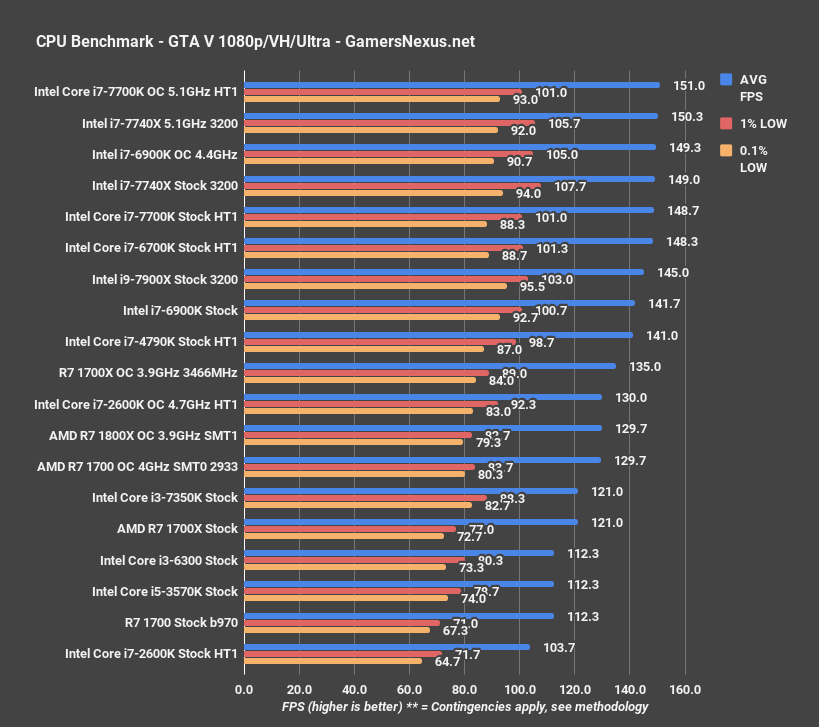
Grand Theft Auto V isn’t much difference. The stock 7740X measured at 149FPS AVG and 108FPS 1% lows, with the 7700K stock CPU at 149FPS AVG. The two overclocked SKUs are difference by less than 1FPS, and are within test-to-test variance. They are effectively identical in results.
MLL – Intel i7-7740X
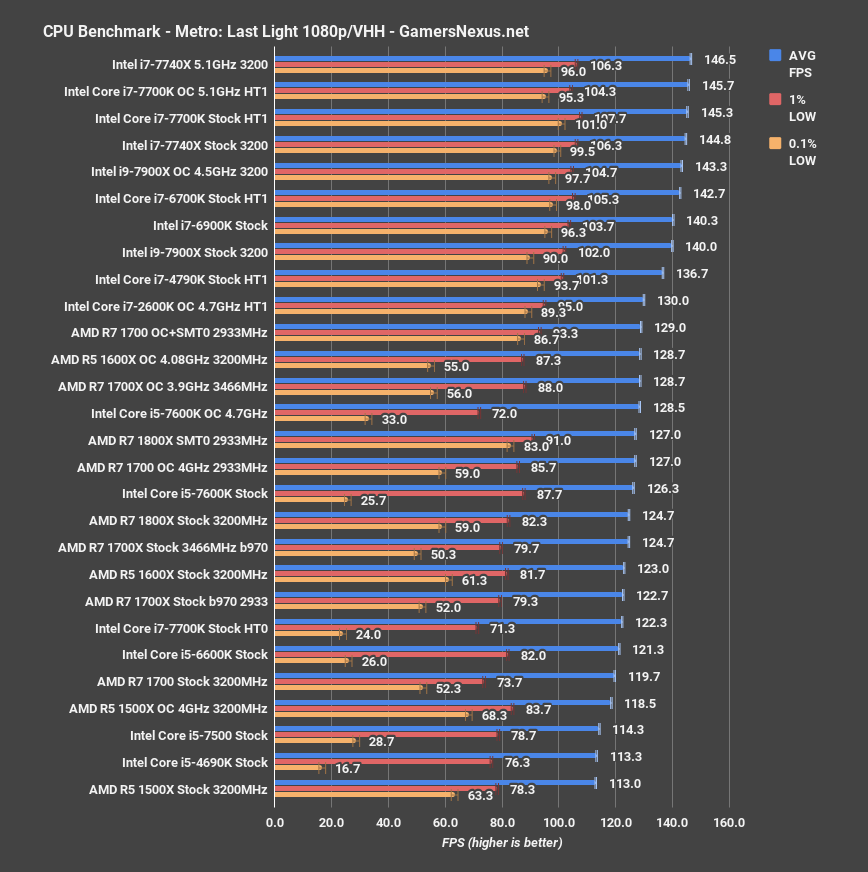
Looking at Metro – useful as a benchmark, for it is largely unchanging – we see the 7700K operating at ~145FPS AVG, the 7740X operating also at ~145FPS AVG, and the overclocked variants both at around 146-147FPS AVG. Again, basically the same performance – just on a more expensive motherboard.
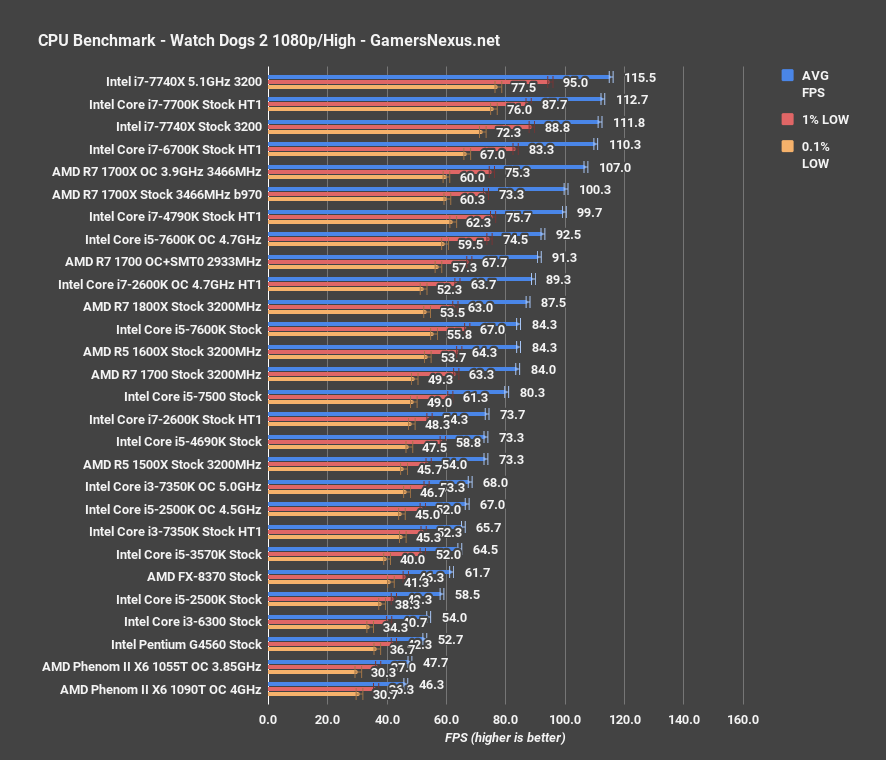
Watch Dogs 2 – Intel i7-7740X
Again, more of the same. When the 7700K and 7740X are different, it is often by less than 1FPS – easily accounted for in differences between boards and test passes.
That’s enough game benchmarks, given the predictable nature of the results.
Conclusion: No Reason to Buy
There’s no reason to buy this CPU. It’s a 7700K – which is a perfectly fine piece of silicon – but on a more expensive platform. Coupling the 7740X with an X299 results in a hamstrung, crippled motherboard the likes of which further complicates an already complex landscape of HSIO. X299 and the HEDT CPUs, like Skylake X, do have a place on the market. We can’t find a place for the 7740X, and anyone thinking that they might buy one and upgrade later should instead consider just going Z-series + 7700K. It’ll be cheaper, it won’t offer features that will go unused (those aren’t free – you pay for those features), and will ultimately offer the same performance. If going for X299, go full HEDT.
Taking a half-step will only stand to waste more money, as upgrading from a $330-$350 CPU doesn’t make much sense. An upgrade from a G4560 to a 7700K might make sense, but that’s a sub-$100 part.
We’re also not clear on why KBL-X must exist in its LGA2066 form factor; Intel was not able to supply an adequate answer for this. If the 7740X and 7640X were simple refreshes on the existing 200-series motherboards, that’d be a completely different story – there’s nothing wrong with a slight bump and a refresh, particularly at the same price. There is something wrong, though, with a refresh of the same hardware as unnecessarily relocated to a new platform (which must be purchased), while also stripping features out of the original product (IGP). Sure, the IGP doesn’t really go used – but there’s no reason to remove it and then charge the same price. Doubly so if Intel’s argument is that one can upgrade from KBL-X to SKY-X; if that’s the argument, let them live on the IGP, too.
Hard pass. If this CPU interests you, we’d suggest the 7700K instead. That’s still a good processor, it’s on a more mature chipset and platform, and it makes far more sense than these. If X299 interests you, go HEDT or consider Ryzen for production and CPU rendering workloads.
Review: Steve Burke
Testing: Patrick Lathan & Steve Burke
Video: Andrew Coleman
