Noctua NH-P1 Passive CPU Cooler Review: Benchmarks, Schlieren Photography, & Mechanics
Last Updated:
The Noctua NH-P1 can’t replace active coolers for high heat loads, but it’s at the high-end of passive cooling and is mechanically impressive
The Highlights
- The Noctua NH-P1 is a massive fan-less CPU cooler
- At $110, it’s expensive, especially compared to similar priced air coolers that perform better thermally
- It is one of the best passive coolers we’ve tested
- Original MSRP: $110
- Release Date: June 14, 2021

The Noctua NH-P1 is a massive passive cooler. No fan is needed, at least sometimes. In our review, we’ll take an in-depth look at thermal performance, installation hardware, mounting pressure, flatness, and overall build quality and viability. While we would normally look at acoustics, because it has no fans, there are no acoustics to analyze. We will, however, look at some Schlieren photography of the NH-P1 in action, which will allow us to see the air density gradient change surrounding the cooler, enabling us to see the pattern in which heat rises off of it.
Reviewing this passive cooler made us change our testing methodology a bit as the NH-P1 isn’t designed to handle 200-watt CPUs. It’s not really meant to handle 120-watt CPUs either. That’s not a knock against it, it’s just designed to be fan-less. As a result, we’re introducing a low-end CPU to account for this and we’ll be testing it against some AMD stock coolers.
Credits
Test Lead, Host, Writing
Steve Burke
Testing
Mike Gaglione
Video Production
KeEgan Gallick
Writing, Web Editing
Jimmy Thang
The most obvious group of who the P1 is for would be anyone who can’t take noise, just as a personal preference, or doesn't want fans for functional reasons. Those might include home studios, recording studios, voice-over PCs, dust control, or acoustics labs. It's difficult to fully eliminate noise in a build as you’ll most likely have fans elsewhere inside the case (PSU, GPU, etc.). Each of those can be made passive as well, but the GPU in particular would be a challenge if running any kind of gaming PC. Passive power supplies like the Seasonic solutions are (expensive) options that can at least silence the PSU while remaining quality. We use the Seasonic Prime Fanless PX series in our acoustics lab.
Passive coolers also make sense for dust control, like if you’re building a low-maintenance and long-running server with a constant uptime.
It is worth mentioning that you can mount a Noctua NF-A12 fan to the cooler, which is sold separately, as a solution to spin-up as needed. At $110 though, the Noctua NH-P1 is in the same price range as the ARCTIC Liquid Freezer II 280 (that we reviewed here), which has two fans and liquid, and also happens to perform a lot better thermally. Even active air coolers like the Assassin 3 or Noctua’s own NH-D15, which both retail for roughly $90 to $100, will also far and away outperform the Noctua NH-P1. We want to make sure that expectations are clear in this review that this is not some “magical” cooler. It’s a passively cooled one that's designed well. Mounting an NF-A12 fan to it would enable a specific scenario: You'd have a 0RPM option under certain temperature thresholds (configurable through BIOS), but a fan present to ramp under heavy load. The curve would be pretty flat until the ramp.
Noctua NH-P1 Mechanics
This section will talk about the mechanical aspects of the Noctua NH-P1. If the years of delays weren’t evidence enough, the design of the cooler makes it evident that most choices were deliberate and informed rather than copying existing designs.
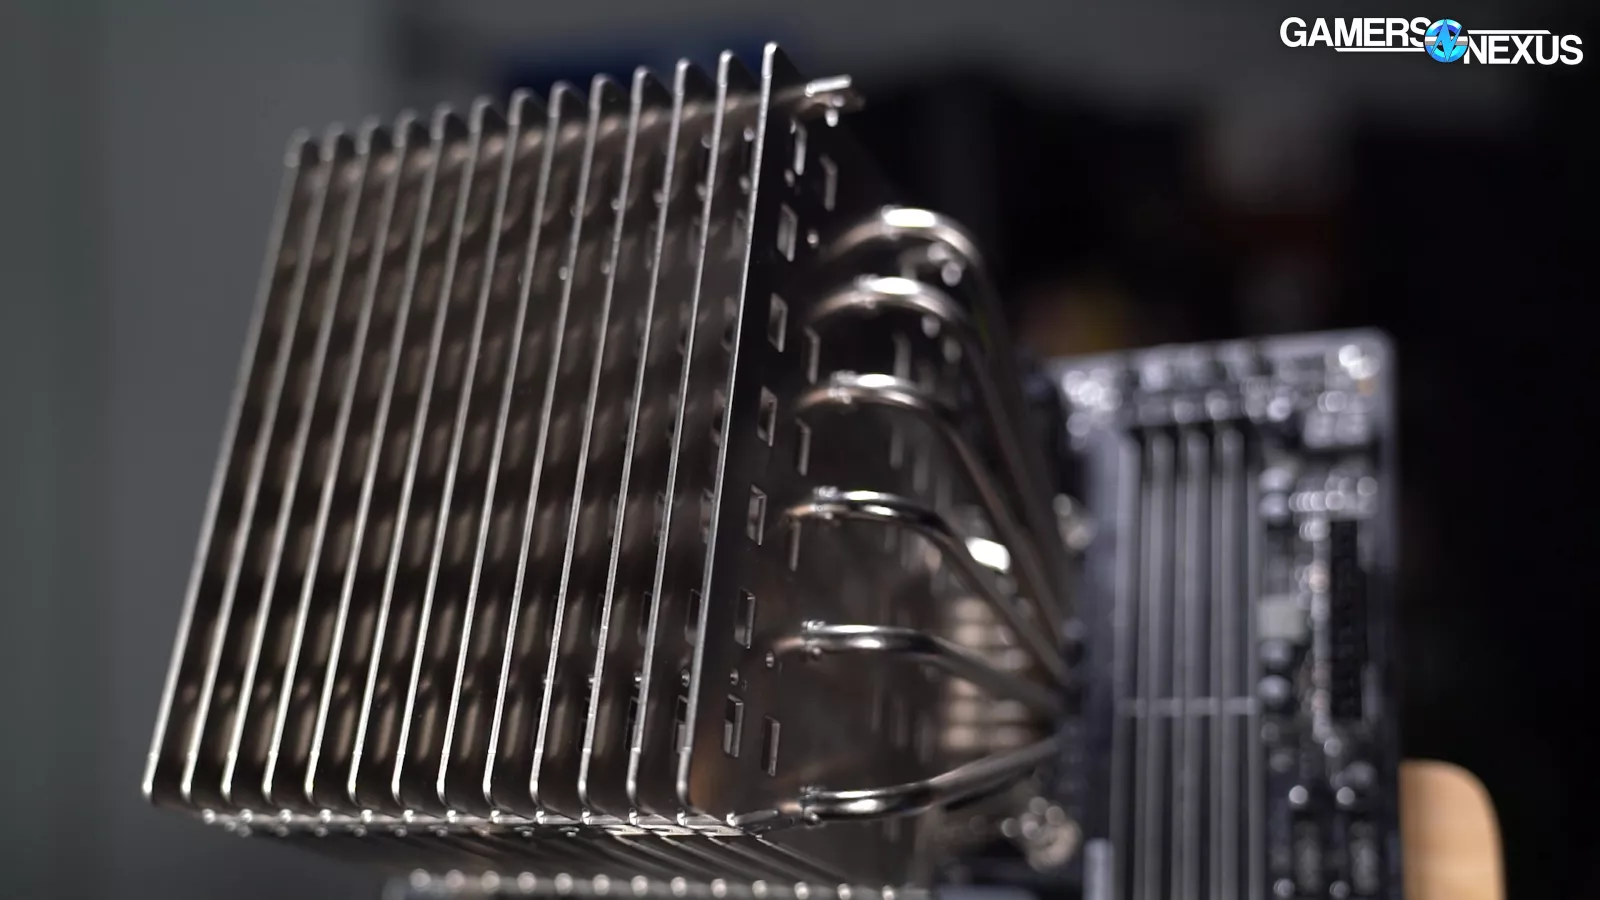
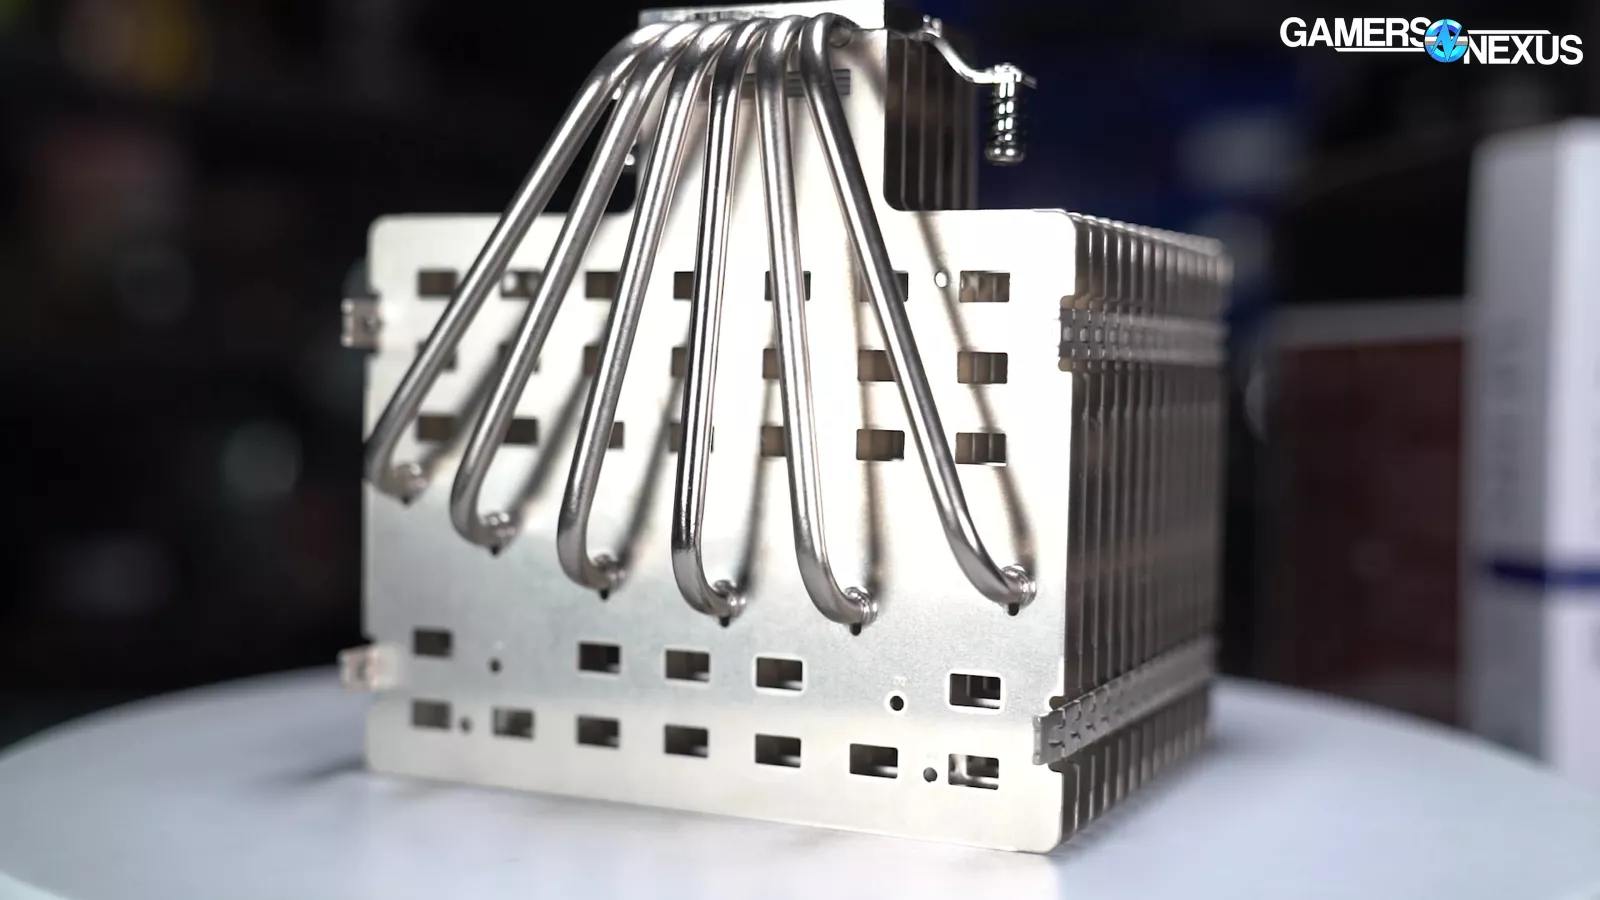
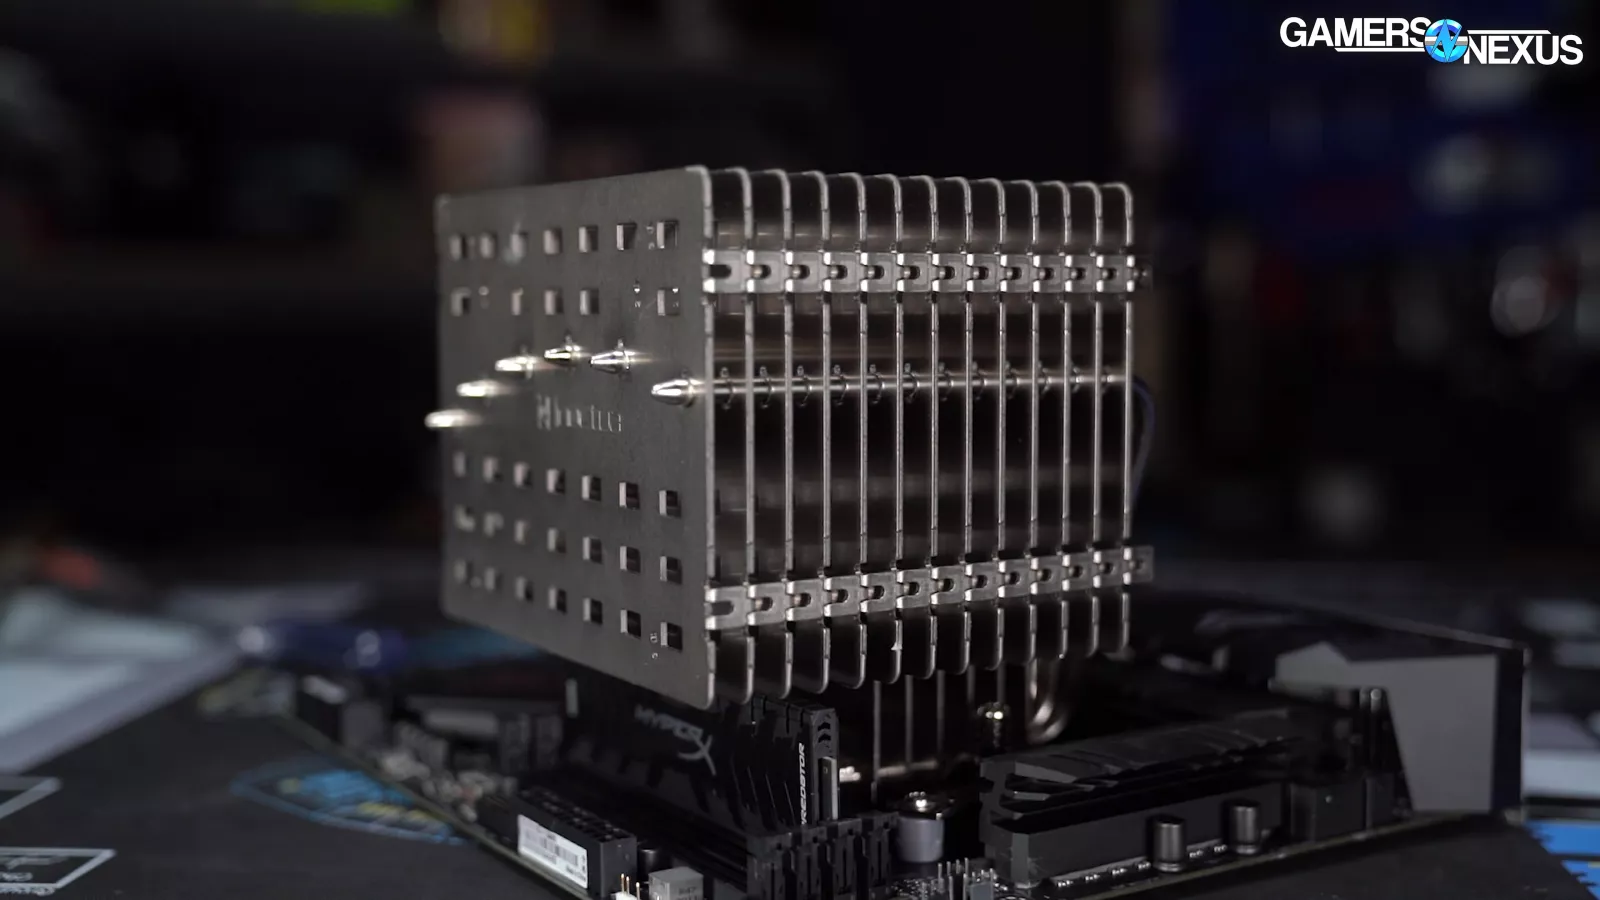
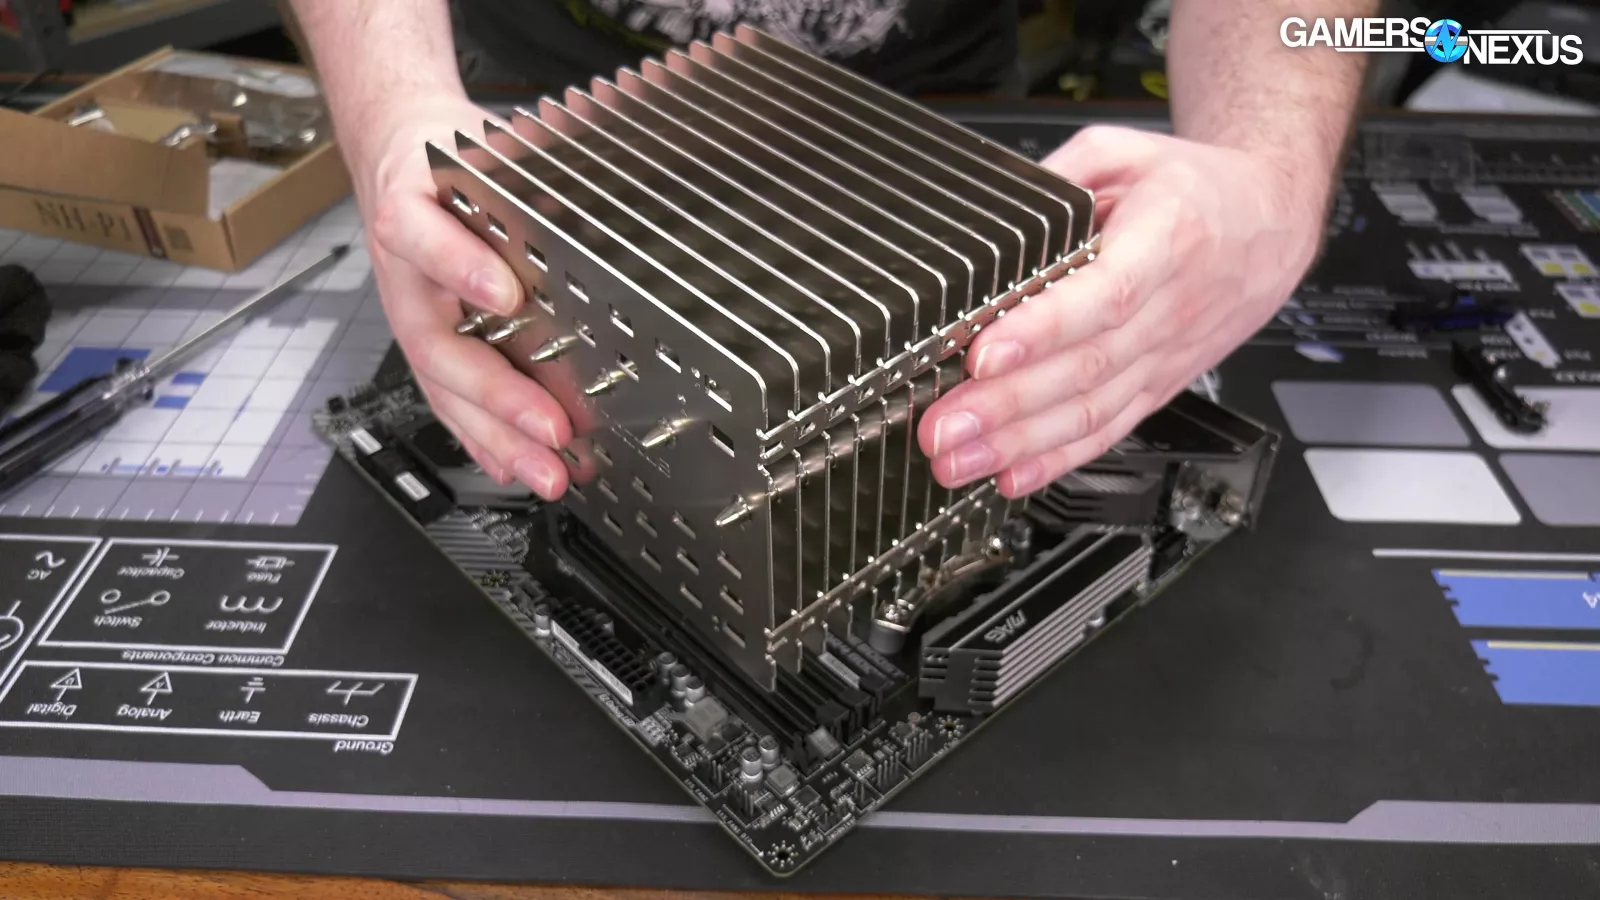
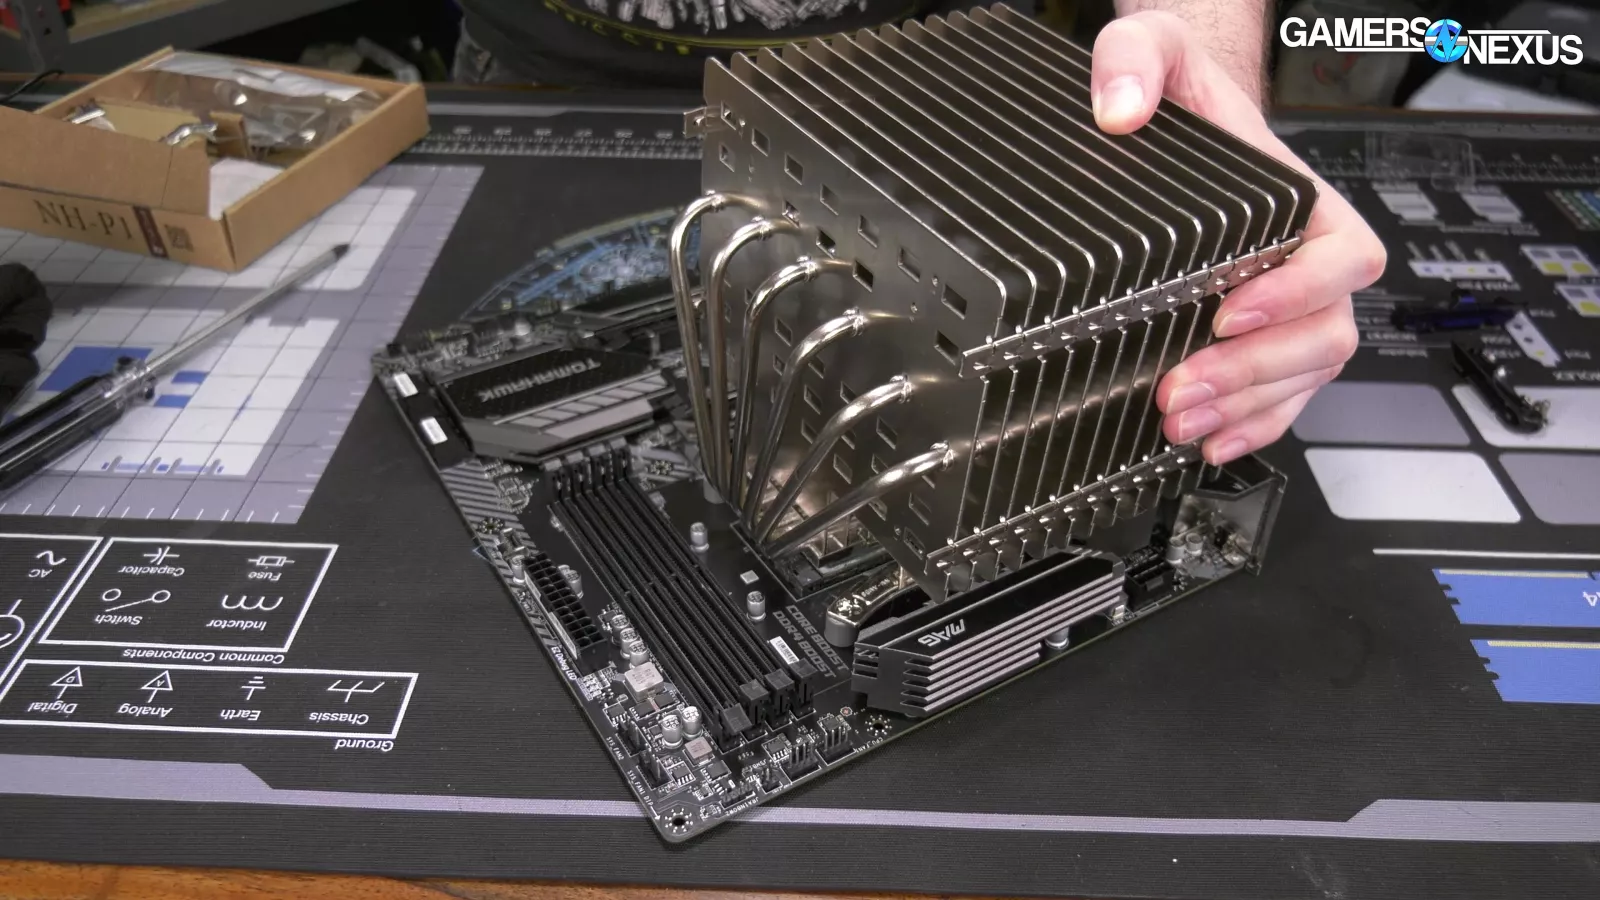
Passive cooling plays by different rules than active cooling: Because we’re relying on natural convection, the fin density must be low. That means that the P1 only has 13 fins, or more appropriately, these are aluminum “plates,” up from 12 on the prototype we saw in 2019. The limited plate density is necessary to allow room for air movement and passive transfer of heat from the plates to the air, especially without assistance of a fan. With a fan, tighter fin density is preferred up to the extent it creates high flow impedance. This is because the higher surface area is more valuable on an active cooler, whereas the specific heat benefits afforded by the P1’s design is more appropriate for a passive cooler.
The passive design also means the fins or plates need to be oriented so that one plate doesn’t obstruct heat from rising off of another plate. Noctua built the P1 such that it can be installed either horizontally, as in a test bench, or vertically, as in a standard tower, while the plates remain perpendicular to the upwards direction in both configurations.
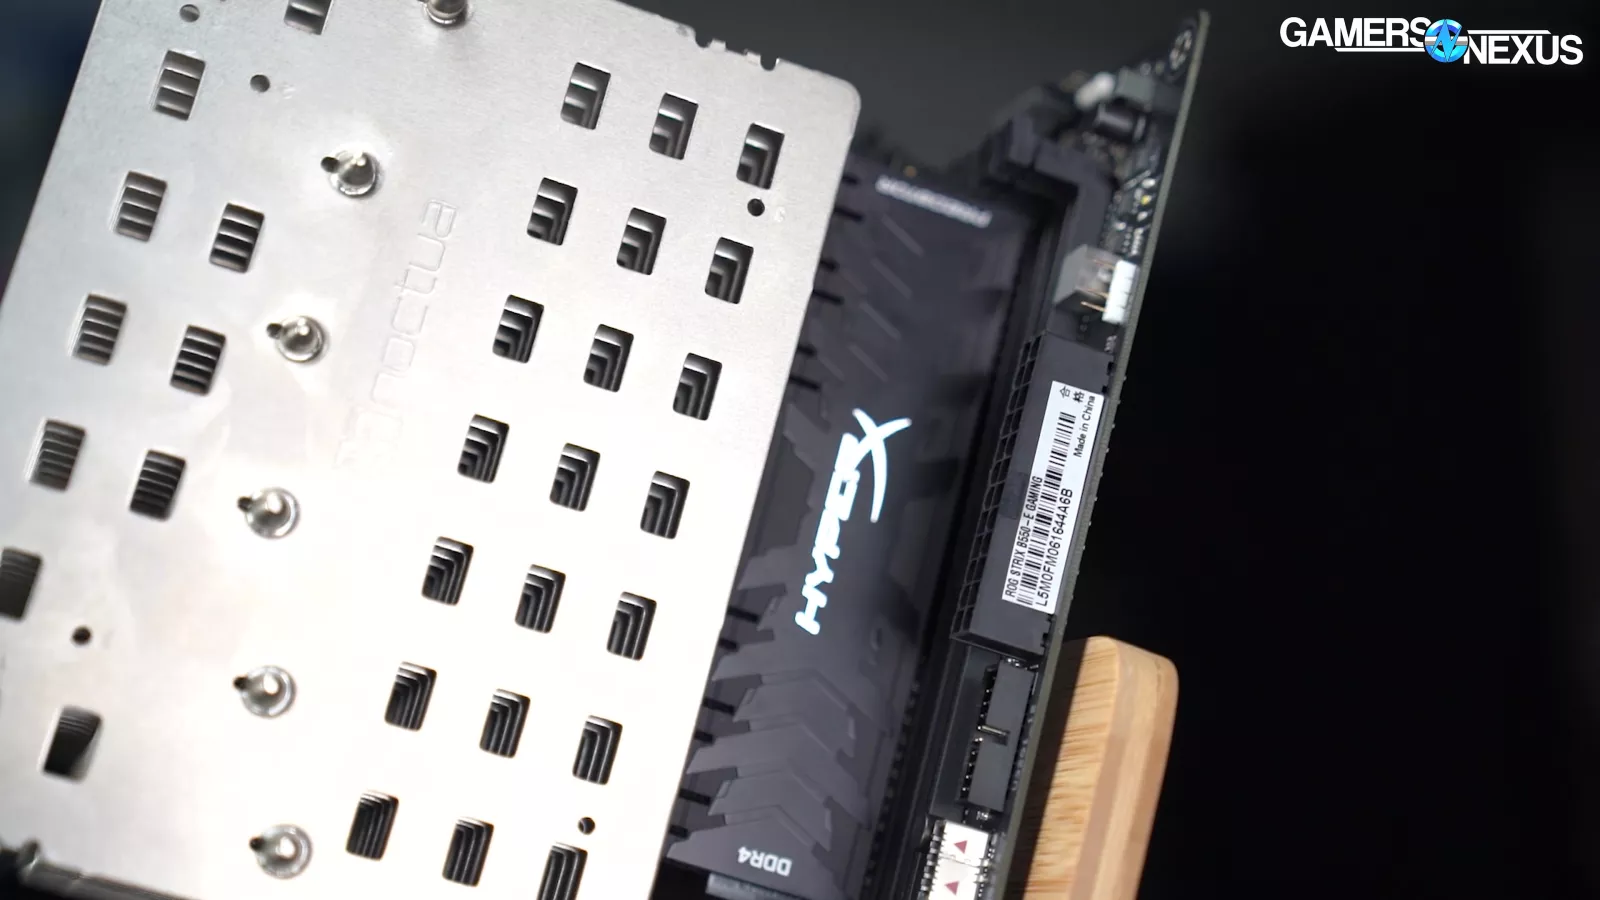
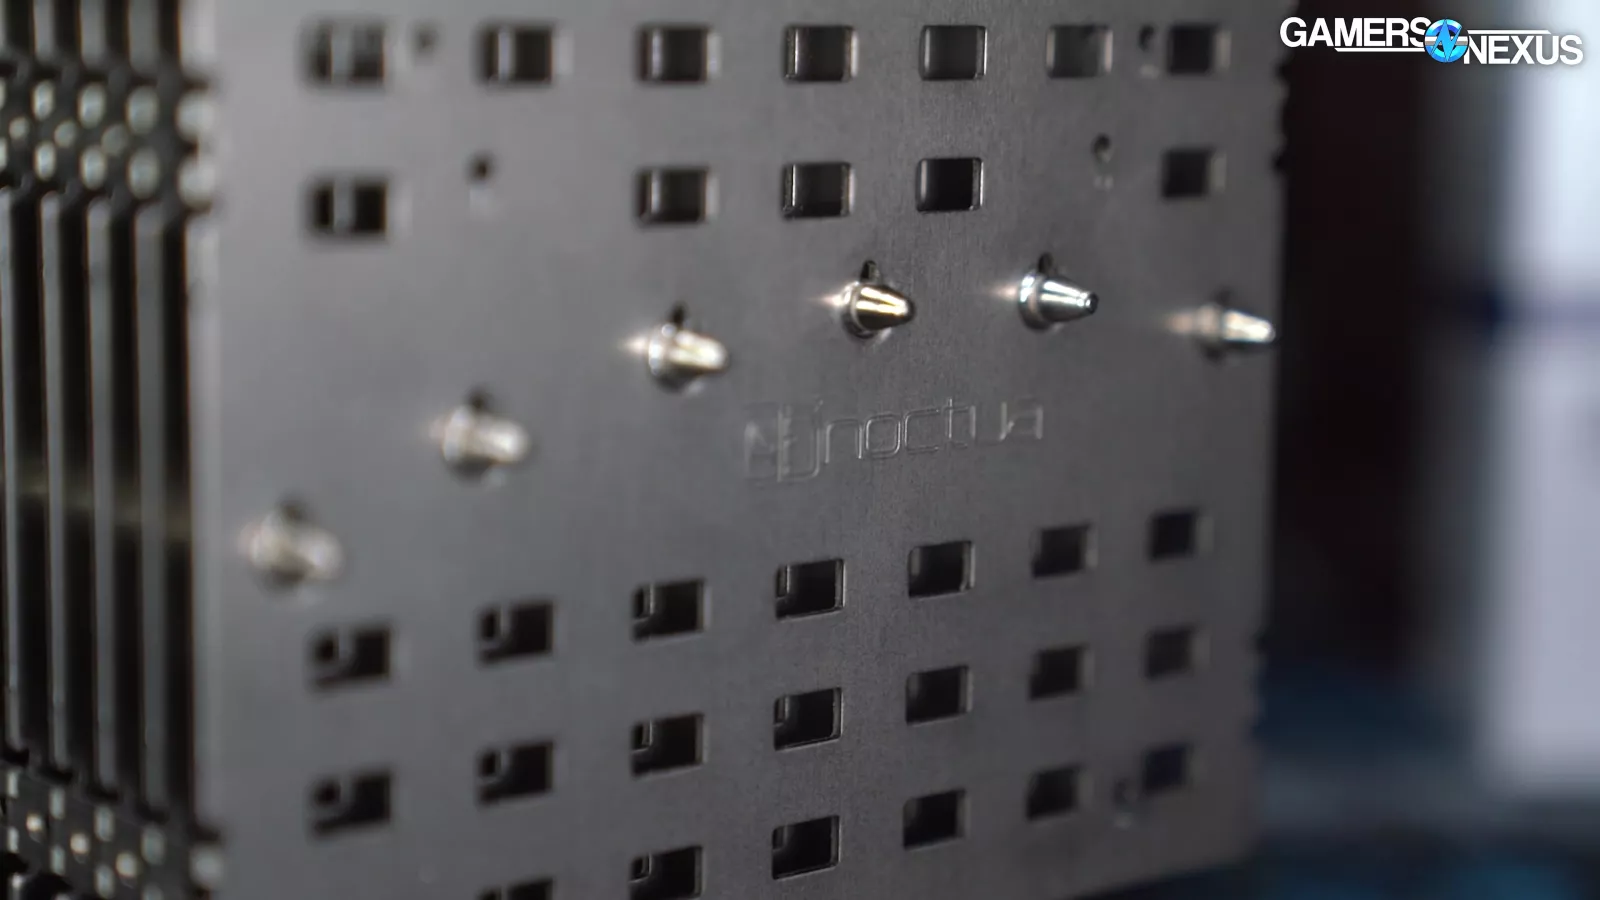
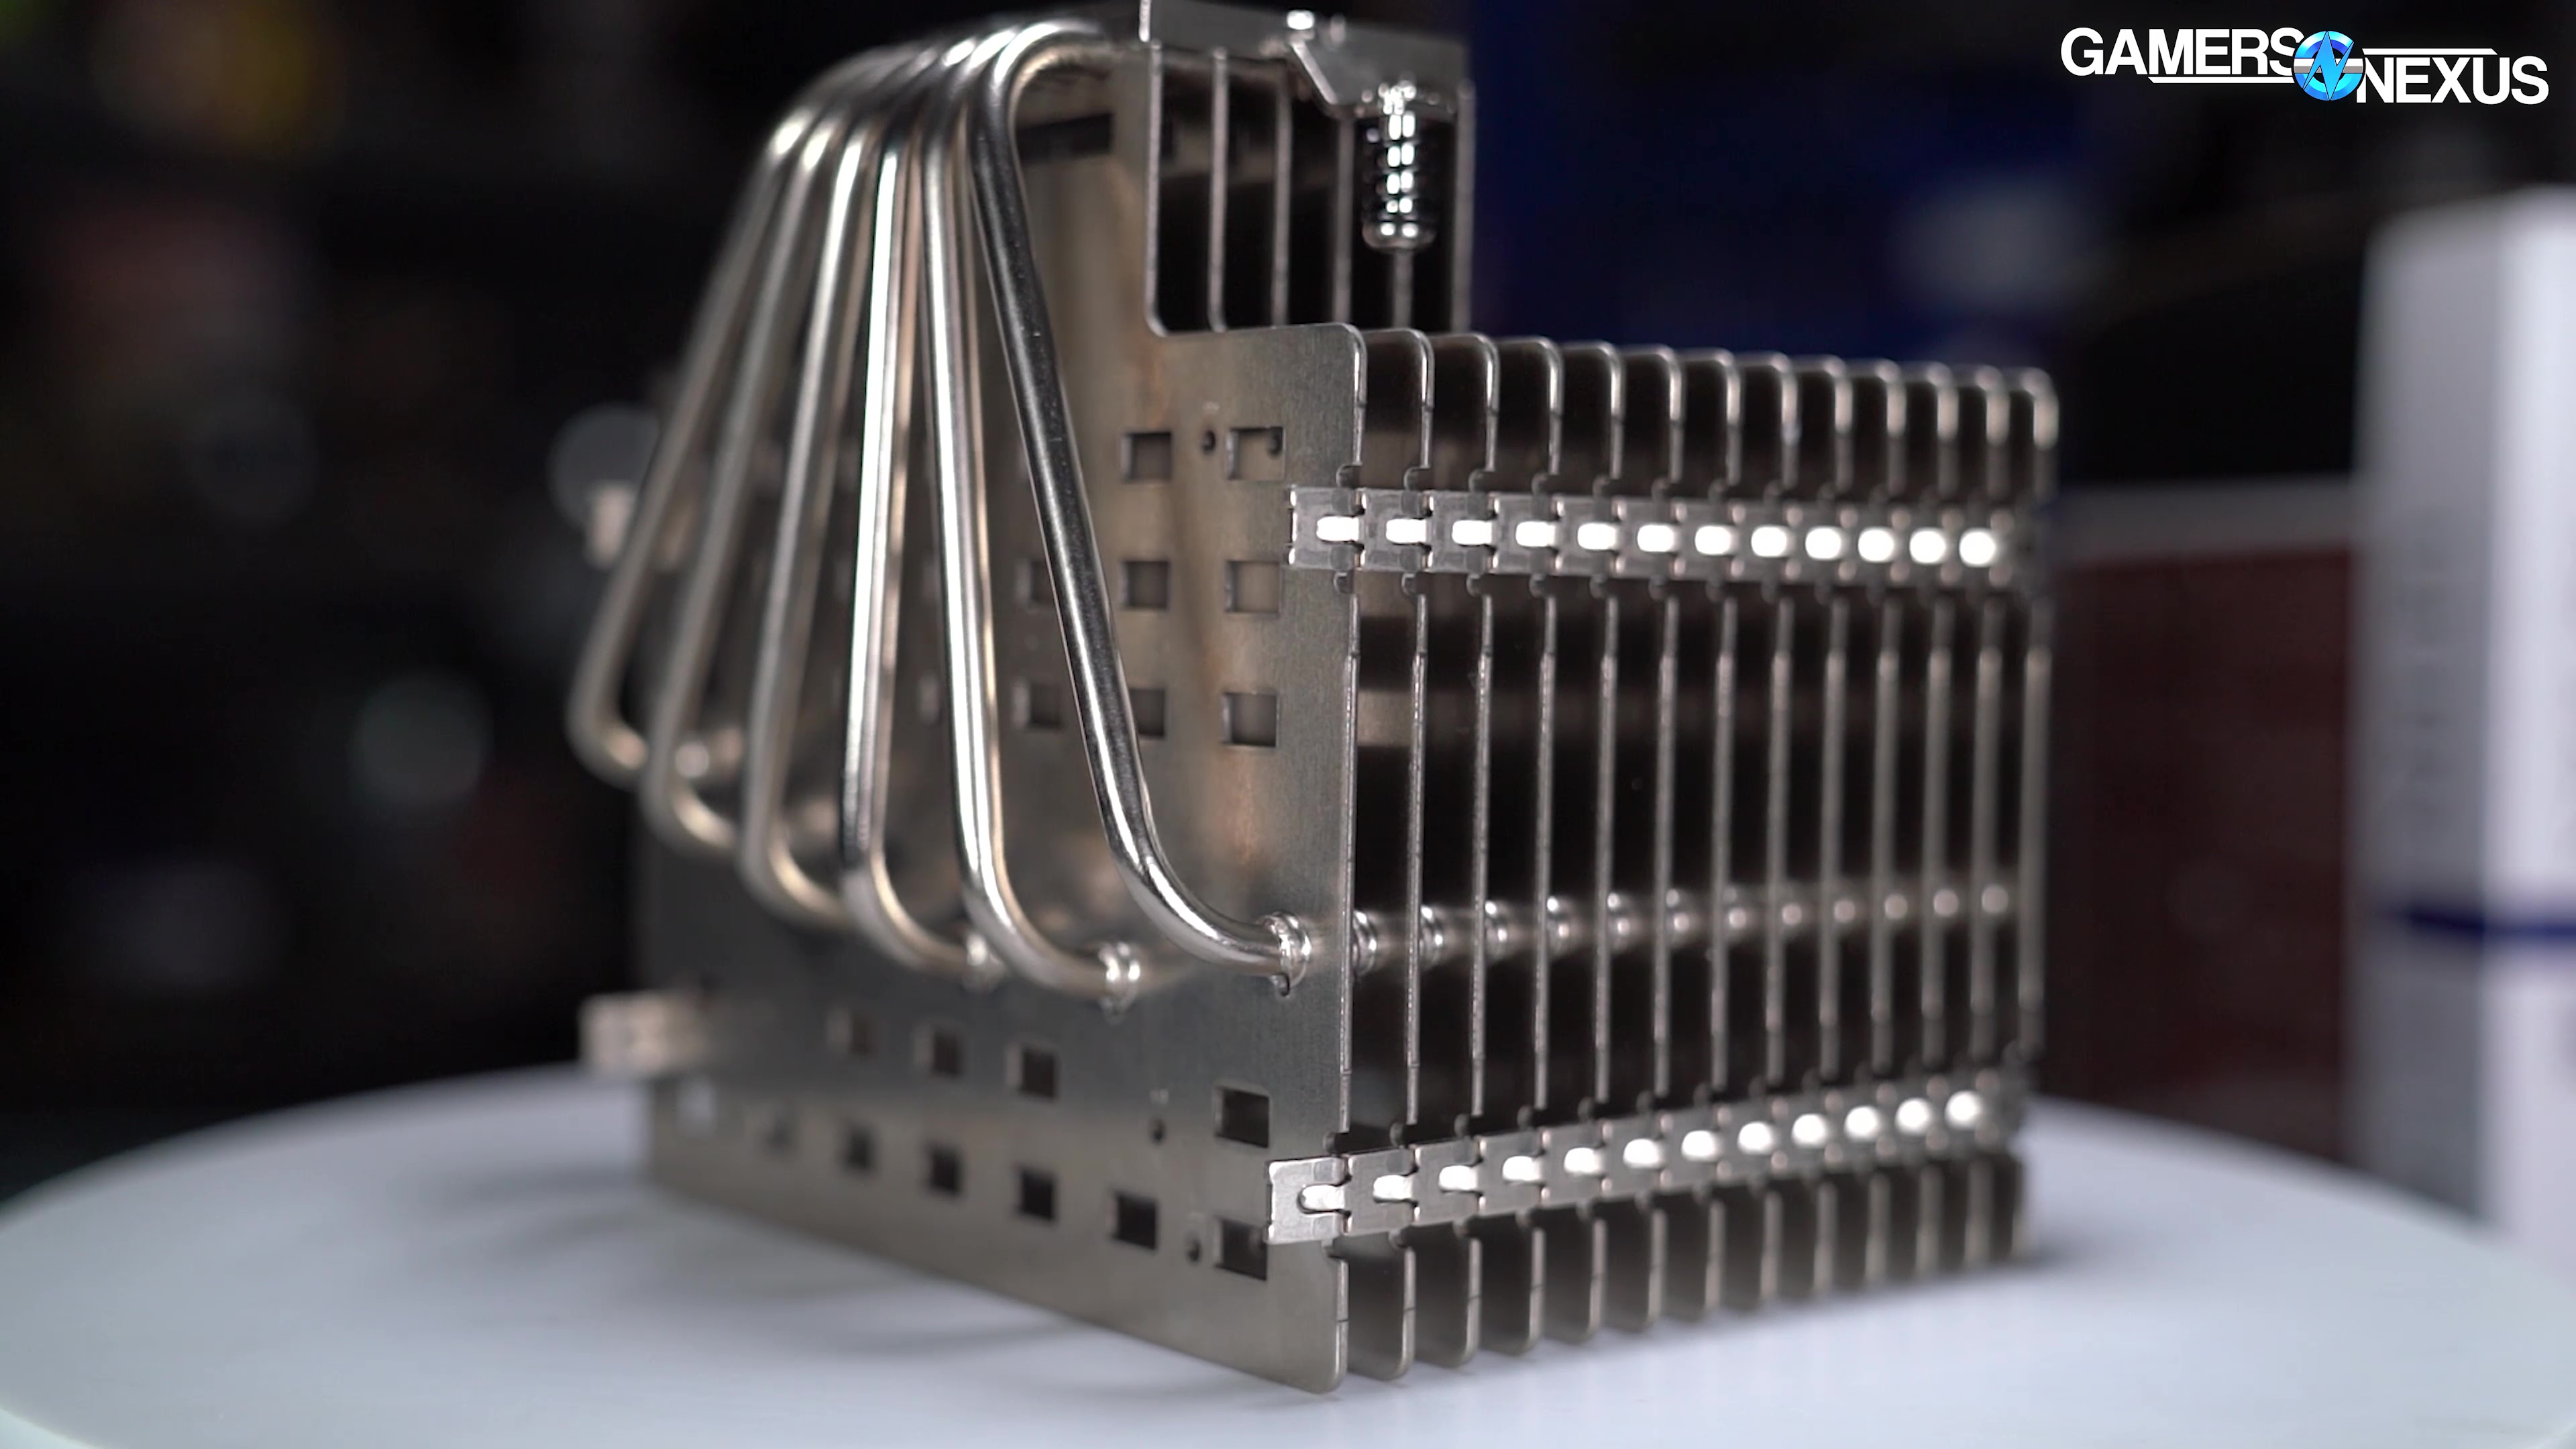
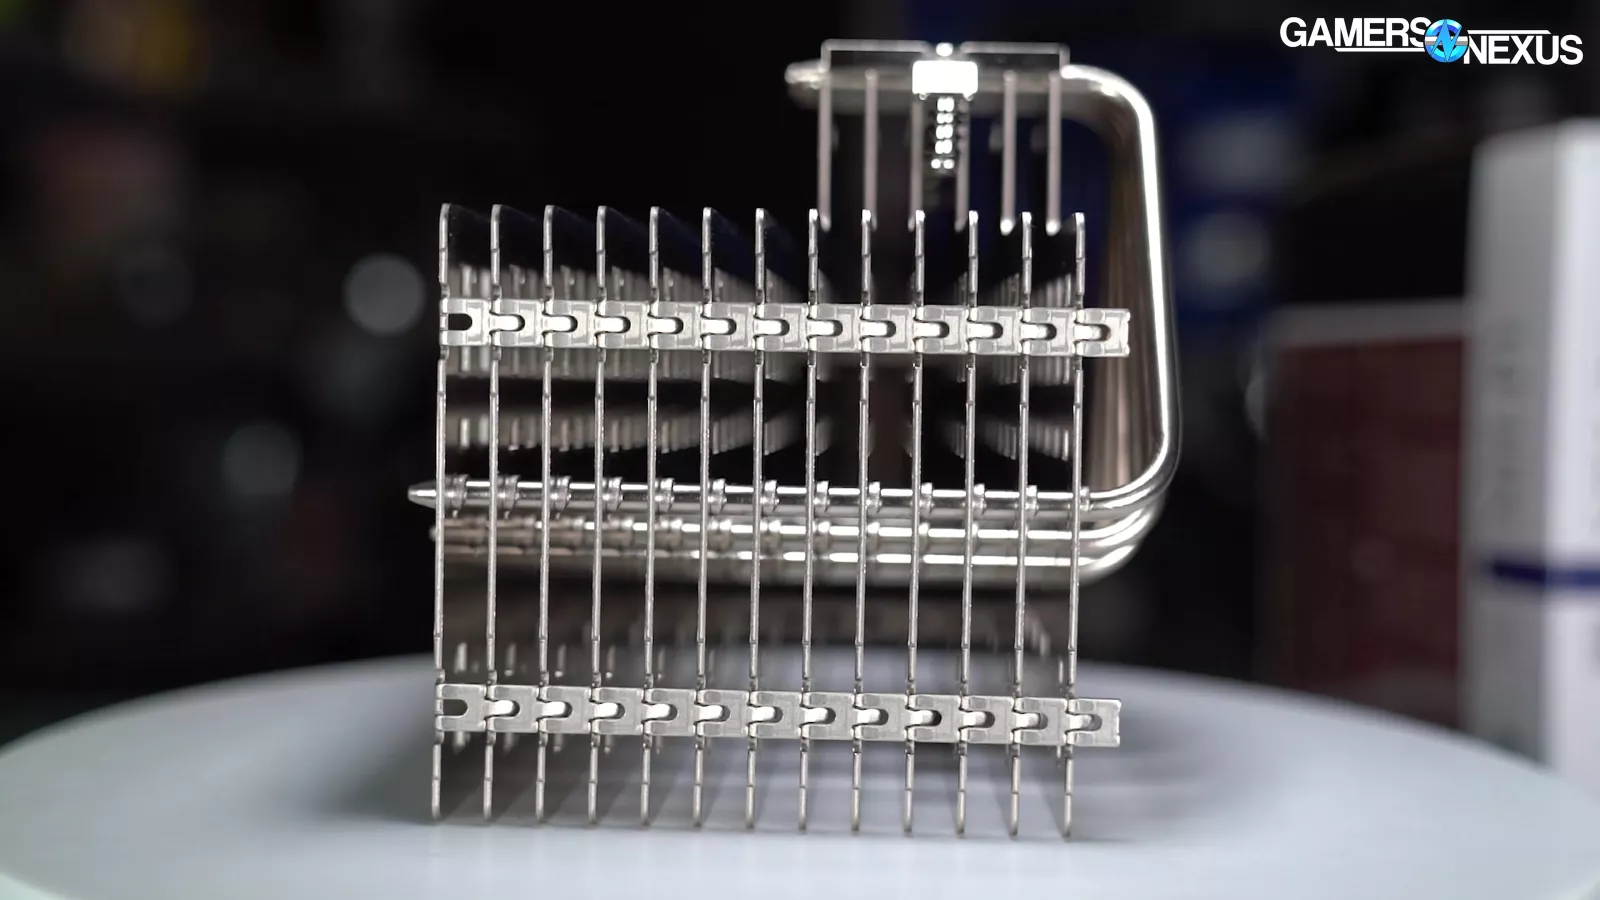
Each plate is 1.5mm thick, the same as the 2019 prototype, and each plate has 6x 2.8mm diameter holes numbered in sets of 1, 2, or 3, which are used for mounting fans if desired. Although active cooling can work on this, keep in mind that you’re best off with either a truly passive or truly active cooler. Hybridizing the approach is less effective than something dedicated, but does mean you can mount a fan whose fan curve stays at 0% until under a heavier load.
Noctua NH-P1 Cooler Gallery
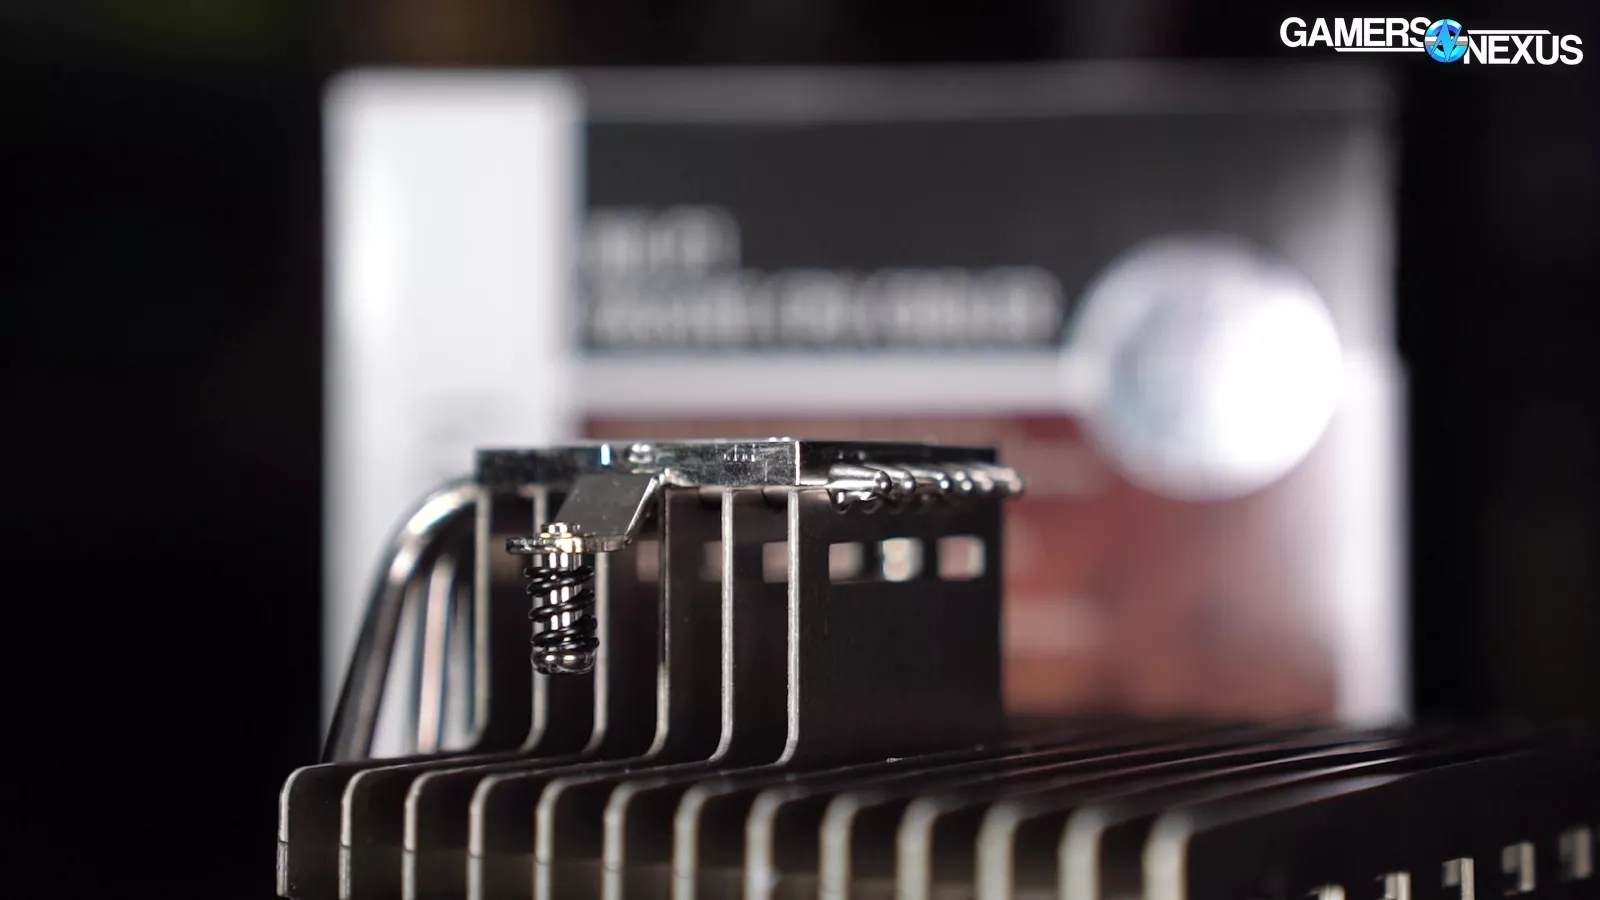
6 of the plates run down towards the heatpipes, but don’t actually connect to them. They aren’t welded together as we’d normally see. For heatpipes, Noctua is using 6x 6mm heatpipes, which are solely responsible for transferring heat from the cold plate to the plates.
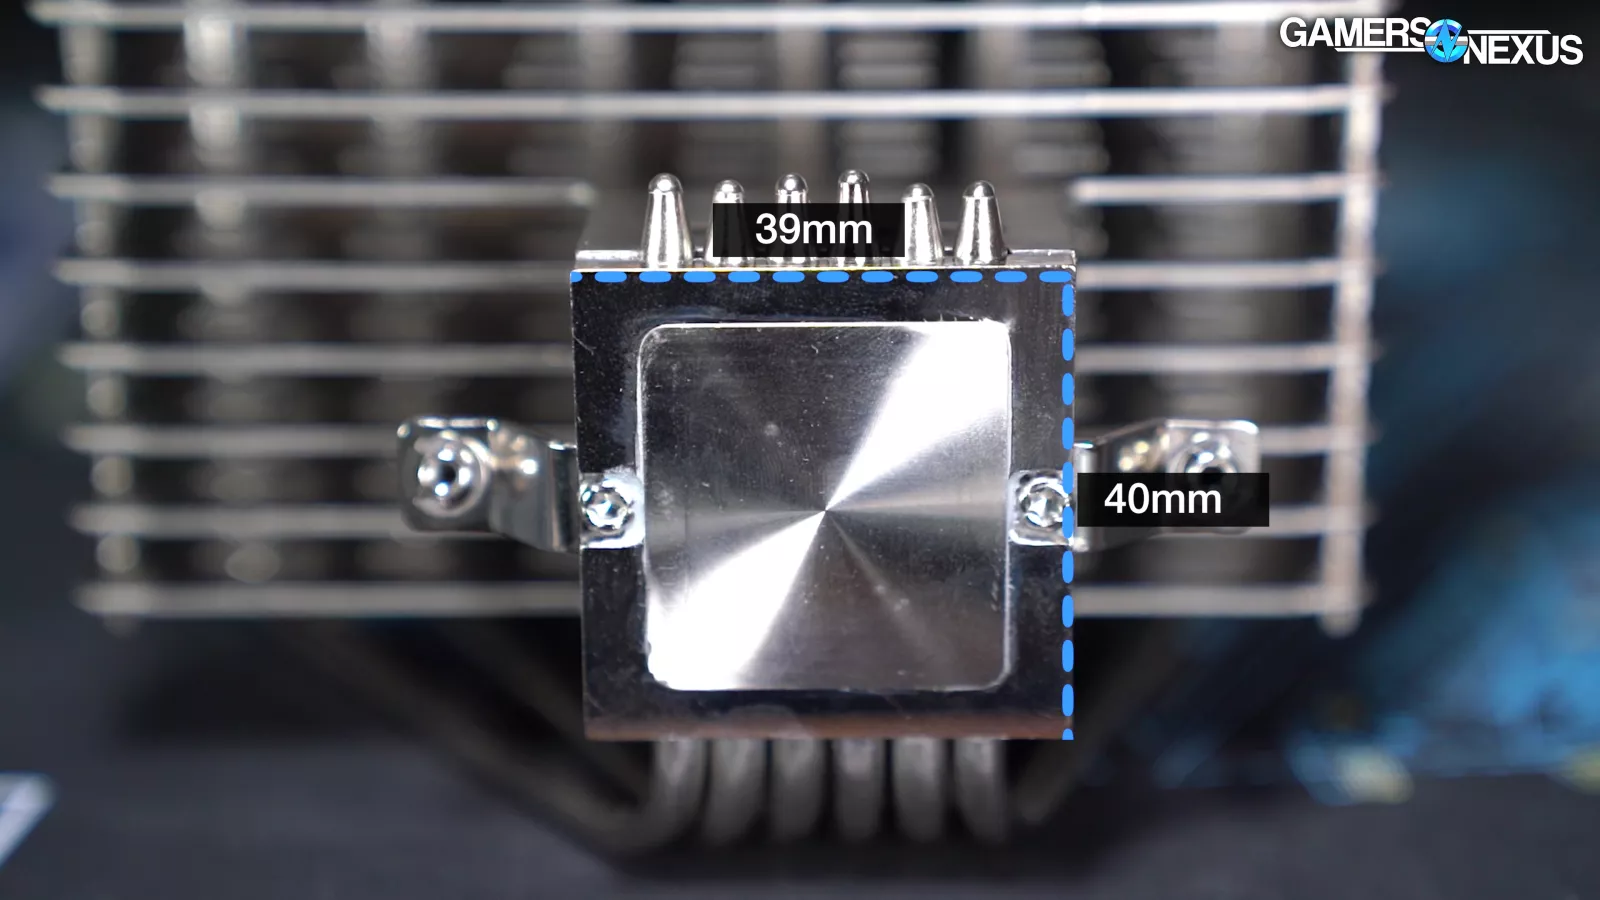
The nickel-plated copper cold plate is about 39x40mm and suitable for Intel or AMD desktop CPUs, but is not a good fit for HEDT parts -- those have power consumption in excess of what this can handle, anyway.
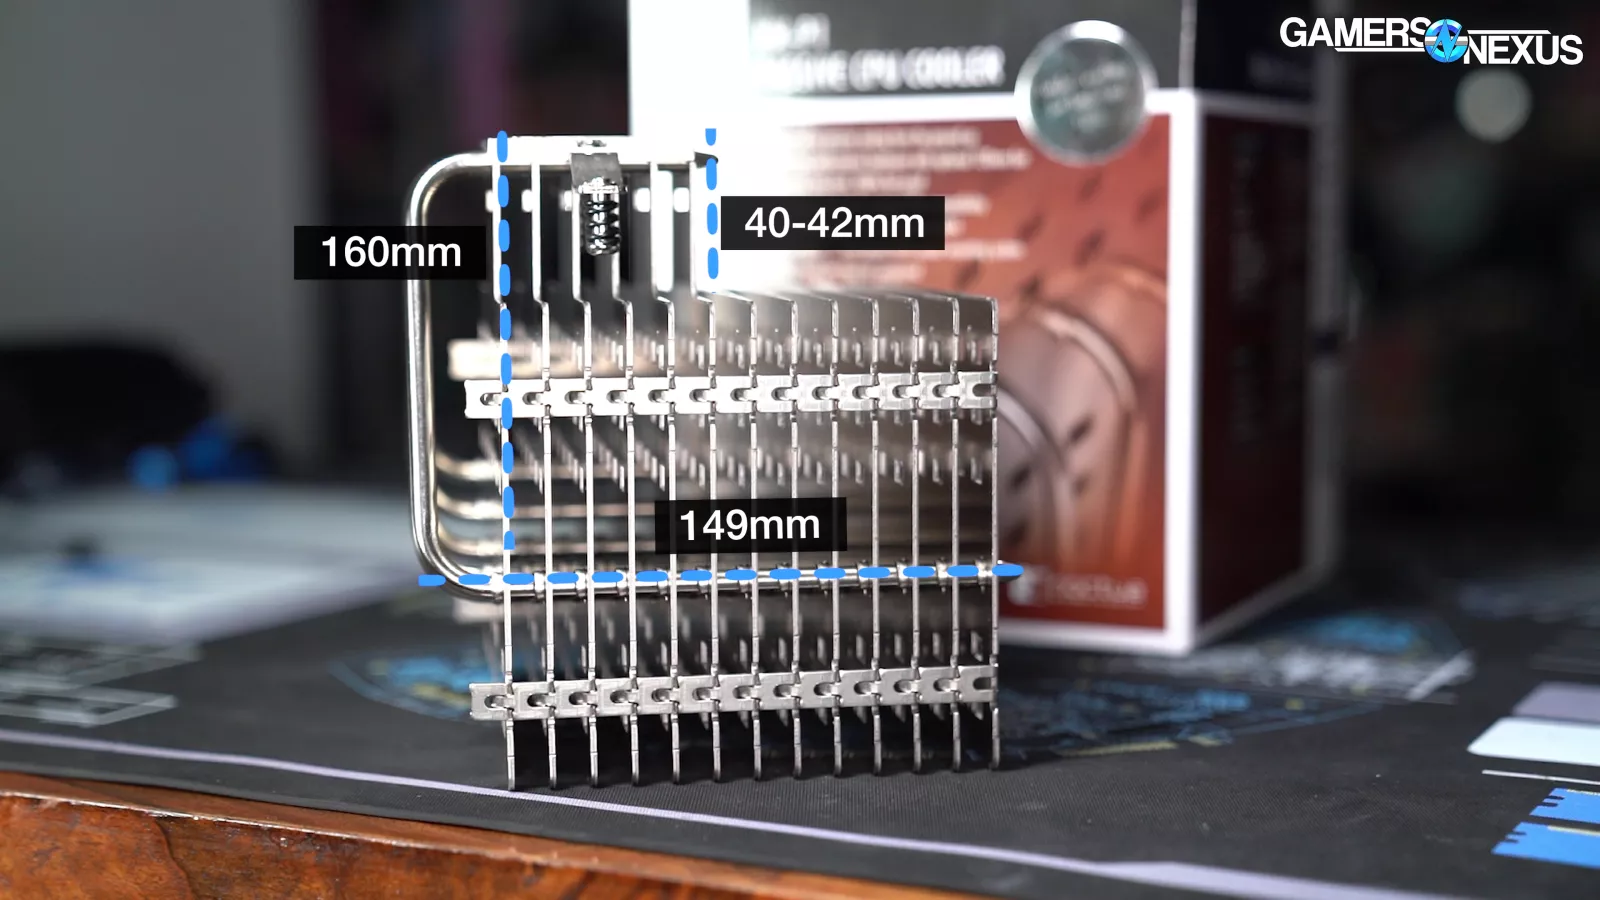
The cooler is about 149mm wide from the protruding heatpipes to the sealed end of the heatpipe on the other side, and about 160mm tall from the bottom of the cold plate to the top of the aluminum fins, not counting mounting hardware or socket height. Clearance at the overhang is about 40-42mm.
Part of the manufacturing difficulty that caused delays on this one has to do with the plate or fin thickness: In 2019, Noctua’s primary supply-side factory had a press which stops at 0.5mm fin thickness, meaning 1.5mm required a new solution. The automatic interlocking of the fins was part of the challenge: As we’ve seen in factory tours in the past, fins often get stamped by 150-ton machines, then folded into themselves to automatically assemble the entire finstack.
Schlieren Imaging
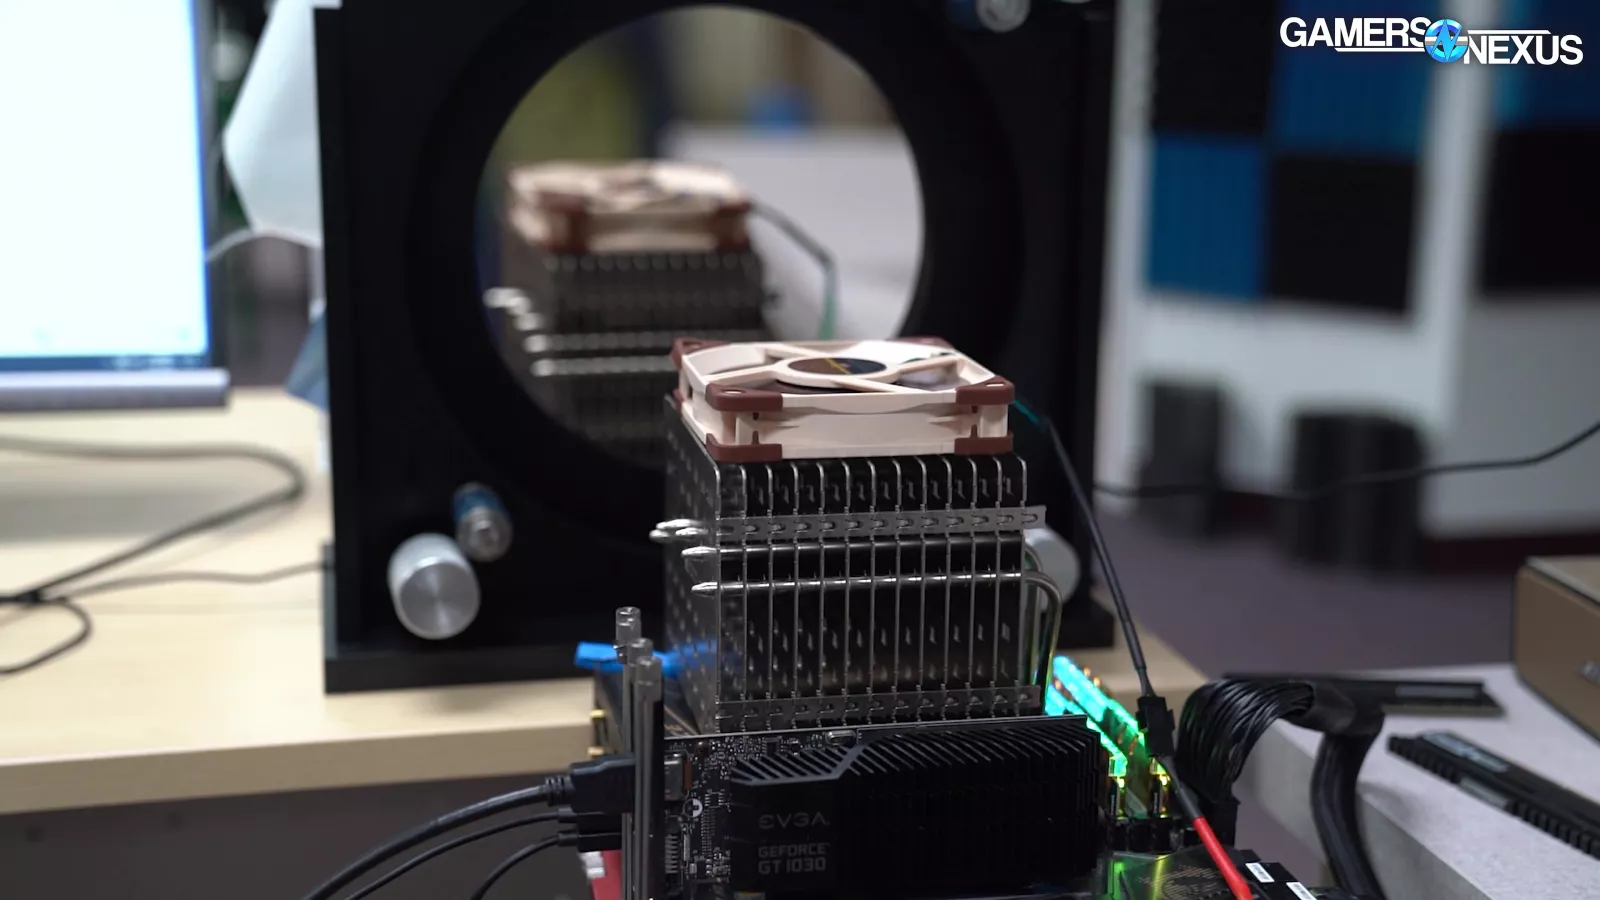
We’ll start with some Schlieren imaging. We took a few hours of footage in various configurations for this, so we’ll try to compress it to the most interesting stuff. Our Schlieren photography setup uses a high-end parabolic mirror and kinetic mount, made possible for purchase by support from our viewers on store.gamersnexus.net. Schlieren photography splits light to image the air density gradient. This doesn’t show the heat and isn’t infrared, but rather shows the movement of air as density changes.
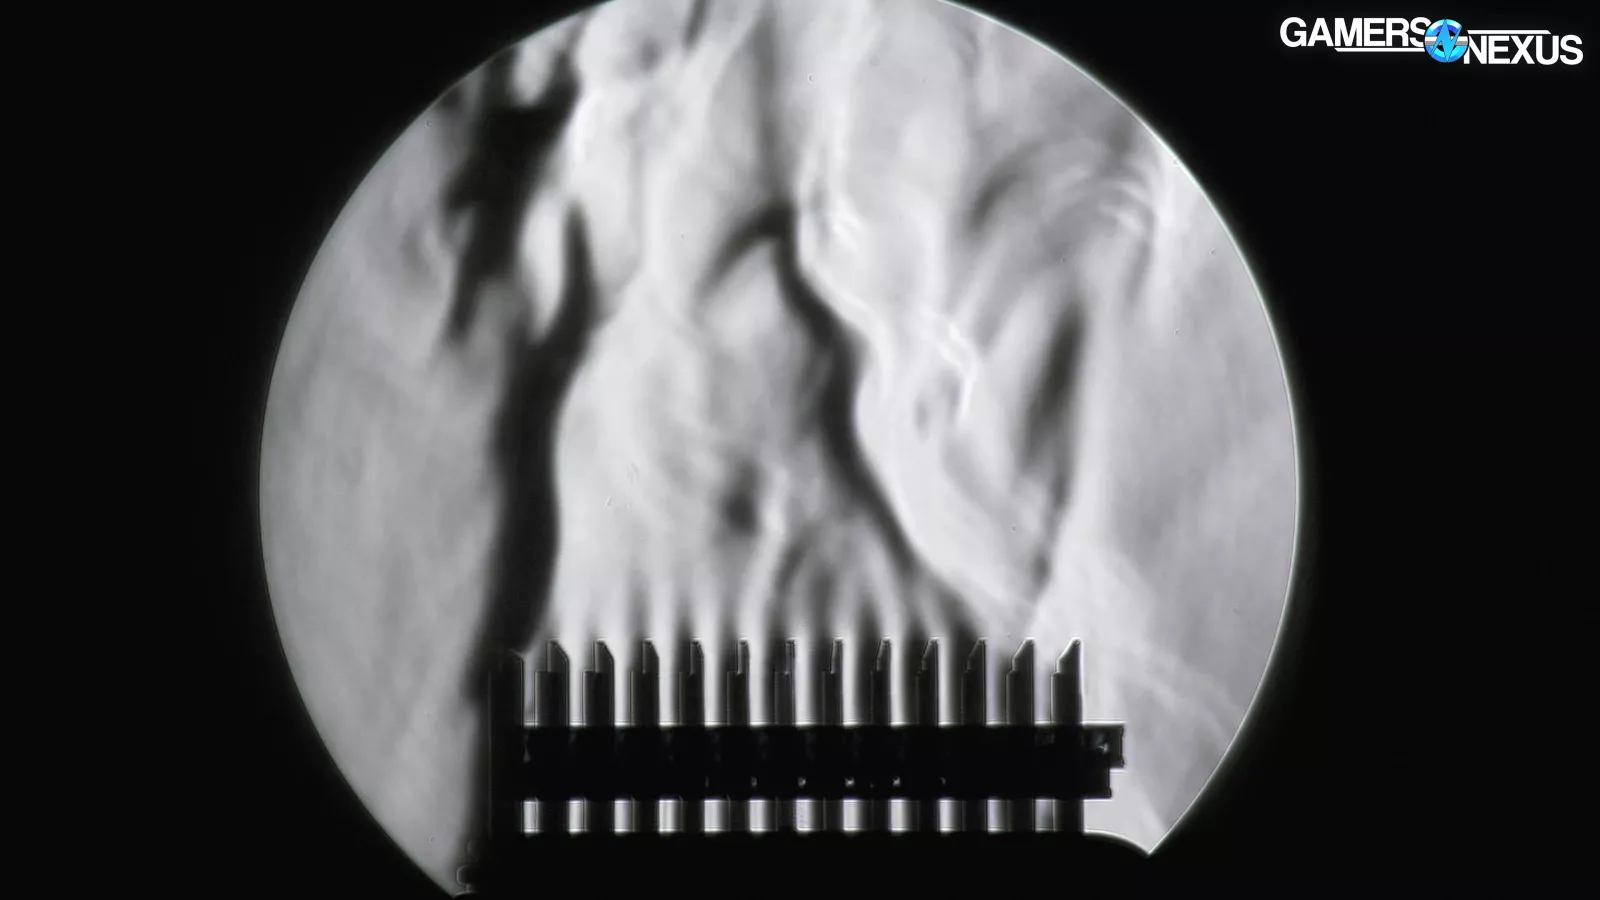
In this clip, we show how heat passively rises off of the P1 when it’s under a 68W heat load from a Ryzen 5 3600 CPU at steady state. Looking closely between the fins, lower down, you’ll notice little density change in the wide gaps between the plates, but you can see the air clinging closely to and drifting off of the plates. The wide spaces between the plates ensure enough space is available for passive cooling without excessive heat buildup. At the top of the fins, we can see where hot air pools and drifts up naturally, following the basic physical law of heat rising. This stops mattering when blasting 2000RPM fans at a cooler, but in passive cooling, it becomes important that the fins remain vertically unobstructed -- including from other fins -- to enable natural dissipation of heat.
The left side of the cooler is interesting. This is where the heatpipes protrude through the plates and is where you can see the highest change in air density.
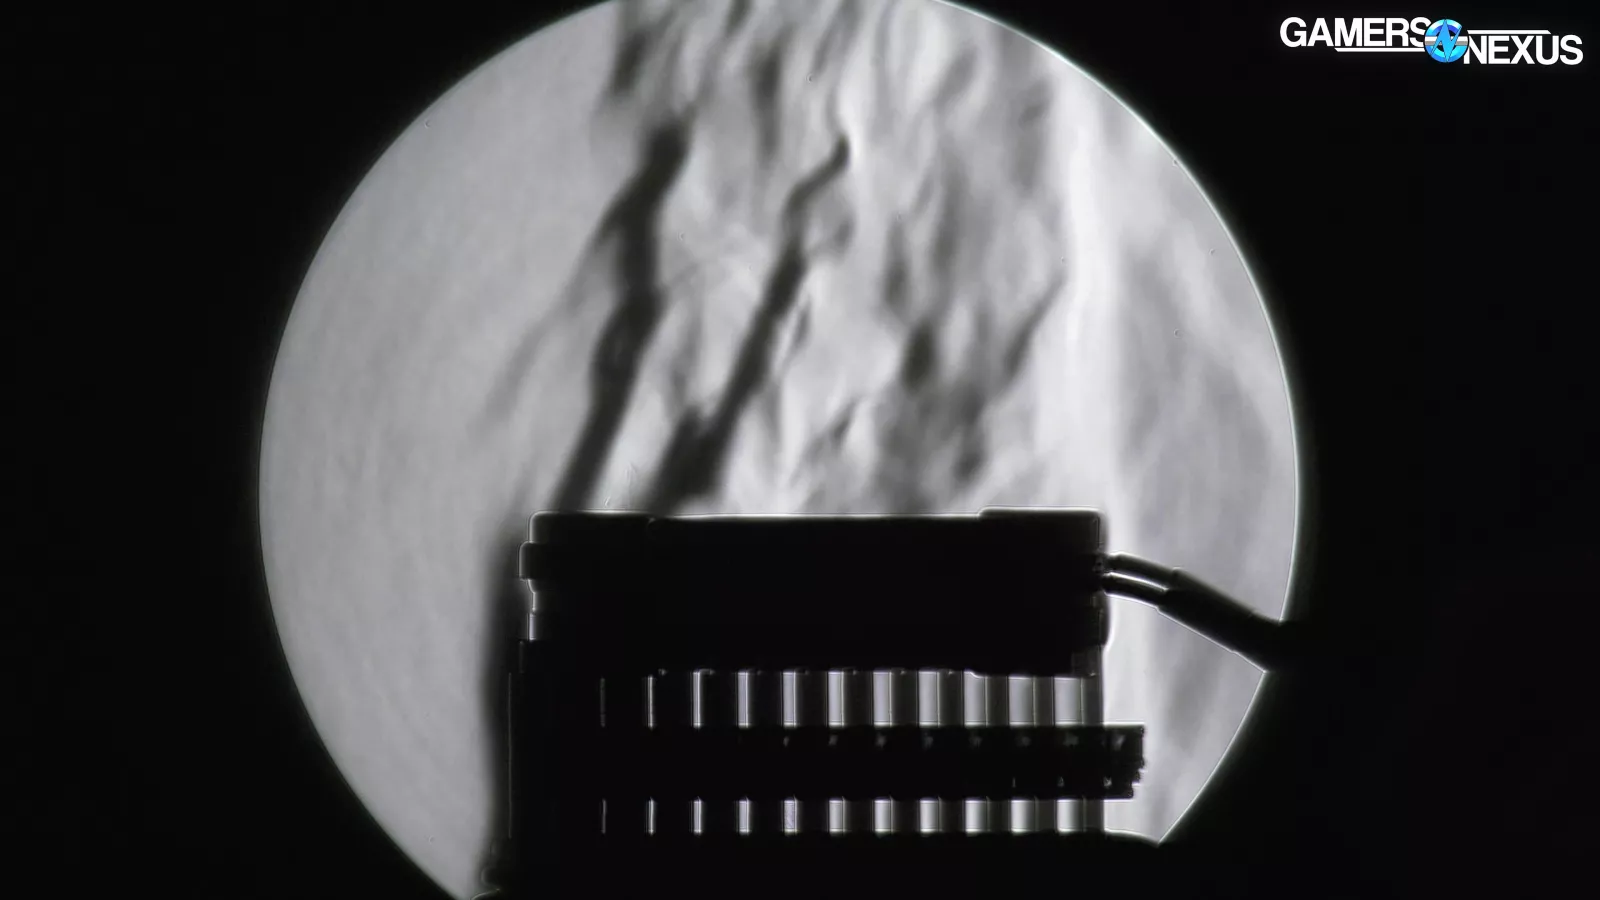
We also tried mounting a fan to the top of it, just for perspective. This overpowers any natural processes, obviously, and funnels the air conically upwards when set as updraft. This was using the Noctua A-series fan.
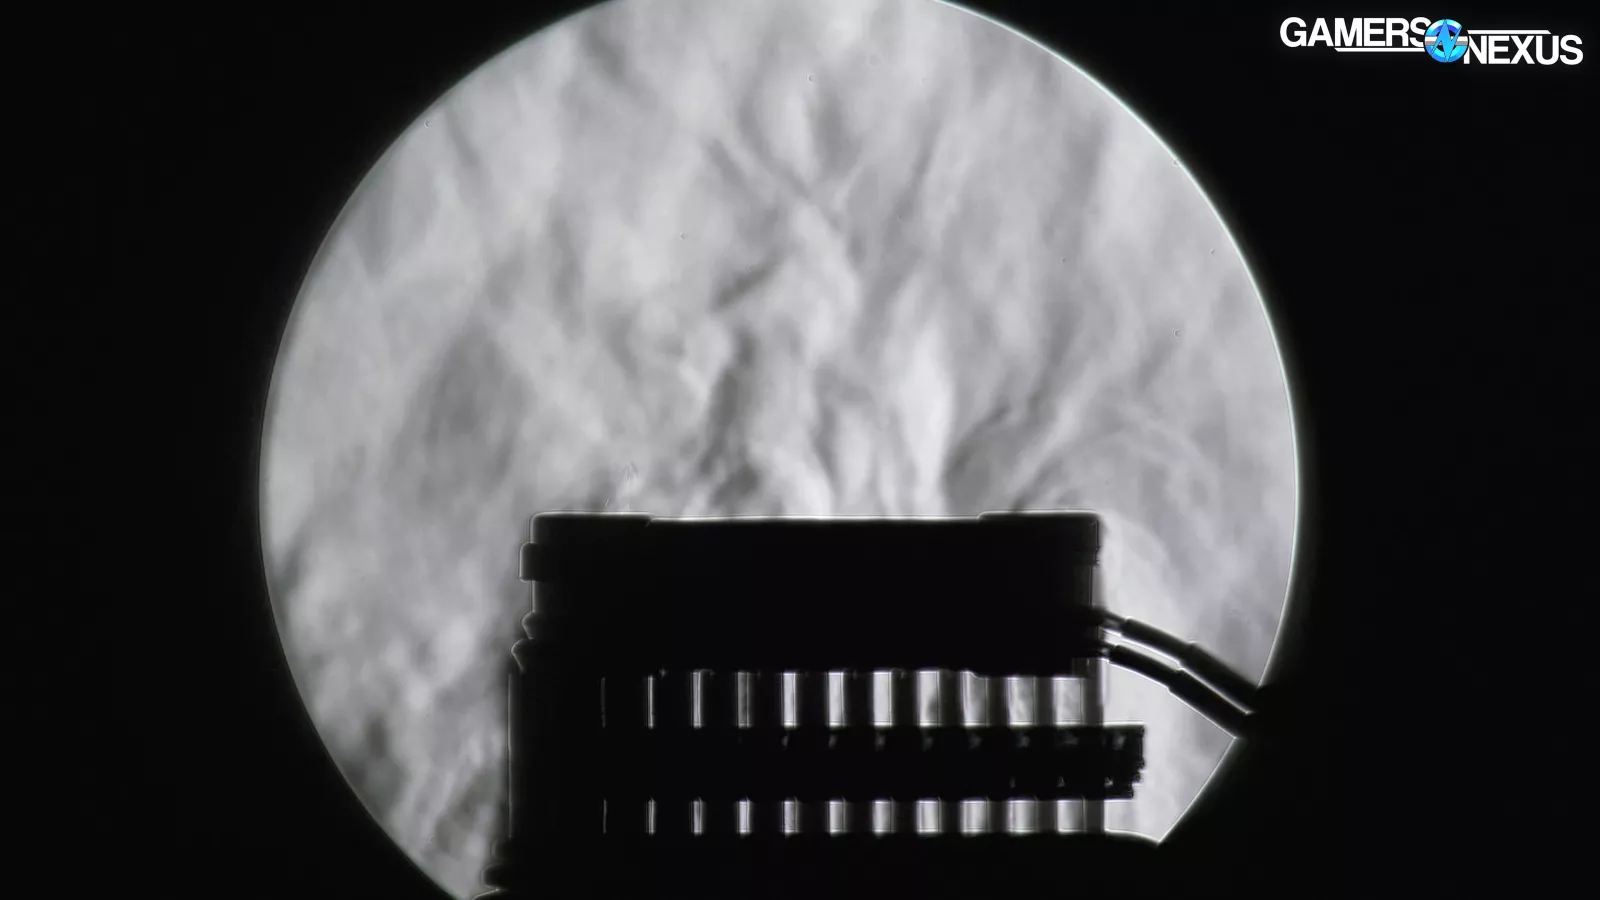
We also set it to Noctua’s recommended downdraft configuration. Here, the fan pulls in air that’s drafting up and off the sides of the heatpipes. It’s pushing warmed air back into the cooler. That’s still a net positive versus passive cooling, but is less efficient. The benefit is that it helps VRM components.
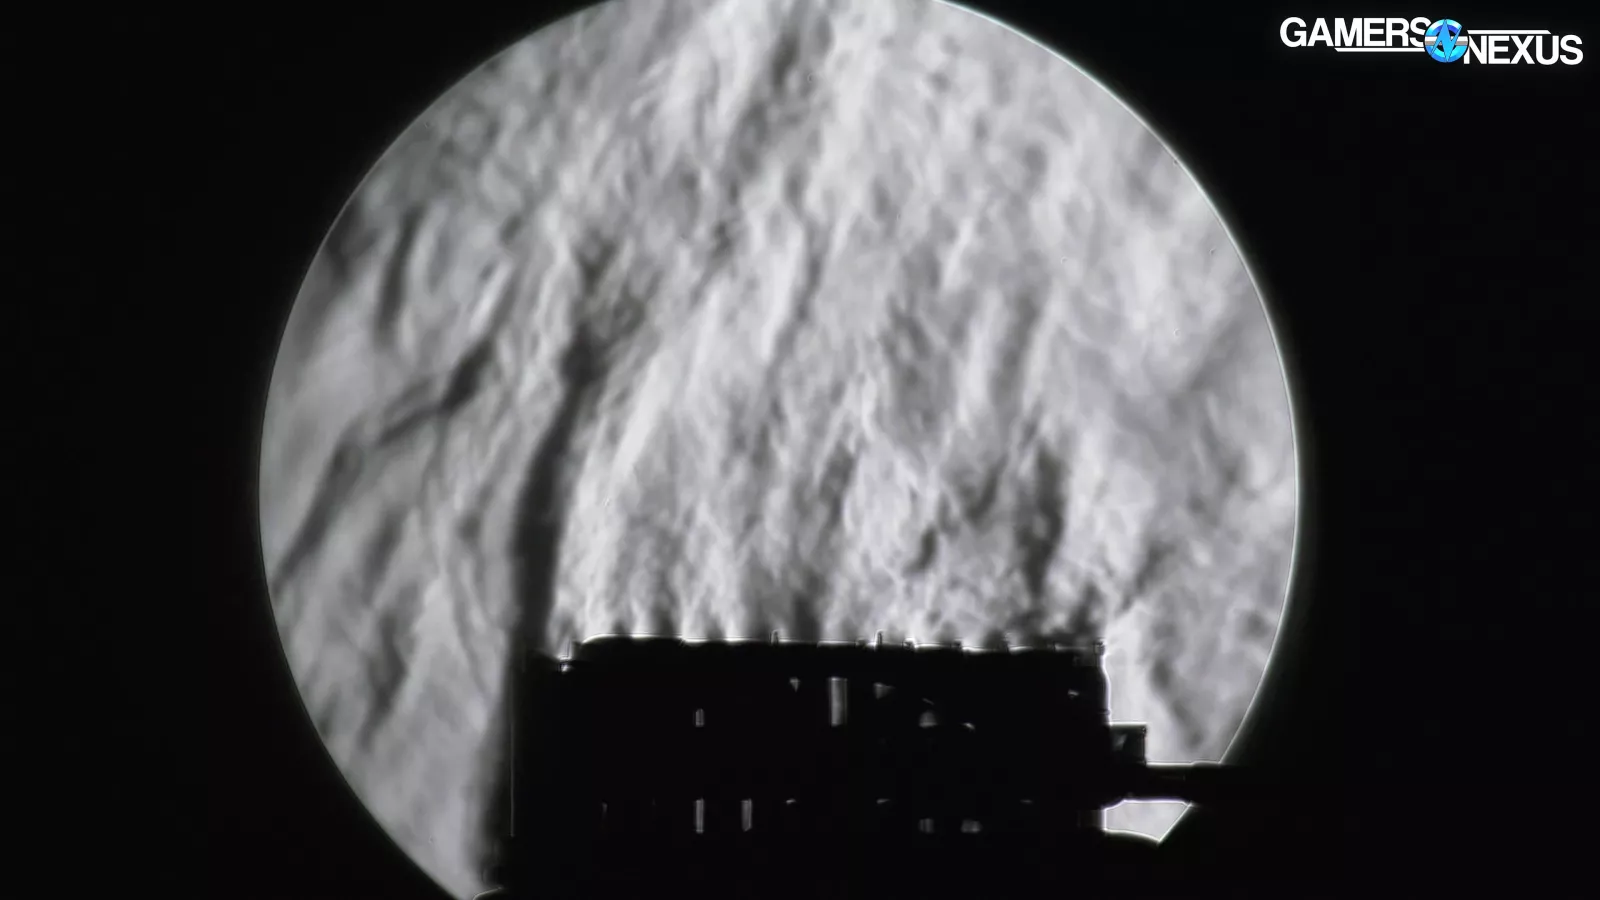
Mounting a fan to the side and pushing air through the cooler resulted in chaos in the imaging. The only interesting thing we saw was the speed at which air density above the heatsink changed, despite the fan being directed through the cooler. This is one part Noctua fin design and one part fan speed: This fan is relatively low speed, so a lot of the air makes its way up-and-out before making it through the cooler.
We'd strongly recommend checking the video above to see this in motion.
Noctua NH-P1 Mounting Instructions
This section will cover installation and mounting hardware. We'll cover both AMD and Intel installation instructions for the Noctua NH-P1 Passive Cooler. We recommend installing the cooler on a flat table rather than in the case, as its size will make it difficult to work with in cramped spaces.
Noctua NH-P1 AMD Installation
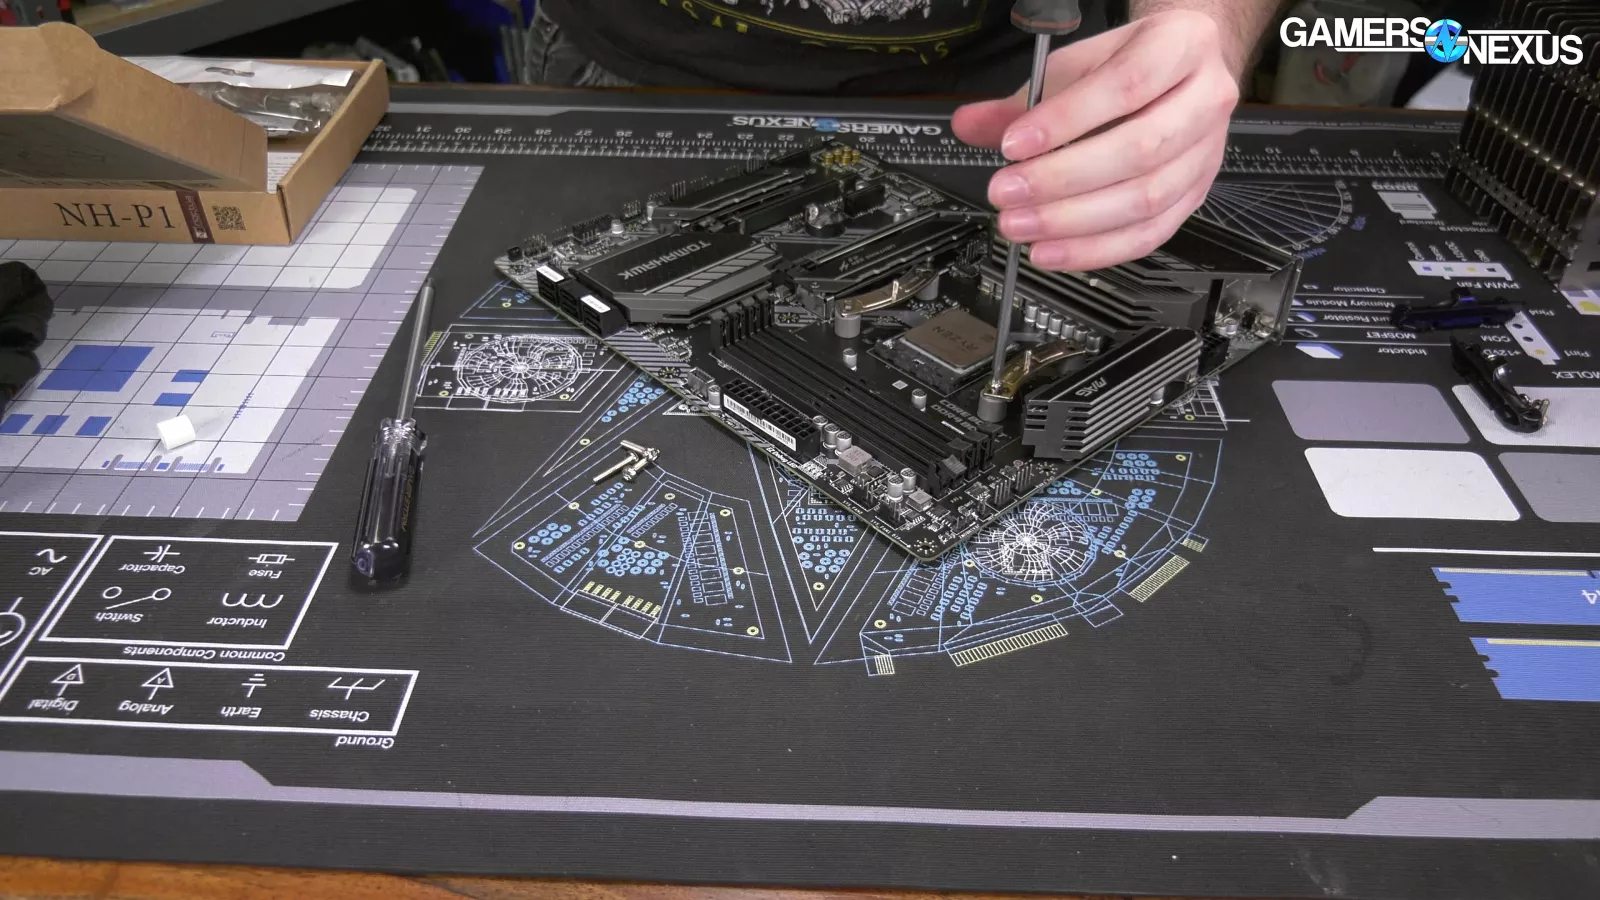
On AMD, the stock backplate is used, as is typical, and four gray spacers are placed on top of the threads. Next, two brackets get installed for AM4 hardware, with an included Torx driver used to secure the screws through the brackets. We’re up to 10 pieces of hardware once the four screws are threaded into the backplate, securing all the pieces.
The Noctua cooler can be oriented two different ways. You can orient the heatpipes toward the RAM, allowing the cooler to overhang the VRM heatsink. You can also have it overhanging the RAM. Optimal orientation will depend on the height of your RAM, the size of the case, and clearance on either side of the socket.
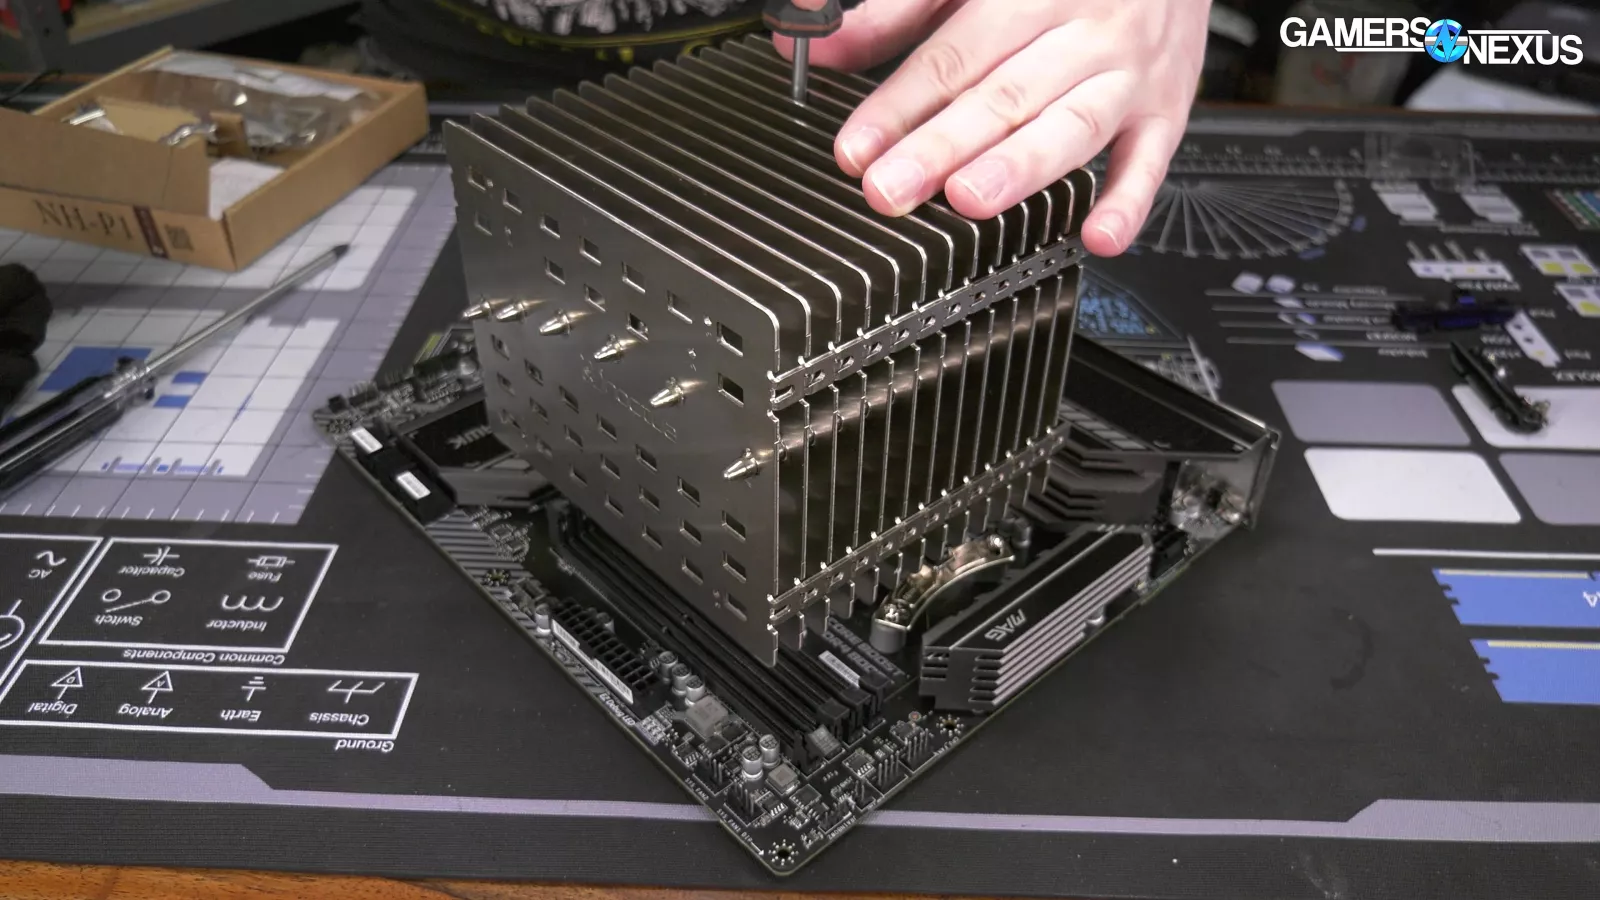
From here, the same Torx driver is used to thread two spring-tensioned screws onto standoffs from the mounting bracket.
This is all fairly straight-forward and the included manual does excellently to explain the steps. Noctua doesn’t skip any steps and provides both visual and written instruction. Mike, our test technician working on this one, said that the manual “gives everything an OCD user would want, or close to it.” This goes down to the diameter of thermal paste dots recommended by Noctua.
Noctua NH-P1 Intel Installation
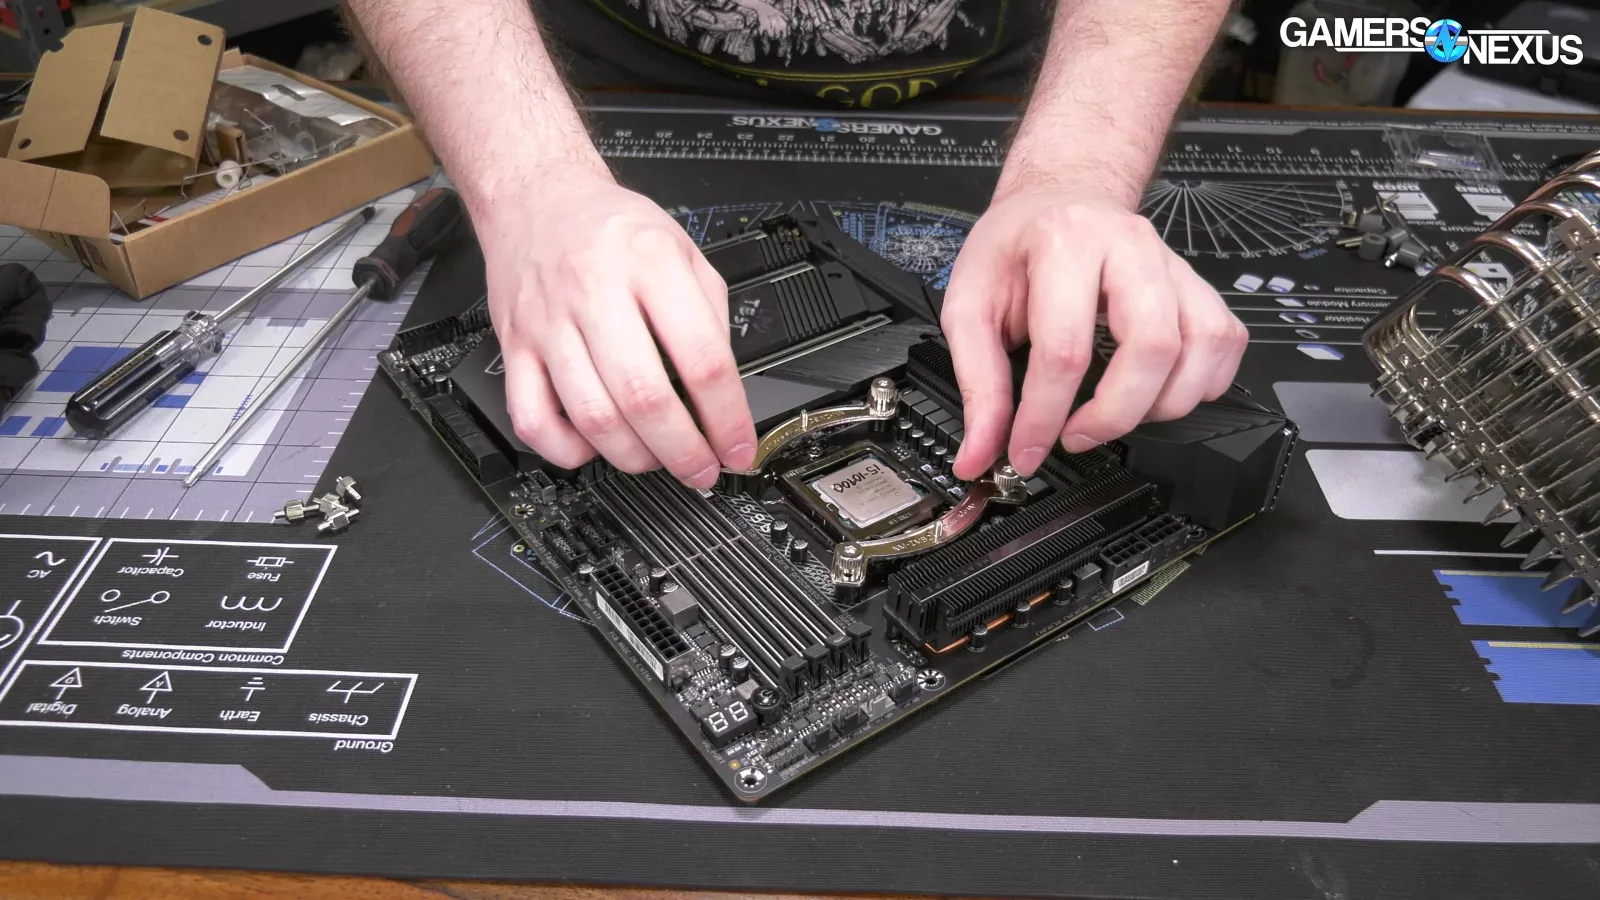
For Intel LGA115X and LGA1200, an included metal backplate and standoffs get installed first, followed by four black standoffs. Two brackets get installed next, bowed outward from the socket, at which point the cooler sockets on and has its spring-tensioned screws tightened onto the standoff on the bracket. It’s mostly the same process as AMD, just with different hardware.
Noctua NH-P1 Compatibility Challenges
This cooler will naturally pose challenges with compatibility. Video card placement and size, especially those with large backplates, will affect the behavior of the passive cooler. Some may need to move down a slot, depending on how packed the motherboard is.
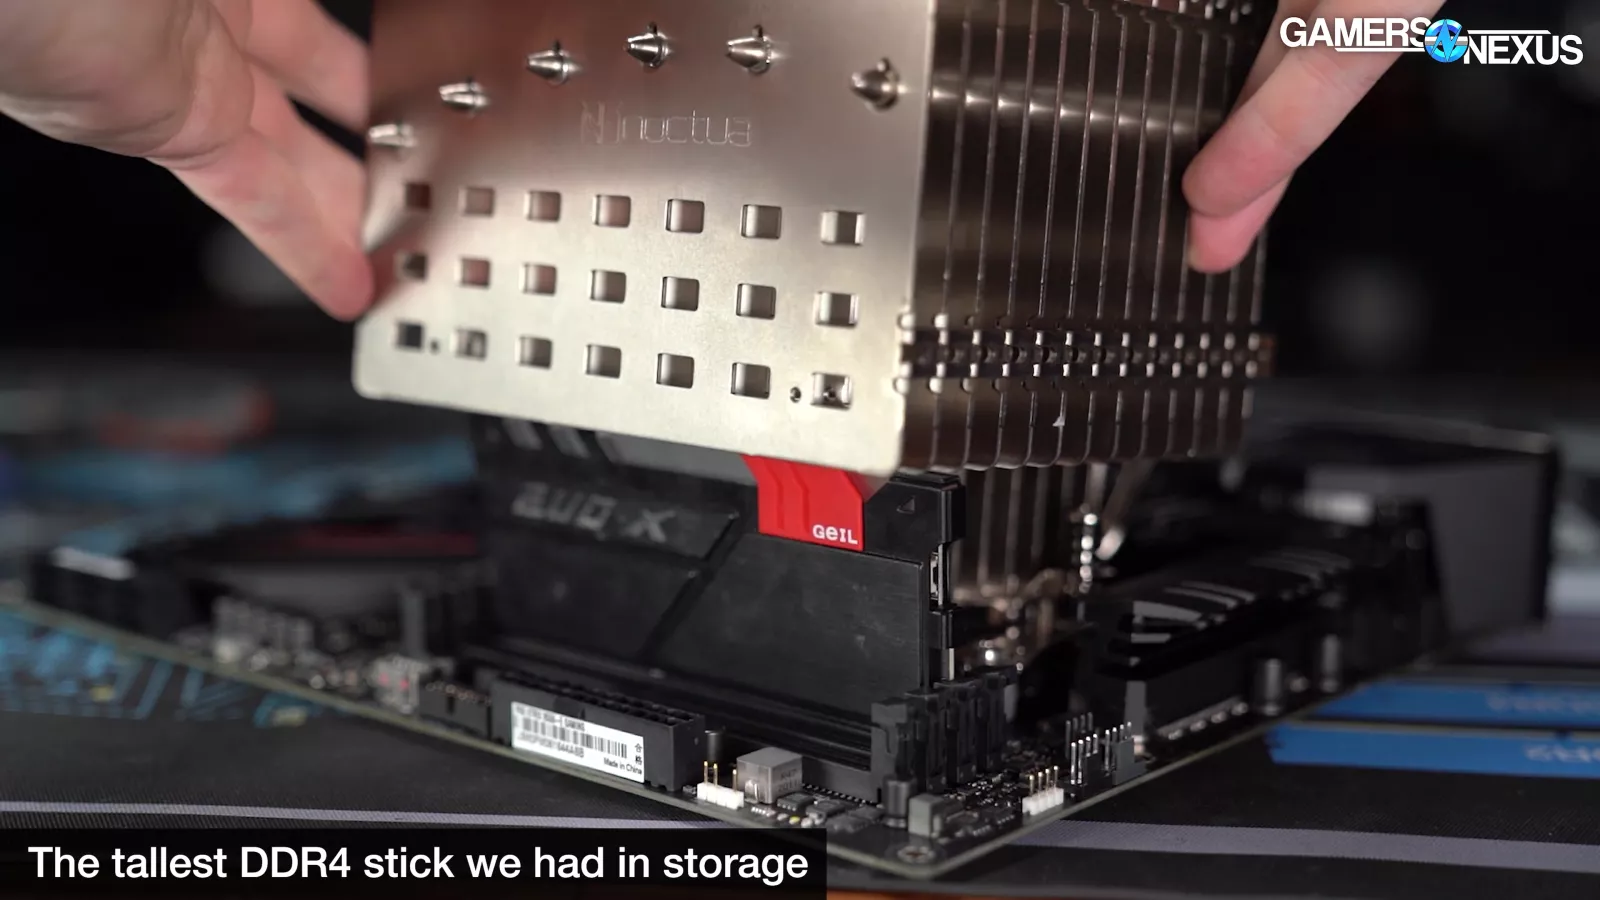
RAM clearance isn’t too big of an issue since the cooler can be mounted to overhang the VRM heatsink, and we haven’t seen any tall enough to be a problem with this cooler.
Case compatibility will probably be a problem: Installed height is about 158mm, and most cases stop at 150mm depth. Noctua has provided a list of compatible cases to try and help with this, notably naming the Cooler Master SL600M that we’ve reviewed, the Corsair 680X that we found subpar, the Jonsbo U5 and UMX4, Lian Li’s O11 Dynamic XL, Thermaltake’s Core series, and Fractal’s Meshify 2 series, among others. We use the Thermaltake Core P3 for our acoustic lab test platform, which itself uses an NH-P1.
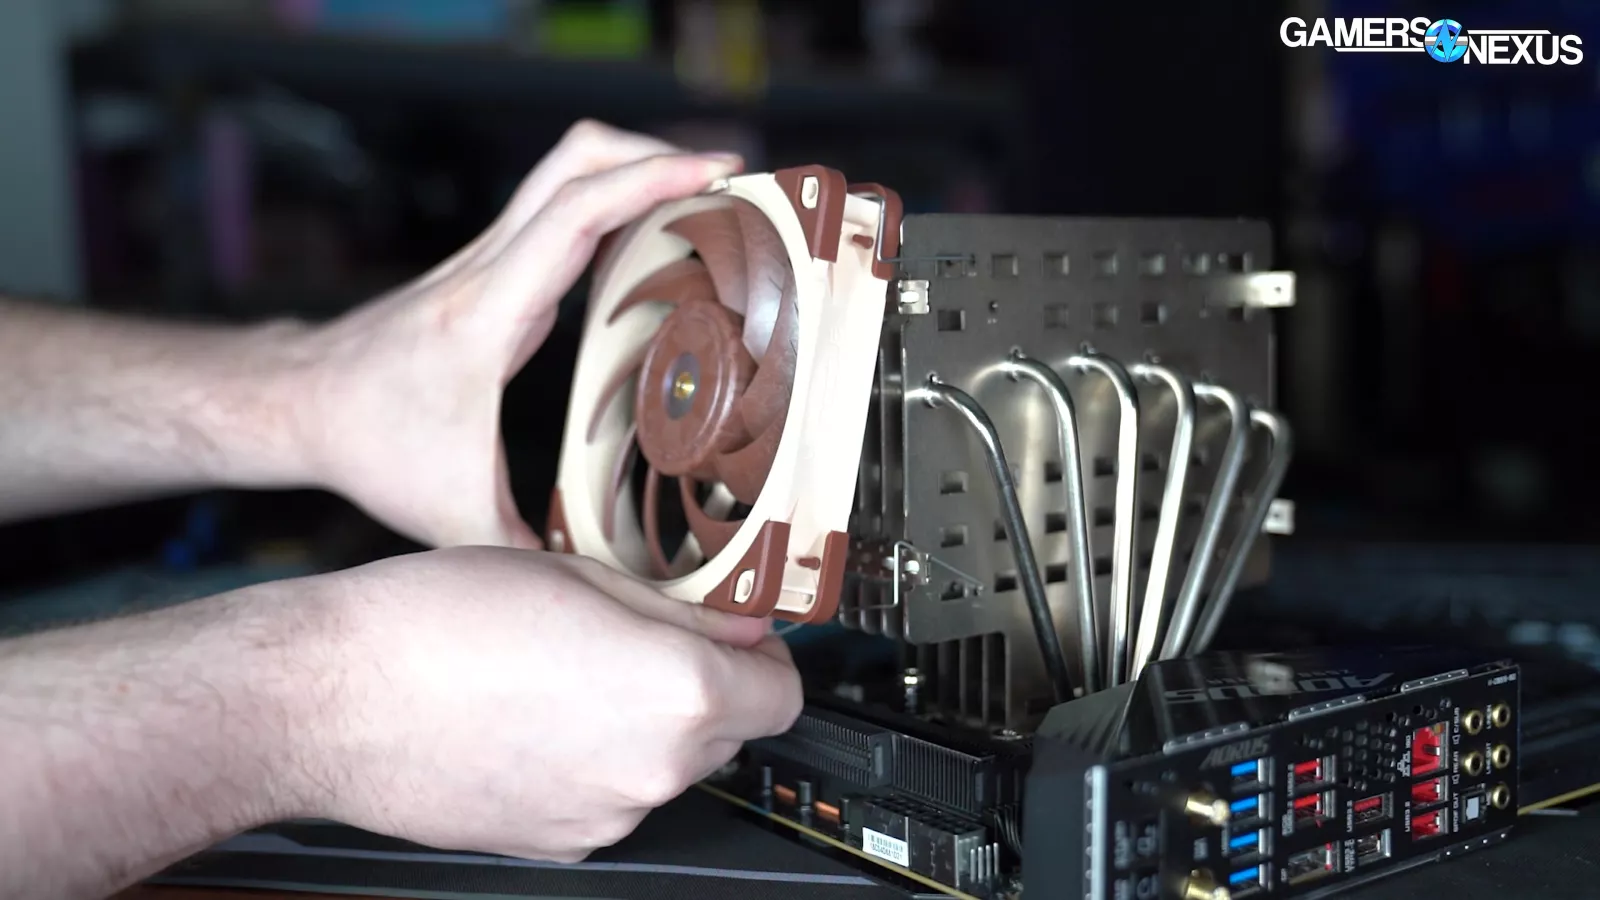
If you are planning to mount a fan to the cooler, though, it’ll need to go on the side. Mounting it in a downdraft or updraft configuration will increase the stack height, but also obstruct the fan with a panel anyway. An open air configuration would be a good solution for the P1 as well, especially since dust is less of a concern when fans aren’t really present.
Noctua NH-P1 CPU Cooler Benchmarks & Tests
This section will cover these tests:
- Thermal benchmarks of the NH-P1 vs. active coolers
- 200W CPU load
- 123W CPU load
- 68W CPU load
- Pressure distribution map from mounting hardware
- Flatness analysis for point-to-point cratering
Of course, no acoustics this time.
GN CPU Cooler Test Bench (2020-2023)
| Part | Component | Provided By |
| CPU | AMD Ryzen 5 3600 - Used for lower ~68W heat loads for small coolers. AMD Ryzen 7 3800X (2 chiplets active) - Used in all cooler benchmarks. AMD Ryzen 9 3950X (3 chiplets active) - Used for higher heat loads to show scaling on big coolers. | AMD |
| Motherboard | MSI X570 MEG ACE | GN Purchase |
| RAM | GSkill Trident Z Royal DDR4-3600 CL16 | GSkill |
| GPU | EVGA NVIDIA GeForce GT 1030 SC (passive cooler, second slot down) | GN Purchase |
| PSU | EVGA 1600W P2 | EVGA |
| OS | Windows 10 | GN Purchase |
Noctua NH-P1 Pressure Map & Analysis
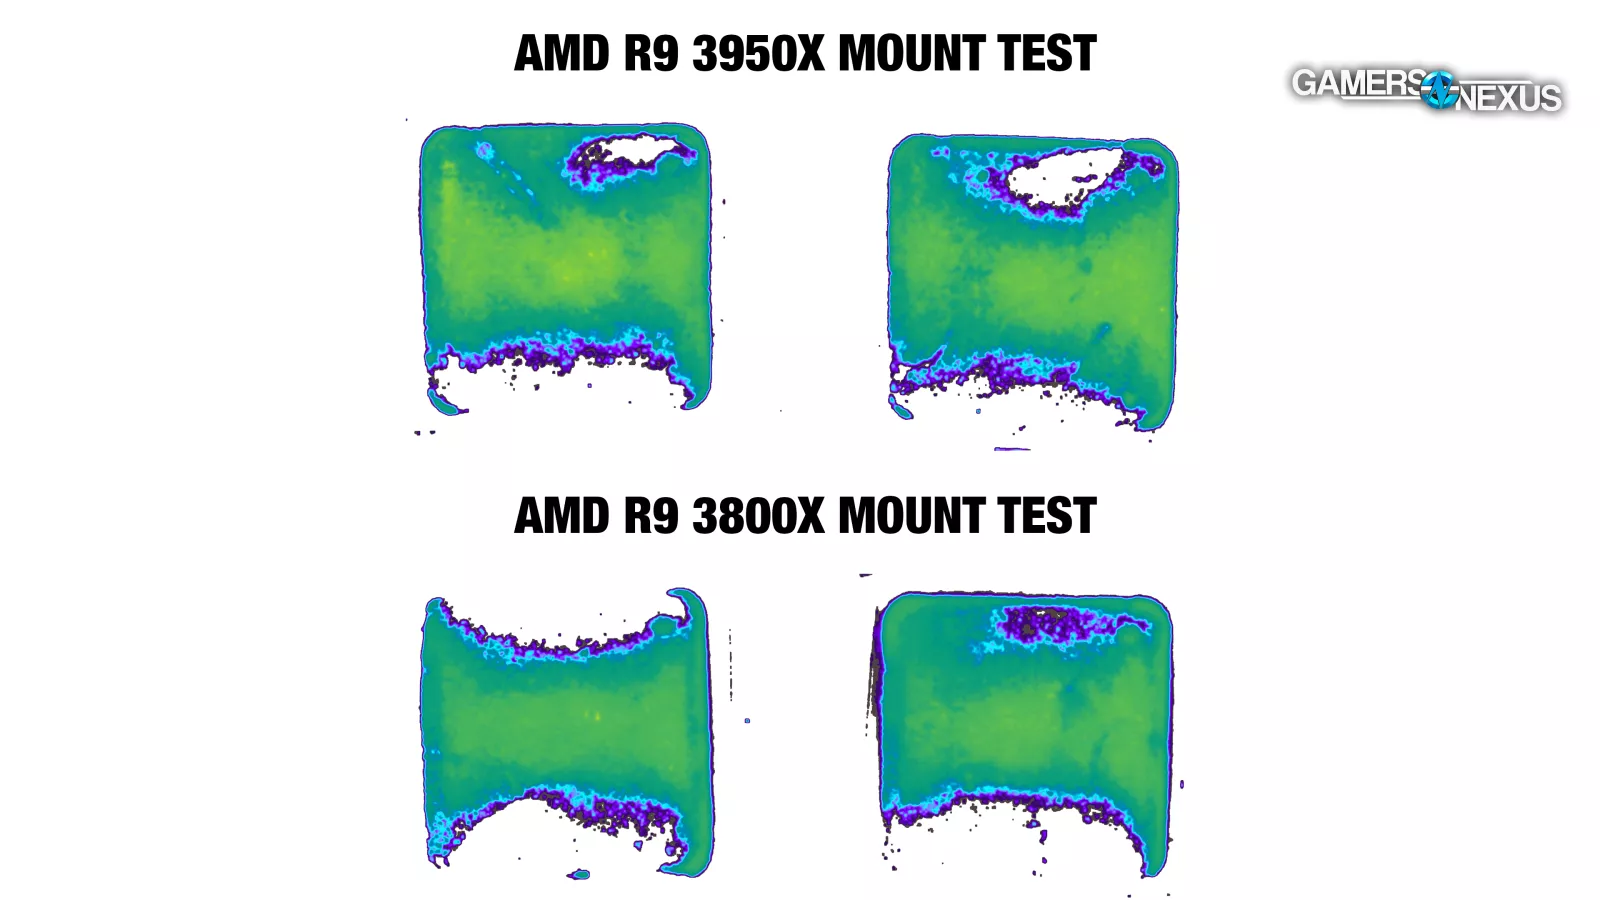
This pressure map illustrates how the mounting pressure gets applied to the surface of two different integrated heat spreaders from our AMD CPU pile. Pseudocolor pressure maps are mostly useful for evaluating the distribution of contact pressure from the mounting hardware. This isn’t the flatness of the cold plate, but rather the efficacy of the mount. The flatness is next.
Remember, thermals aren’t taken during pressure mounting. It’s done with the system off, so the CPU itself is irrelevant to the test. Mounted to our 3950X IHS, we noticed overall excellent contact except for a few problem areas. Notably, the edge closest to the RAM was lacking in pressure, as was its opposite side, where a small hole in pressure formed.
The 3800X through two mounts had less consistent results than we normally see, but was consistent in its gaps at the edge toward the RAM.
Noctua NH-P1 Surface Flatness
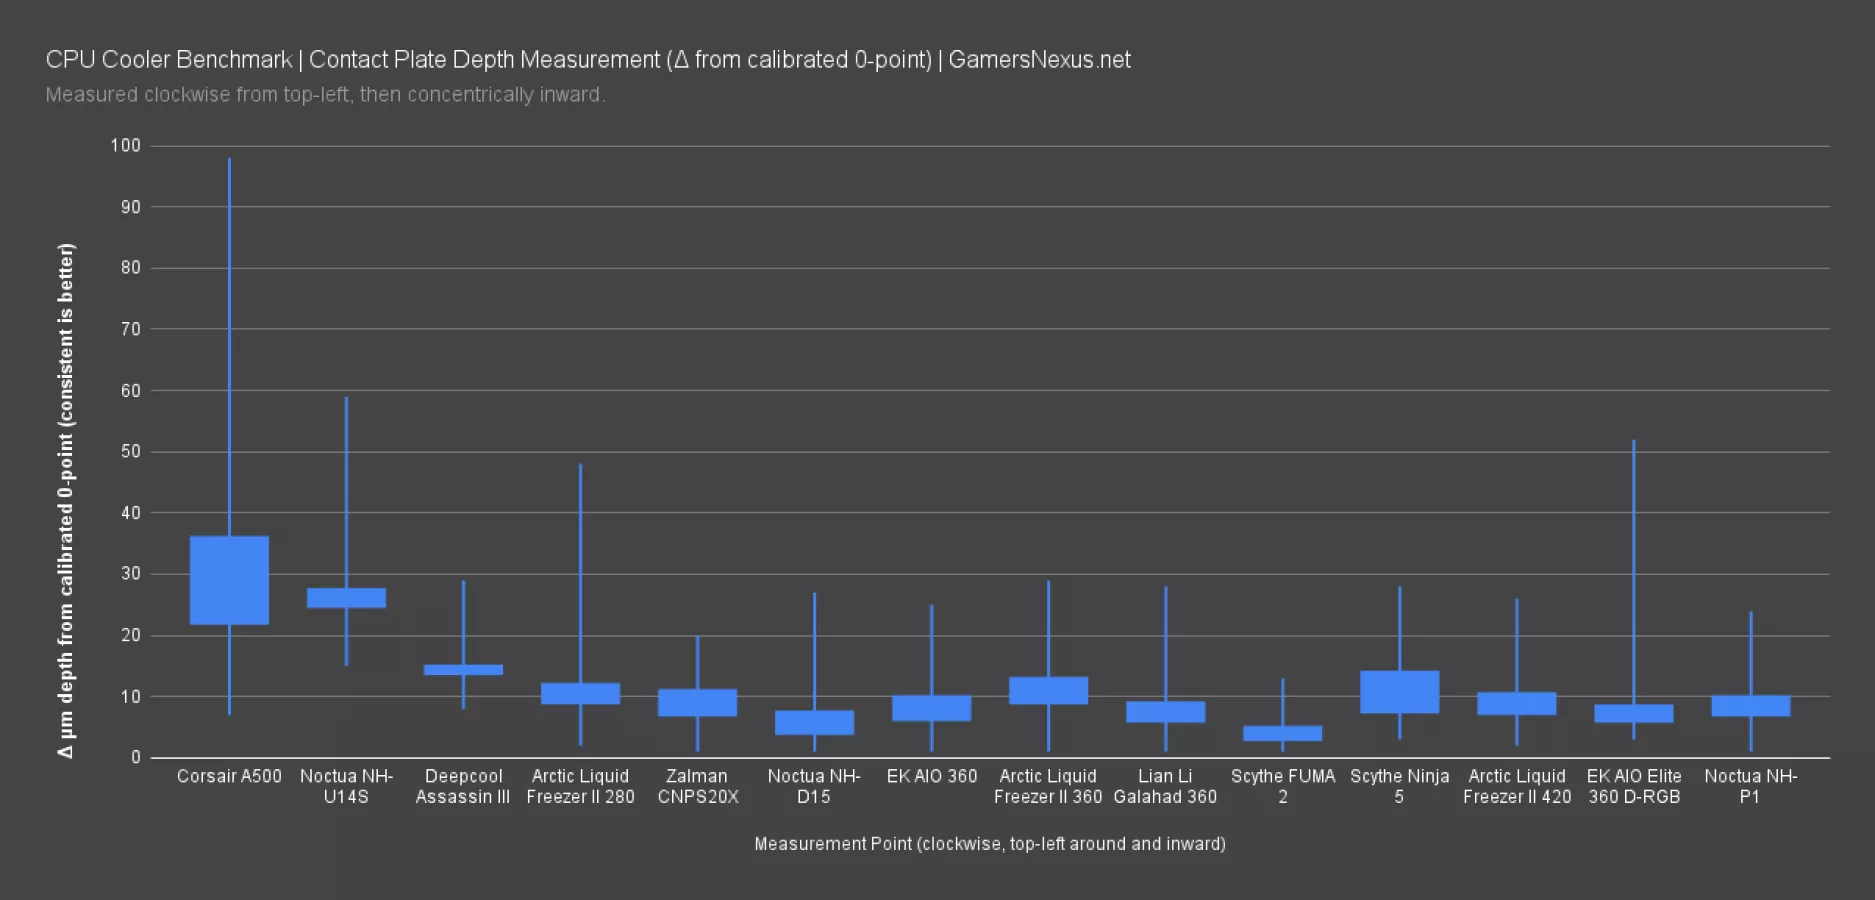
Our surface flatness testing uses a depth needle to analyze distance from a known 0-point in microns. This one has the Noctua NH-P1 cold plate as overall flat, within the average of most other coolers. It’s not magic, but it’s doing well. The median had us at about 10 microns, with excursions to 24 and 1. Noctua sticks with the rest of the pack for this one, and that’s not a bad thing.
Noctua NH-P1 Heat Load Tests

Noctua NH-P1 200W Heat Load
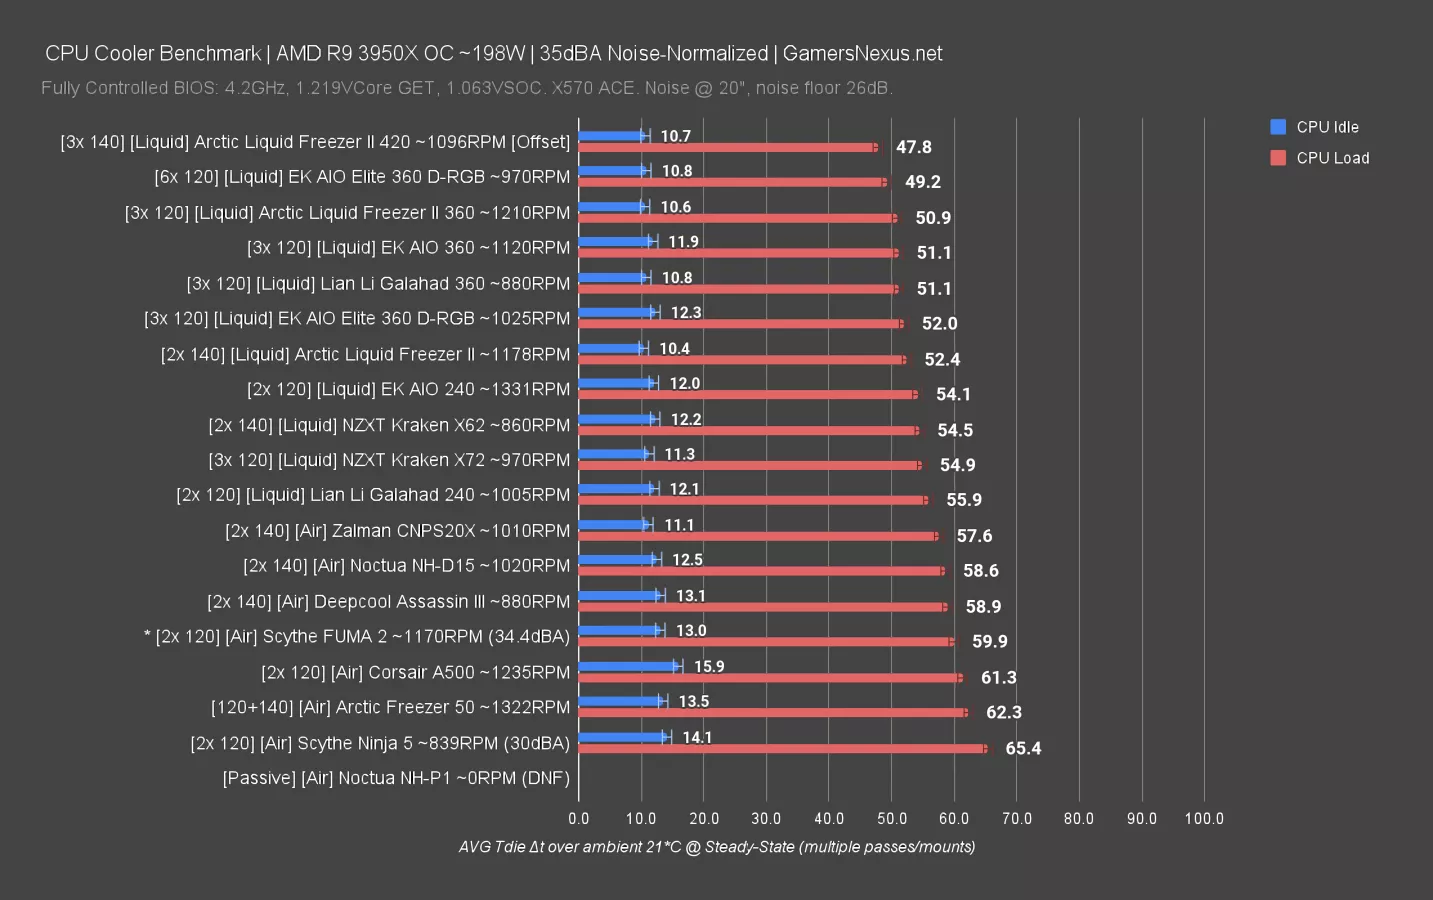
We’re first going to show a chart of our 200W heat load tests just so you have a good understanding of how the coolers line-up. We’re doing this because we have the most data for this heat load, so it gives the most perspective. Noctua doesn’t advertise the P1 as being capable of cooling this much power, and in fact, markets against the use, so this is expected. The cooler, like we said, isn’t magic -- but it is good engineering once applied to the right use case. The P1 gets a “DNF” for our 3950X test -- it didn’t finish and hit TjMax within seconds of a load starting. This isn’t meant to be seen as a negative, just a reality of passive cooling. This chart is normalized to 35dBA, with the P1 at noise floor.
If you wanted a very quiet cooler that is capable of cooling 200W, then the Scythe FUMA 2 (which we reviewed here), Arctic Liquid Freezer II 280, or even Noctua’s own NH-D15 would make sense. The FUMA2 and Liquid Freezer II are among the most efficient at their price brackets and performance levels.
Noctua NH-P1 120W Heat Load
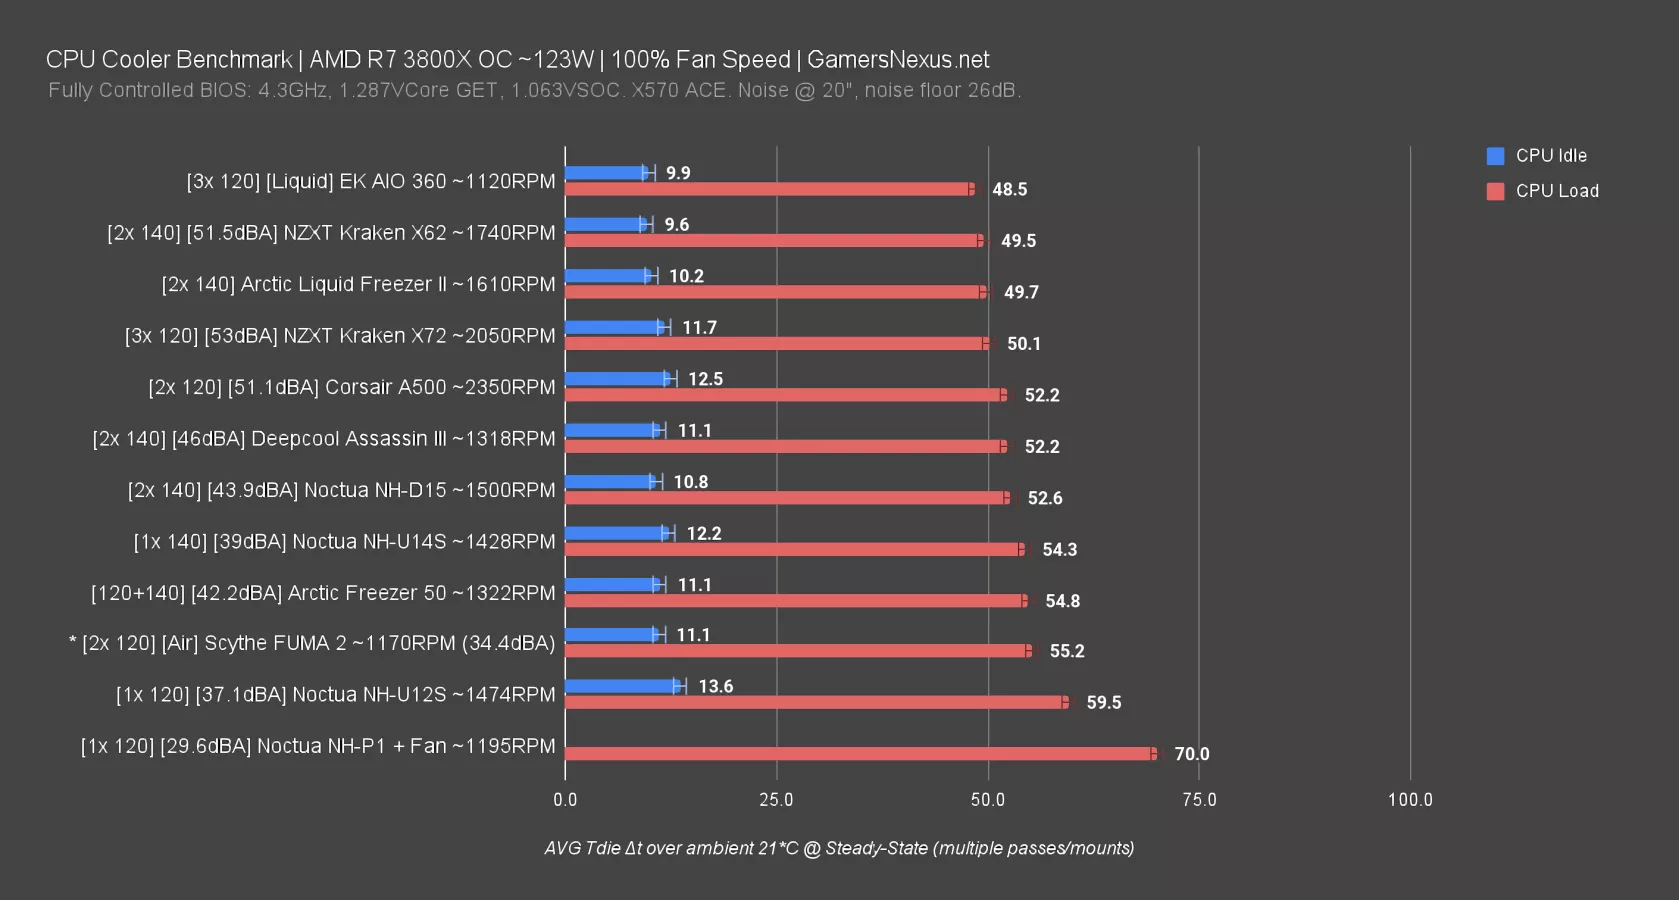
With expectations set, we stopped that test nearly immediately to preserve our test platform, then moved to a 123W heat load with our 3800X and fixed frequency and voltage settings for test consistency.
As a reminder, the 120W heat load isn’t high enough to differentiate several of these coolers, so everything starts to look about the same when we measure the top performers.
This one is also too much for the passive cooler, but we’ll show the chart for perspective as before. The Noctua NH-U12S at 35dBA held 61 degrees Celsius over ambient, meaning it’s in the 80s for Tdie. That’s near the cut-off for what’ll run, although there’s some room for slightly worse coolers below it.
With the A-series fan strapped to the NH-P1 and at 100%, the cooler still couldn’t handle the 3800X heat load with our settings. We were running at about 90C before we abandoned the test, or 70 degrees over ambient, which is high enough that we shut it down before hitting full steady state. It’s quiet, thanks to the fan, but the NF-A12 fan isn’t powerful enough for this use case.
Noctua NH-P1 R5 3600 68W Heat Load
Finally, we get to the R5 3600. Noctua technically marked this CPU as unsupported in its list, but our benchmarking has a custom Vcore set that’s lower than most auto settings. The CPU remains stable at 4100MHz locked and follows our CPU testing methodology that we published previously -- just with a 68W heat load and 3600 instead. The CPU ends up working with the P1 when using our settings. This is new to our bench suite, so it’ll enable us to test lower-end hardware going forward. Of course, this also means that it’s the most barren of all the charts, since we only just added it.
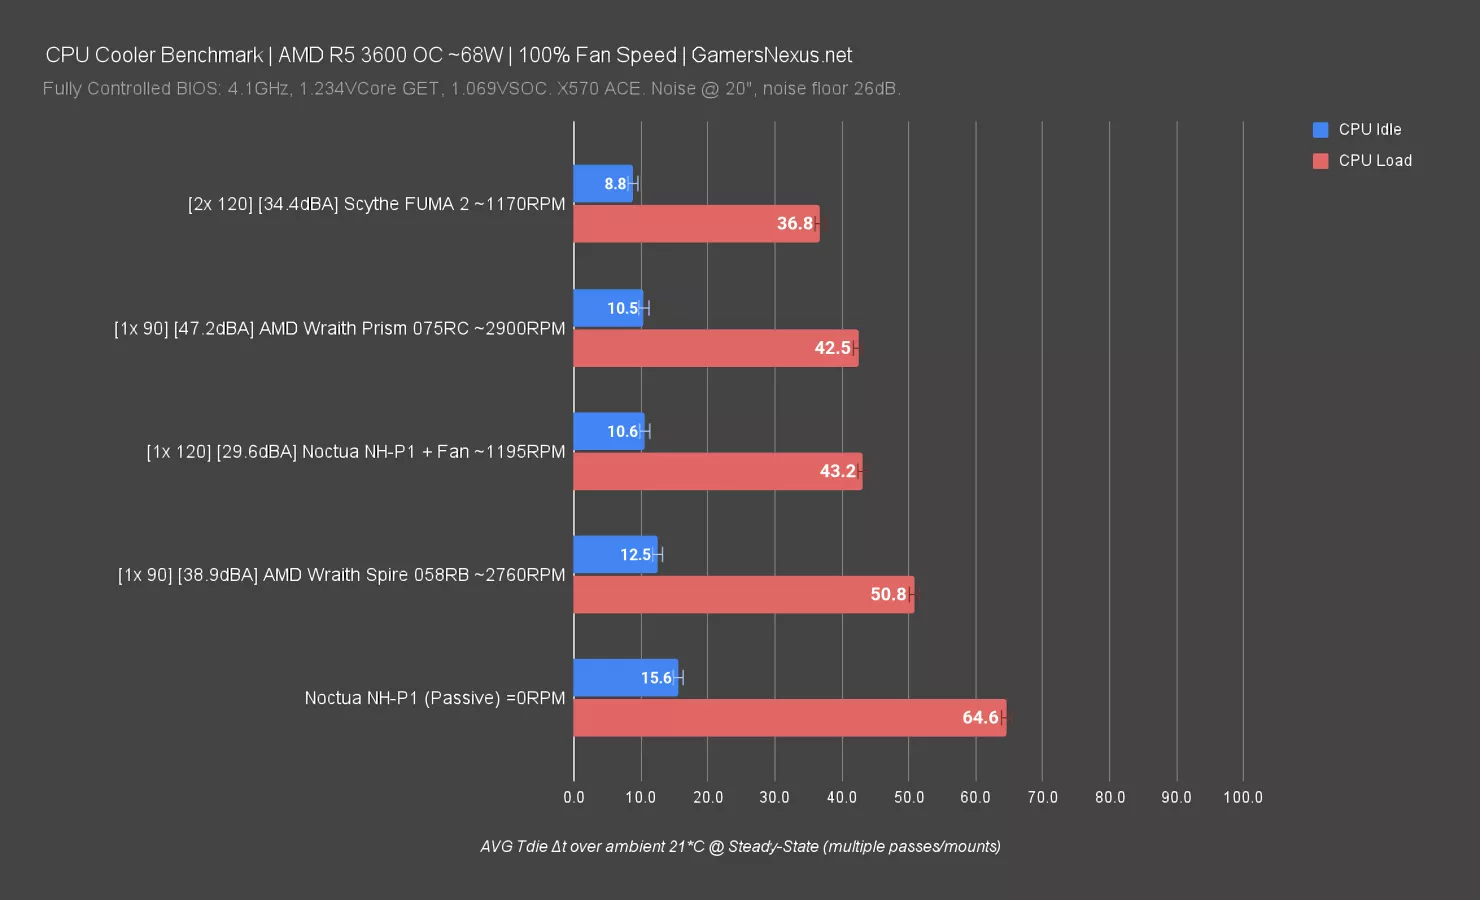
Here’s the chart at 100% fan speeds. The Noctua NH-P1 is finally in a workload it can handle. We measured it at 64.6 degrees over ambient steady state, or about 84-86 factoring-in our ambient. We have a couple degrees of room, but not much. It’s barely doable at this power load and voltage. Overall, it’s working.
The cooler produces no noise, so we’re at a noise floor of about 26dB. The Scythe FUMA2, at about $60, is a great example of a cheaper, thermally superior aftermarket cooler, but this is with its noise level at 34.4dBA at 20” distance. That’s quiet enough that most people won’t notice it, especially over other ambient noise like AC, but it’s still significantly louder than no noise at all. The FUMA2 runs at 37 degrees over ambient to the P1’s 65, nearly 30 degrees cooler.
The Wraith Prism ran at a comparatively deafening 47dBA, thanks to the 90mm fan at high RPM, but did benefit from a 43-degree result. The FUMA is significantly more efficient, as is the Noctua P1 with an NF-A12 mounted to it, at 30dBA for the same temperature. The Wraith Spire ran at about 39dBA with this setup, measuring 51 degrees.
The P1 can do it, and with a fan mounted at a low RPM, it remains quiet but drops a staggering 21 degrees off our test results. Still, if you’re going active, a true, targeted active cooler will be the most efficient. The FUMA2 could have its RPM reduced to meet the P1’s A12 noise level and would still be cheaper.
Noctua NH-P1 Time-to-Max
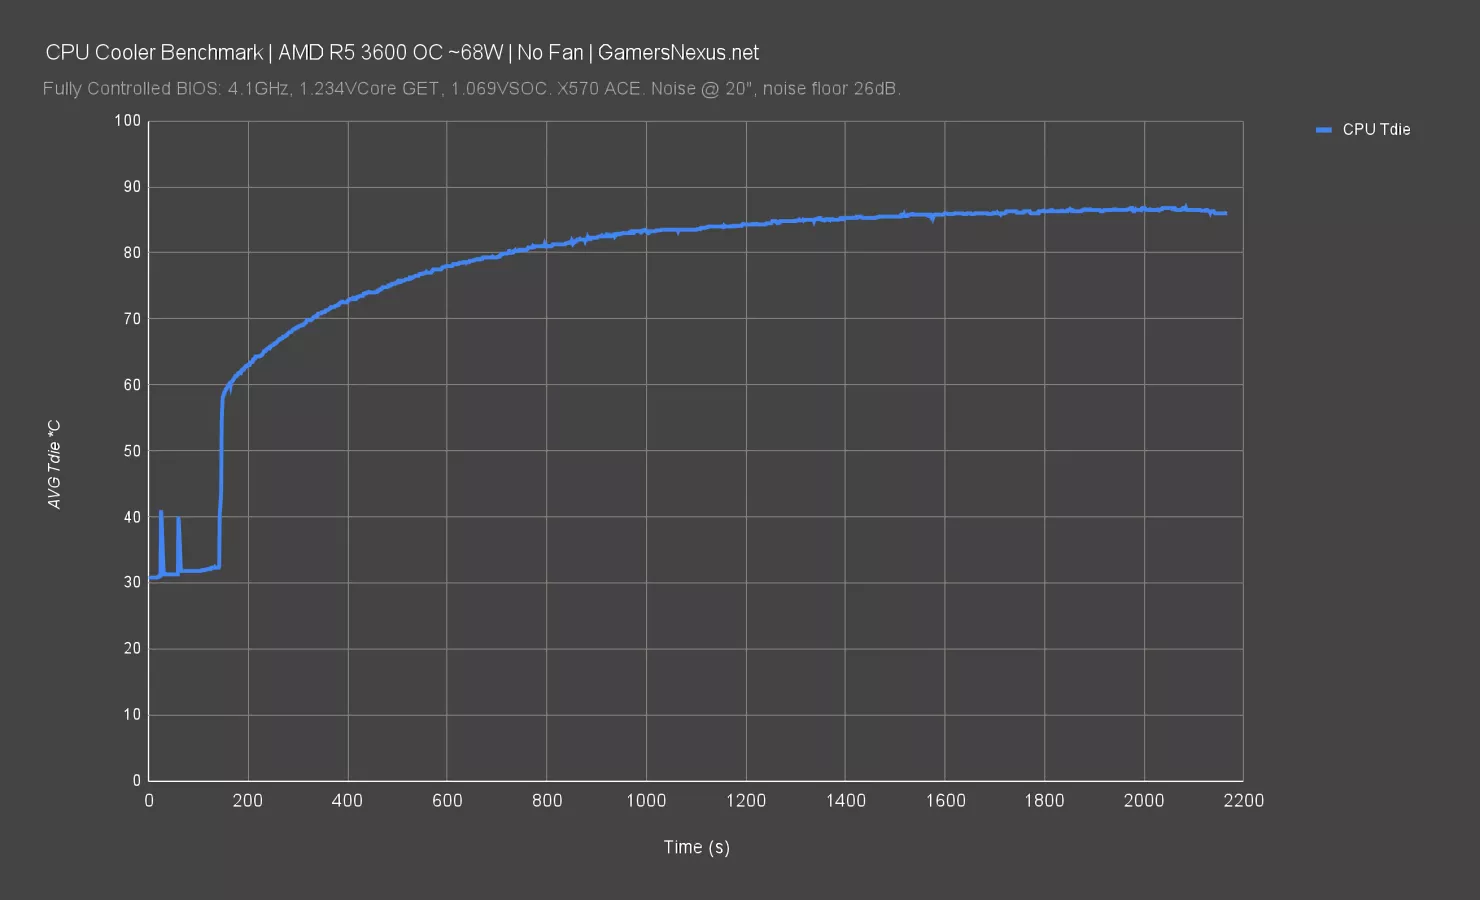
This chart will show the time-to-max temperature at steady state under the R5 3600 heat load. This is plotted at Tdie, not delta T over ambient, so you’re looking at CPU temperature for one pass. We had to adjust our measurement time for the P1, because it took about 25 minutes to be within 1 degree of the final steady state measurement. The initial ramp to 58 degrees happened within 10 seconds, for perspective, so there’s not much soak capacity for short bursts.
Noctua NH-P1 VRM Thermals
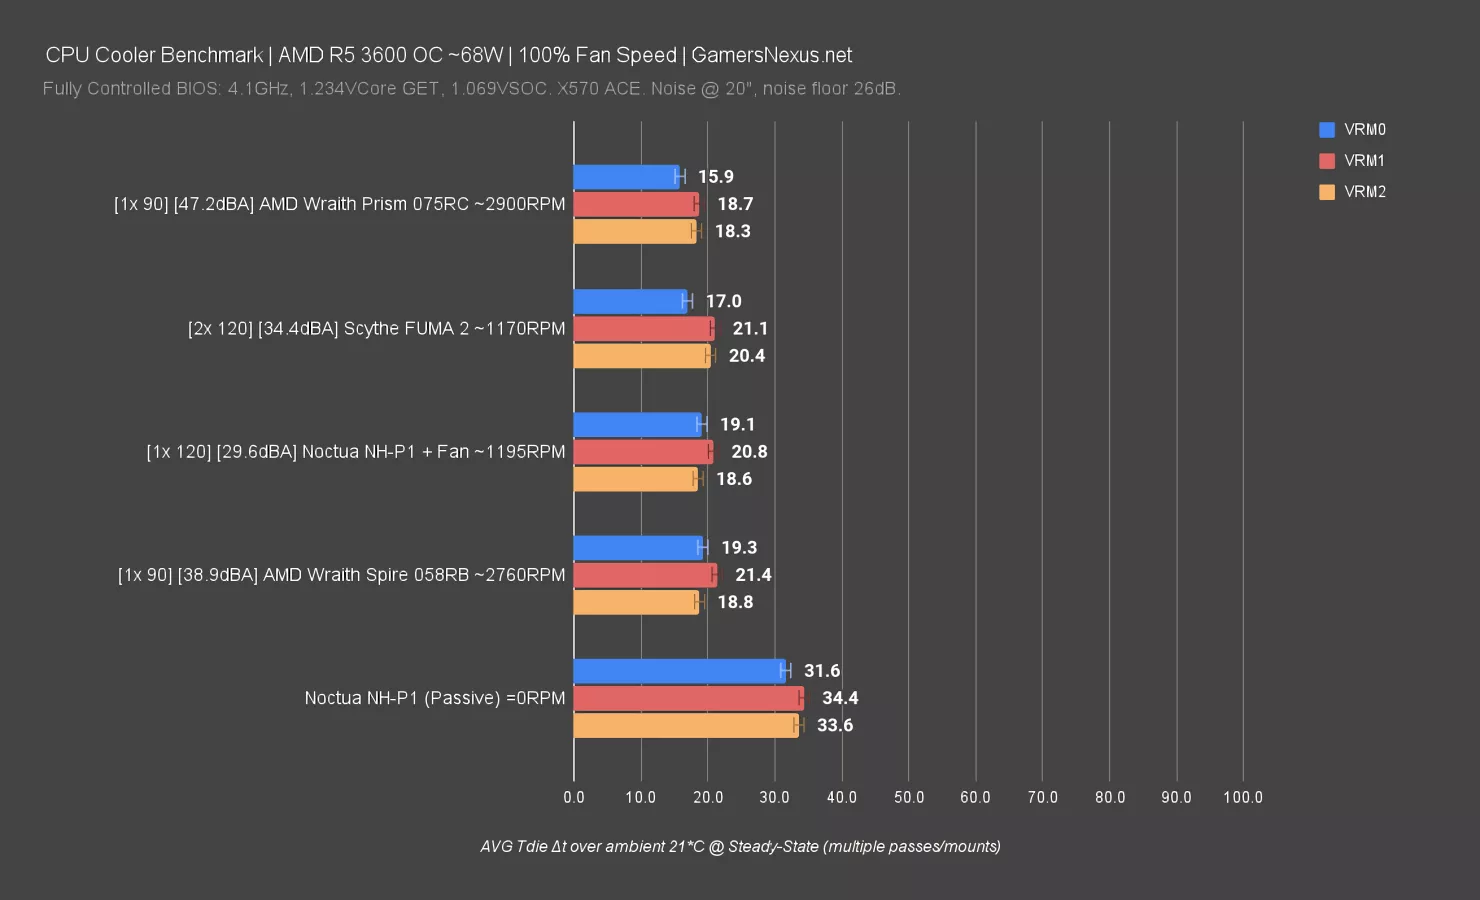
Finally, some VRM thermals. With the more doable heat load of just 68W on the R5 3600, VRM thermals are basically a complete non-issue on most motherboards -- even the lower-end ones. It’s still interesting, though: The Noctua P1 has a clear deficit here, made obvious by the fact that there’s no fan to blow air over the VRM heatsinks. The downdraft Prism does well, although it’s acoustically inefficient compared to the FUMA2 or P1 with a fan. Fortunately, because the P1 can’t really handle overclocking and high-power scenarios to begin with, the VRM cooling deficiency is unimportant.
Noctua NH-P1 Conclusion

Installing the Noctua NH-P1 was straightforward and the engineering on it is pretty good overall. It is very expensive at $110, though. If you’re okay with some noise and aren’t aiming to be dust-free, then don’t buy this cooler because it’s probably not meant for you. You will get much better performance and value out of something like the Liquid Freezer 2. If you prefer an active air cooler, there’s also Noctua’s NH-D15 or DeepCool’s Assassin III.
The P1 is excellently constructed and is a good performer for its use cases, which will largely be media-related (voice over studios, recording studios, acoustics rooms, anechoic chamber exteriors, medical facilities like operating rooms, etc).
For performance, what the NH-P1 can handle is something in the class of an R5 5600X. We were able to get it running on a Ryzen 5 3600. We did tune the voltage on that, though. If you have a motherboard that runs high Vcore auto, then you’ll be borderline. Certain cases can also pose challenges as you’ll need space above the cooler to be unobstructed so heat doesn’t build up. Fortunately, Noctua has a supported CPU and case list on their website. We appreciate how it feature listings from competitors.
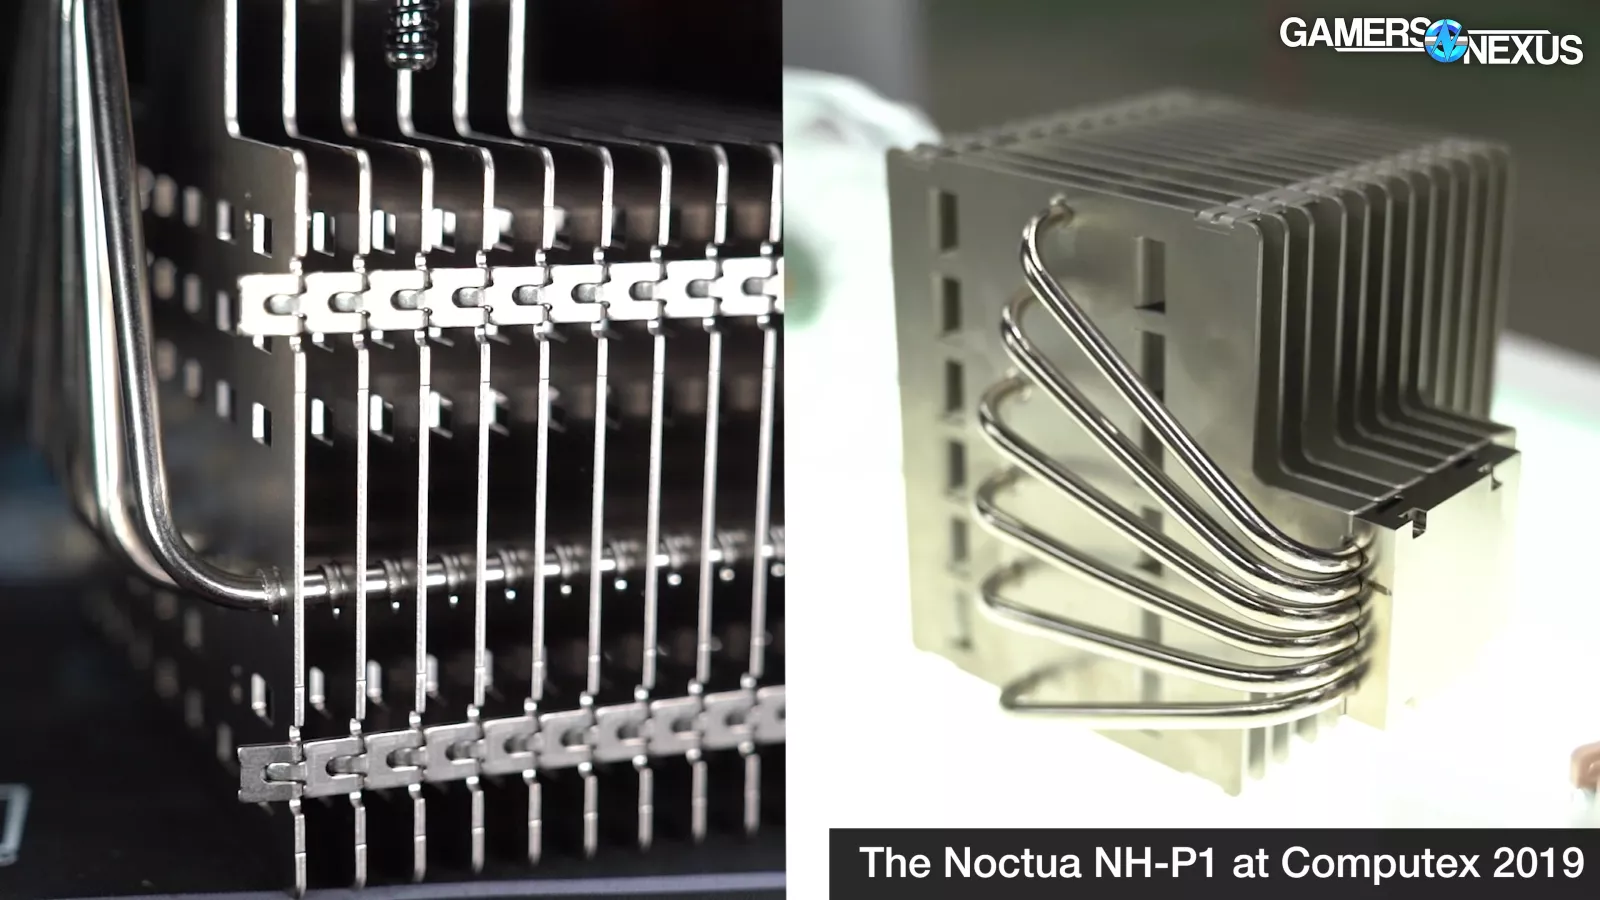
The Noctua NH-P1 has been a few years in the making and has gone through several revisions. We noticed that there are more square holes through the fin stack than what we saw in their 2019 prototype and some of the L-shaped bends within the internals of the cooler are gone as well.
Performance overall is good for a passive cooler but, again, it’s obviously not going to be able to compete against active air or water coolers. Still, it’s one of the best passive coolers we’ve seen so far. Even just its engineering, design, and build quality are among the best of any cooler we've tested. Ever.
