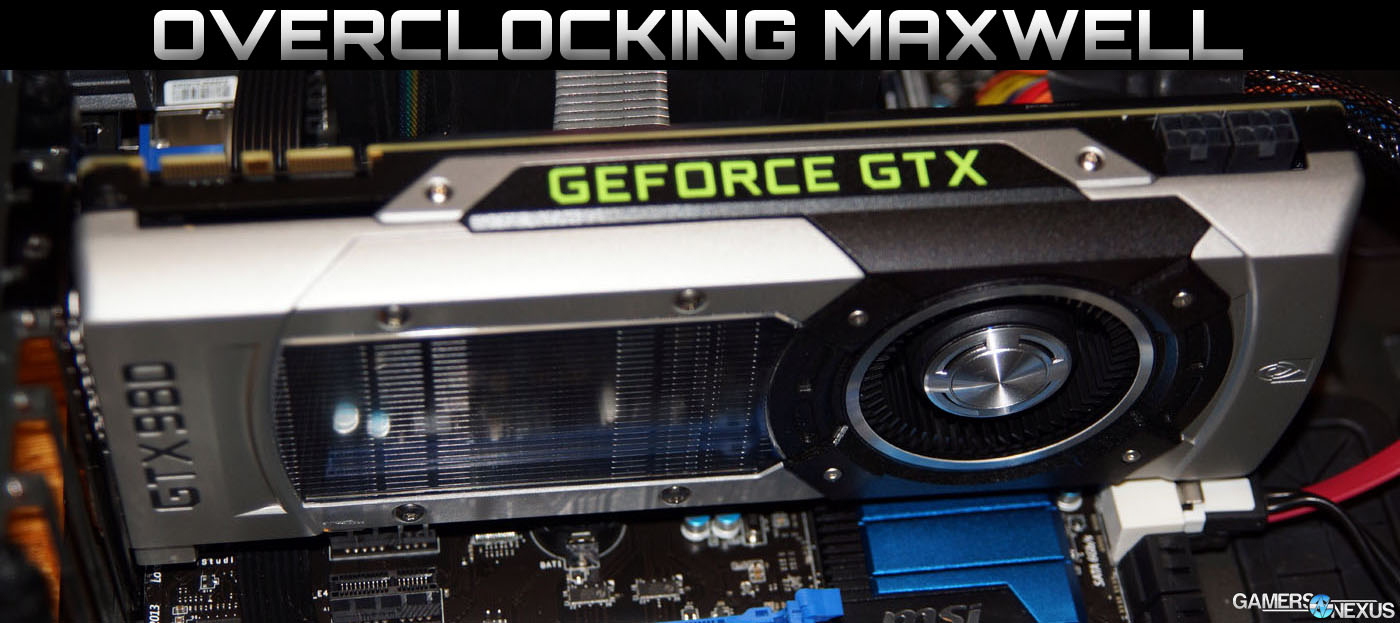
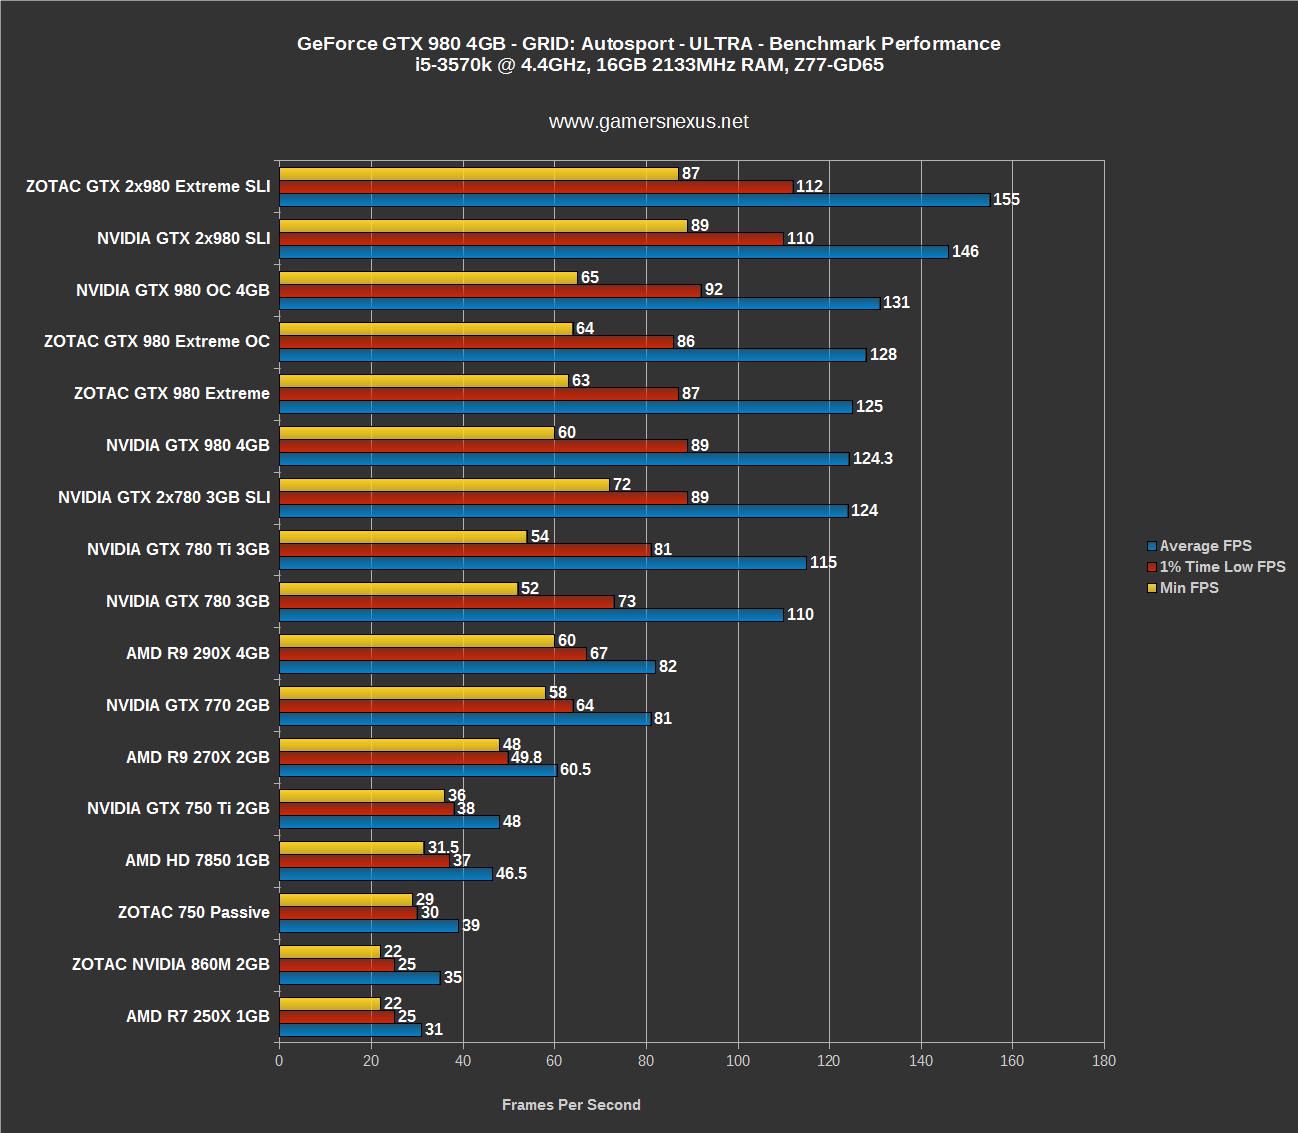
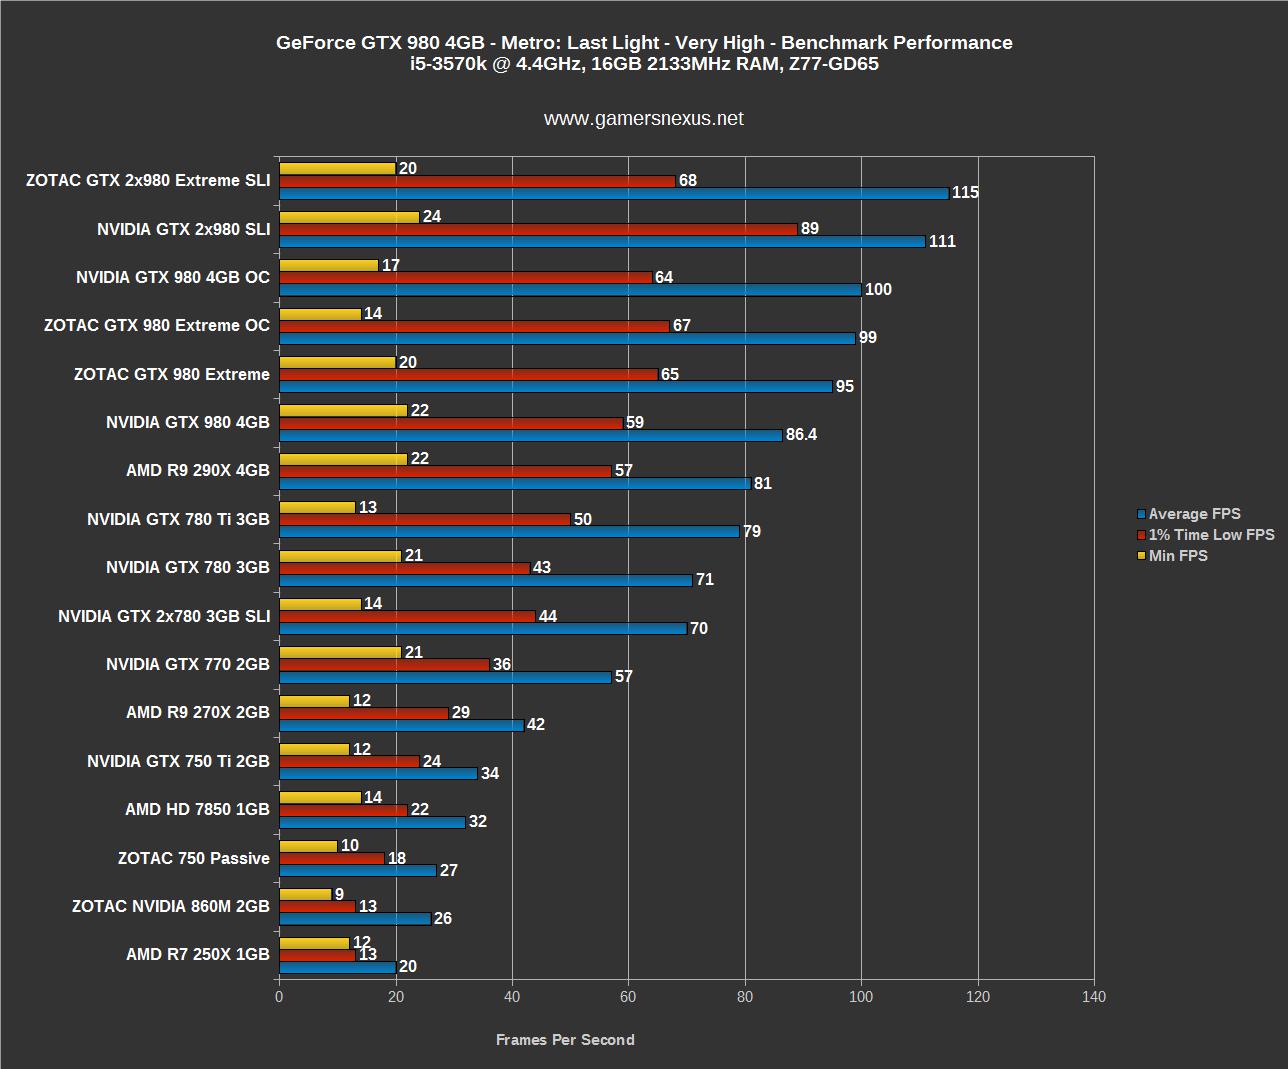
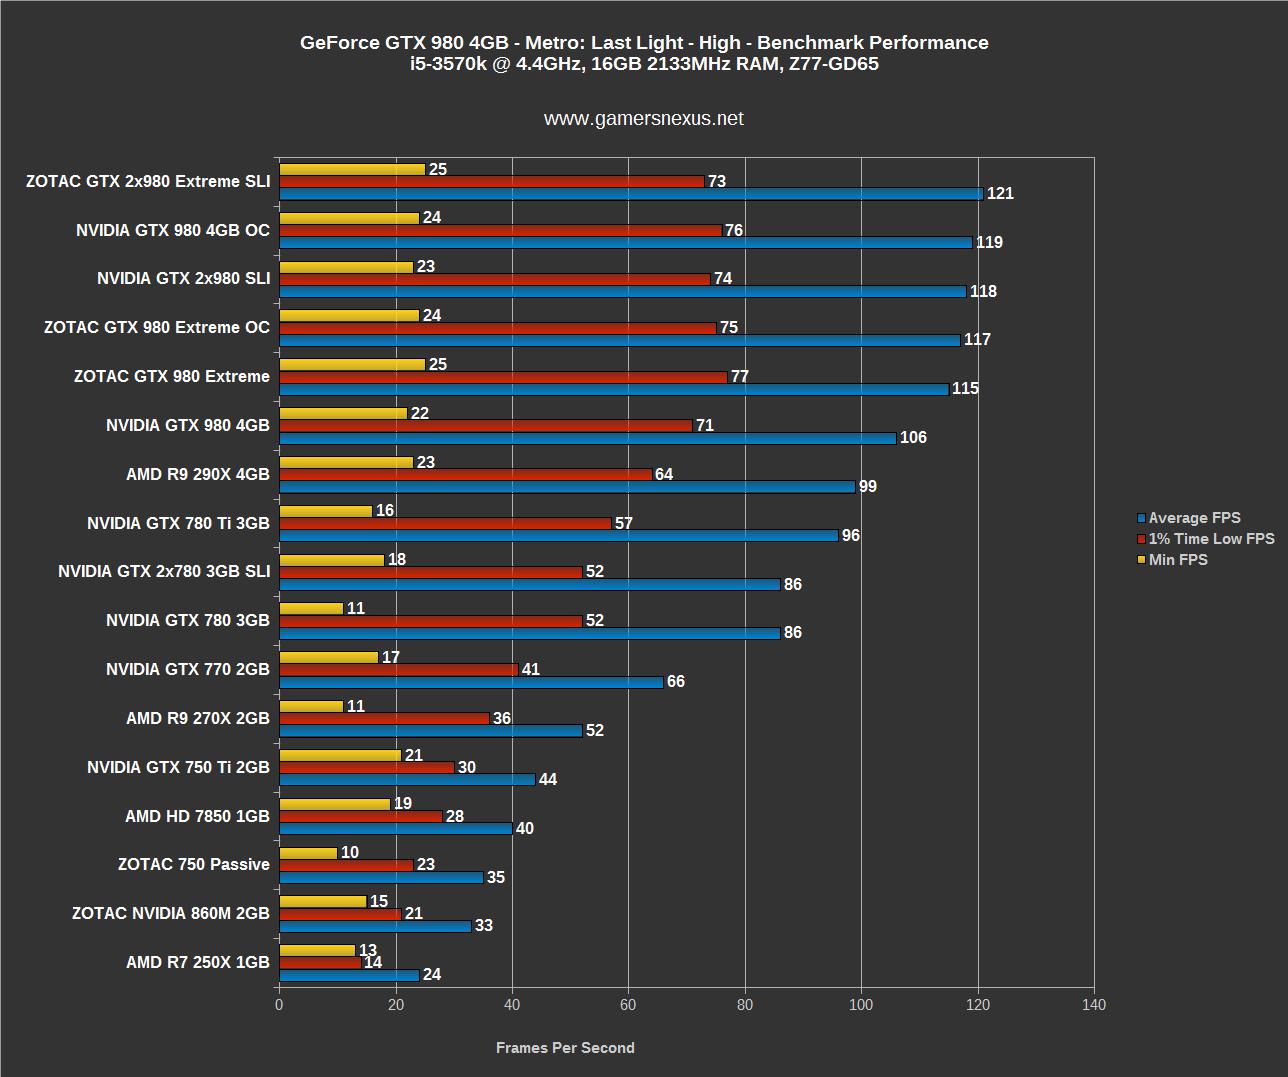
GPU overclocking changed with the release of Maxwell's updated architecture. The key aspects remain the same: Increase the clock-rate, play with voltage, increase the memory clock, and observe thermals; new advancements include power target percent and its tie to TDP. We recently showed the gains yielded from high overclocks on the GTX 980 in relation to Zotac's GTX 980 Extreme and the reference card and, in some instances, the OC produced better performance than stock SLI pairing.
This GTX 980 overclocking tutorial will walk through how to overclock nVidia's Maxwell architecture, explain power target %, voltage, memory clock, and more.
Tutorial: How to Overclock the GTX 980
NVIDIA GeForce GTX 980 & 970 Video Card Specs
| GTX 980 | GTX 970 | GTX 780 Ti | |
| GPU | GM204 | GM204 | GK-110 |
| Fab Process | 28nm | 28nm | 28nm |
| Texture Filter Rate (Bilinear) | 144.1GT/s | 109.2GT/s | 210GT/s |
| TjMax | 95C | 95C | 95C |
| Transistor Count | 5.2B | 5.2B | 7.1B |
| ROPs | 64 | 64 | 48 |
| TMUs | 128 | 104 | 240 |
| CUDA Cores | 2048 | 1664 | 2880 |
| BCLK | 1126MHz | 1050MHz | 875MHz |
| Boost CLK | 1216MHz | 1178MHz | 928MHz |
| Single Precision | 5TFLOPs | 4TFLOPs | 5TFLOPs |
| Mem Config | 4GB / 256-bit | 4GB / 256-bit | 3GB / 384-bit |
| Mem Bandwidth | 224GB/s | 224GB/s | 336GB/s |
| Mem Speed | 7Gbps (9Gbps effective - read below) | 7Gbps (9Gbps effective) | 7Gbps |
| Power | 2x6-pin | 2x6-pin | 1x6-pin 1x8-pin |
| TDP | 165W | 145W | 250W |
| Output | DL-DVI HDMI 2.0 3xDisplayPort 1.2 | DL-DVI HDMI 2.0 3xDisplayPort 1.2 | 1xDVI-D 1xDVI-I 1xDisplayPort 1xHDMI |
| MSRP | $550 | $330 | $600 |
Before getting started, these articles may interest you:
- The GTX 980 that we're using (technically, ours is branded by nVidia – they're the same, though).
- Zotac GTX 980 Extreme review + OC / SLI benchmarks.
- GTX 980 Reference review.
Overclocking Primer – The Concepts
We've previously written a CPU & GPU overclocking primer that explained the top-level basics of overclocking. I'll re-cover a few of those items before getting started.
All microprocessors operate on a timed “clock-rate.” This clock “ticks” with regular, predictable intervals – just like a wall clock would – and does so at a frequency. As you all know, CPU and GPU frequencies are measured in hertz, normally in the millions or billions of hertz. This unit of measurement can be translated as “oscillations per second” or “cycles per second,” so a 60Hz monitor would refresh 60 times per second; a 1500MHz core clock on a GPU would poll 1.5 billion times per second (1MHz = 1 million hertz). Now go look at a CPU with a 4.0GHz clock-rate – it's staggeringly impressive that such a small semiconductor can cycle four billion times per second.
Although there's a lot more at play that determines our performance – because frequency is certainly not everything – the core clock-rate is what we spend most of our time modifying when overclocking a GPU. “Overclocking” is specifically referring to the action of increasing the clock-rate over stock, a process that eventually requires “overvolting” to ensure stability.
There's a reason that the GPU doesn't just ship at its highest possible overclock, though.
Every GPU has a defined “stable baseline” that achieves the TDP, thermal, and stability targets established by the semiconductor manufacturer – that'd be nVidia or AMD, in the case of relevant gaming GPUs. Manufacturers may bin (sort) for higher-quality chips that will perform with greater stability at higher frequencies and voltages. There are still longevity and endurance concerns with high overclocks, so it's unlikely that manufacturers will pre-overclock GPUs into the numbers we can achieve manually.
What makes the GPU lose stability?
As frequency of the core clock continues to increase, the GPU will degrade in its stability. “Stability” has a sort of loose definition, depending on who's asked, but ours is very definitive: Any artifacts at all will be considered “unstable.”
A GPU with threatened stability due to overclocking will often exhibit soft failures initially, like blue flashes, texture tearing and artifacting, screen flickering, and driver crashes that are recovered. Push the clock still higher without compensating (with voltage) for stability and you'll start seeing hard crashes that require a cold boot or warm reboot.
Stability is threatened for a few key reasons: The clock can't handle the frequency applied at its current voltage, and thus fails to sustain a high clock-rate before power failure (or safety features kick-in); the temperatures exceed TjMax of the GPU (the maximum allowable safe temperature, as defined by nVidia or AMD); or watt draw is too high and has exceeded what the PCB and VRM are capable of supporting. Other reasons exist, of course, but there tend to be the most prevalent in basic overclocking.
Compensating for Stability with Voltage
A core concept of any overclocking is that of accompanying overvoltage. Every semiconductor receives some amount of voltage from its source of power (the power supply, in the case of PCs). The power goes through a Voltage Regulator Module (VRM), which we've explained in the past. This module is a collection of components, to include chokes, capacitors, MOSFETs, and a heatsink, and is responsible for “cleaning” the voltage supplied to the semiconductor.
VRMs are often measured on spec sheets as being a certain amount of phases – you might see 8+1 phase power design VRMs for motherboards. The number of phases can also (generally) be revealed by counting the number of exposed chokes on the PCB. When power is supplied to the board, it steps through each of these phases to temper the volatility of the power (“clean the voltage,” as we say); that power is then delivered to the GPU or CPU, hopefully in a stable enough state to sustain operation. A low-quality VRM will not sustain higher overclocks due to voltage increases that make it impossible for the cheaper VRM to keep up with demand.
Overclocking should always be done in steps. The general philosophy is to do some research first (if any exists yet) and determine a realistic expectation for your overclock. Do not commit this number to heart – every GPU is different, so it's possible that you've got a GM204 in your GTX 980 that binned out better (or worse) than what you're seeing online.
As a general rule, it's a bad idea to immediately apply the settings that someone online determined as stable for their GPU. Yours is different, and as such, this could be damaging or unstable to lift without incremental testing.
You'll want to step up the clock frequency first and without touching voltage, then find the point of instability. That's where we begin playing with other sliders. Let's look specifically at how Maxwell works.
Maxwell Overclocking Changes the Game
Maxwell introduced power percent increases over TDP. The GTX 980 has an advertised TDP of 165W, meaning it won't push more than that when at 100% stock TDP. Despite the advertisement, inspecting the card's BIOS with Kepler BIOS Inspector (and running wattage tests) reveals that the card actually draws closer to 180W when under max load. Not unexpected and not a big deal, but an important difference when making other calculations.
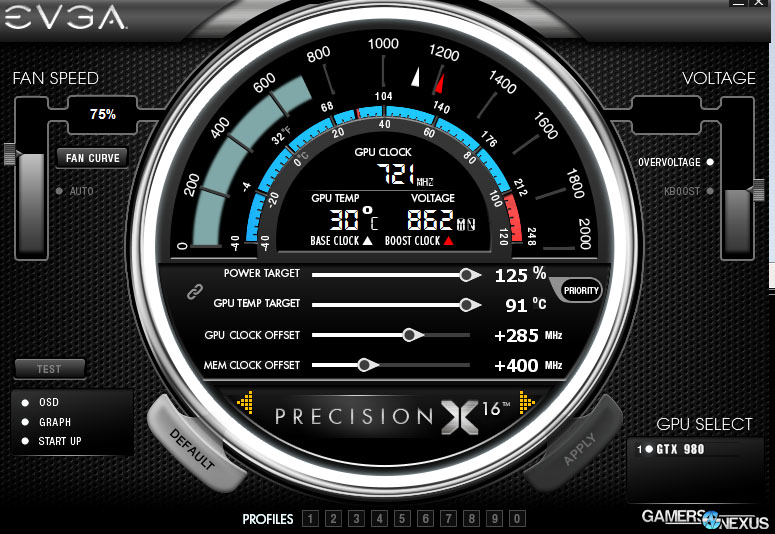
Even with a 180W TDP, the maximum power allowed by the GPU, VRM, and PCB is actually roughly 225W. It is possible to exceed this and stretch to upwards of 435W with the right hardmods and aftermarket design, like some of the manufacturers have done. The reference GTX 980 uses a 2x6-pin power setup and is capable of handling 225W of power, even though we read the TDP as 180W. We determine the 225W number in a pretty easy fashion: By opening an overclocking utility like EVGA Precision or MSI Afterburner, it is revealed that the power target percentage can be increased maximally to 125%. This means that the power supplied to the card from the PSU can be driven at 25% higher than stock. In other numbers, 180 * 1.25 = 225W. That's our maximum allowed power budget on the reference GTX 980.
We've heard of some reference cards, depending on BIOS iteration, that can only increase power to 110%.
All of this noted, Maxwell overclocking makes use of boost clock increases (overclocking), GPU vCore voltage increases (overvolting) for stability, and power target % as the core items to increase the clock. Memory clock can also be increased. Some software and hardware combinations will allow separate control of the memory voltage for fine-tuning, but this will only be found on extreme overclocking cards.
With Maxwell, overvolting becomes less important than previous and competing GPU architectures due to the power cap. There's only so much power (in Watts) to go around between the clocks and the voltage. We want to spend as much of this budget as possible on the clock-rate.
Warnings & Disclaimers
Overclocking carries a risk of killing the involved component(s). By overclocking irresponsibly or recklessly high, it is possible that your GPU will sustain permanent damage or become non-functional. Small overclocks are almost always entirely safe, but “going big” or attempts at extreme overclocking can damage or destroy components. Note that running a semiconductor at a high overclock for extended periods of time will also be detrimental to its longevity. You'll want to operate at a moderate overclock if anticipating long-term usage; if you're only using this GPU for a short period of time before upgrading, you'd be in OK shape to run it at a higher clock-rate.
We like to get the clocks as high as reasonably possible, benchmark it, and then drop down to something more moderate for extended use. Just to see how high we can get the numbers, really.
Continue to Page 2 for the tutorial for overclocking a GTX 980, including tools required for the job.
Tools for the Job
You'll need the following tools downloaded and installed for this process:
- EVGA Precision or MSI Afterburner (your choice). If you've got an aftermarket unit, consider using whatever tool they supply.
- GPU-z. You'll need this for logging, measurements, and validation.
- 3D Mark (the paid version is worth it if you're doing a lot of this, but the free version is fine for starters). FurMark doesn't always convoke the boost clock properly.
Let's Overclock the GTX 980
The procedure, once we establish a baseline, will resemble something like this:
- Modify clock-rate in Precision.
- Enable logging in GPU-Z.
- Launch 3D Mark and begin the test. Inspect FireStrike (the test) for flickers, shimmers, or crashing / driver crashes.
- If no crashes are observed, increase the clock some more.
- Once flickering or instability is observed, begin increasing power target % and vCore.
Before overclocking, benchmark your GTX 980 using 3D Mark's FireStrike and record the score and FPS results. You may want to do this a few times for parity, though the test tends to be fairly consistent. These results will be what you compare against once OCing is complete.
In overclocking incrementally, we'll increase the clock-rate as high as stability allows before touching voltage. It's important to find a baseline. Most superclocked and pre-overclocked cards start somewhere around 170MHz higher than the stock clock. You should be able to jump straight to something like +150MHz on the GTX 980 without even considering voltage changes or significant power % changes (maybe 5-10%, depending on your chip). Go ahead and do that for starters.
The changes will look like the above screenshot. Apply them.
Launch GPU-Z and check that the “Graphics Card” tab matches the specifications you'd expect for your product. Next, go to the “Sensors” tab and checkmark “Log to File” at a sensor rate of one second.
Launch 3D Mark and run FireStrike. You shouldn't walk away from this during testing because not all crashes are obvious or reported – some are strictly visual and require human presence. Watch for typical signs of instability. These are obvious and include:
- Texture tears.
- Bright, blue flashes on-screen during testing.
- Black screens, crashes to desktop, and drive failure/recovery.
- System crashing.
This first test should be pretty stable. If you observe instability, it can likely be resolved by increasing the power target. I'm assuming it's stable for all users – but jump to sections below if not.
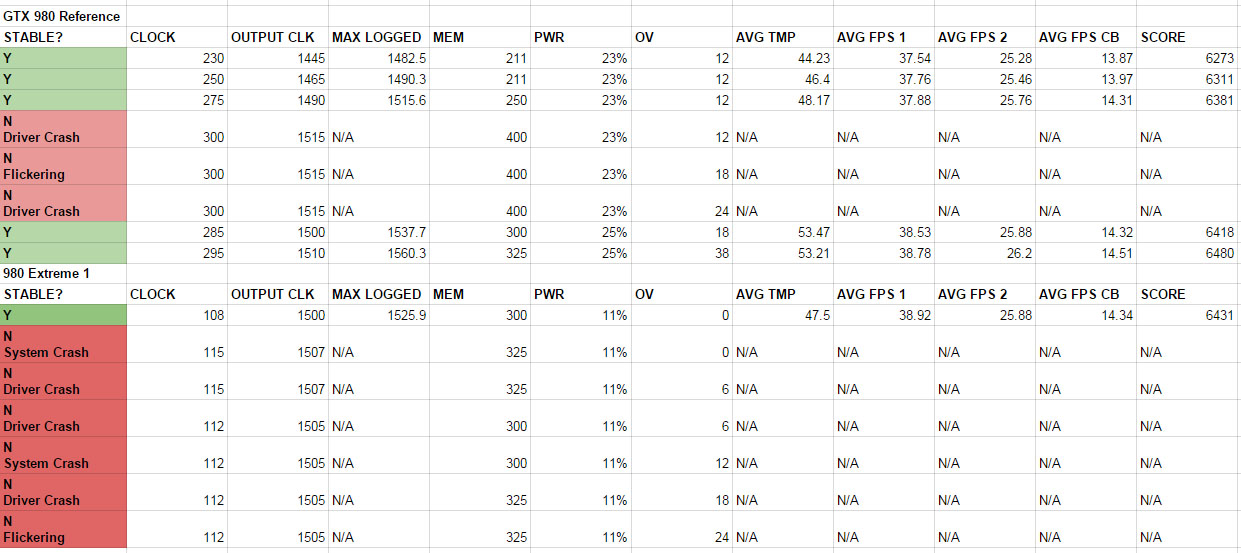
Log your FireStrike score in a document. Our document looks like this:
You'll want to track the Precision settings, the FireStrike FPS and/or score, and the maximum boost clock achieved as logged in GPU-z. Consider averaging the temperatures and logging those, too. We normally do this by dumping the data into a spreadsheet (Google Drive is fine) and then running the =averagea(cell:cell) formula from the start of the test to the end of the test. Log that as an average.
It's important to log these changes so that you can roll-back once things get unstable.
That's our basic OC completed. Now it's time to get a bit more serious. Increase the clock-rate more. Do it incrementally – you'll start off doing bigger jumps (maybe try +170MHz next), but as the GPU becomes less stable, you'll start increasing the CLK only a few MHz at a time. Keep increasing the clock and testing. This is what we did:
| GTX 980 Reference | |||||||||||
| STABLE? | CLOCK | OUTPUT CLK | MAX LOGGED | MEM | PWR | OV | AVG TMP | AVG FPS 1 | AVG FPS 2 | AVG FPS CB | SCORE |
| Y | 230 | 1445 | 1482.5 | 211 | 23% | 12 | 44.23 | 37.54 | 25.28 | 13.87 | 6273 |
| Y | 250 | 1465 | 1490.3 | 211 | 23% | 12 | 46.4 | 37.76 | 25.46 | 13.97 | 6311 |
| Y | 275 | 1490 | 1515.6 | 250 | 23% | 12 | 48.17 | 37.88 | 25.76 | 14.31 | 6381 |
| N Driver Crash | 300 | 1515 | N/A | 400 | 23% | 12 | N/A | N/A | N/A | N/A | N/A |
| N Flickering | 300 | 1515 | N/A | 400 | 23% | 18 | N/A | N/A | N/A | N/A | N/A |
| N Driver Crash | 300 | 1515 | N/A | 400 | 23% | 24 | N/A | N/A | N/A | N/A | N/A |
| Y | 285 | 1500 | 1537.7 | 300 | 25% | 18 | 53.47 | 38.53 | 25.88 | 14.32 | 6418 |
| Y | 295 | 1510 | 1560.3 | 325 | 25% | 38 | 53.21 | 38.78 | 26.2 | 14.51 | 6480 |
You'll eventually lose stability. That's normal. Once you do, if you haven't already, increase the power target % to something higher – maybe 110% or 115%. A higher power draw will threaten longevity of the GPU if it is run at a higher wattage for extended periods of time (read: more than just benchmarking). Re-test the configuration. If still unstable, let's tweak voltage.
Unlock voltage modifications in Precision. Do this on the right side of the application by ticking the radio button. You may be given a warning. Listen to it – do not increase voltage irresponsibly or hastily. Try increasing the voltage by 6mV (the smallest increment available).
Re-test.
If the GPU exhibits instability, try increasing the voltage by a few more millivolts. It may be necessary to increase the power target % in tow.
Once stable, let's play with the memory clock a little bit. You'll want to increment this slightly alongside the GPU base/boost clock to limit bottlenecking within the GPU and its memory. Memory is easily overclocked on the GTX 980, with several websites reporting a +600-800MHz memory OC. We tend to focus our resources on base/boost overclocking here, with our memory clocks running a bit lower than other sites (but our boost runs higher). It's generally safe to start with a +200MHz memory OC without stability issues. Use that as your baseline. Test for stability, and increase accordingly. I tend to stop my memory OC in the 300-400MHz range to allow more room (and time, really) to play with the boost & base clock.
Test for stability if any further changes are made on this front.
Let's go back to the base/boost clock. Continue the process of increasing the clock, finding the point of instability, and then increasing the power to establish stability. You'll eventually hit a power and voltage wall. The GTX 980 is only capable of eating 1.256v of power (aftermarket cards are different, some – like the early EVGA ACX and ASUS Strix models – can only take 1.12-1.21v). Whatever the voltage limit, that's your hard wall. There is no bypassing that. The power limit is also a wall once you've hit the maximum power target.
Once you've found that limiter, run FireStrike on loop or use another burn-in utility for endurance testing. If the GPU proves unstable after extended burn-in, it's time to step-down the settings a bit. We don't consider an overclock stable unless it survives 4 hours of looped burn-in testing.
Notes on the Boost Clock Disparity and Temperatures
Boost 2.0 is a great technology for most use cases. It ensures the GPU throttles down when additional horsepower is unnecessary, saving on wattage and keeping temperatures cool. For overclocking, Boost 2.0 can cause some (initially) confusing results. You'll notice in your GPU-z logs that the reported clock-rate often exceeds the clock-rate reported by Precision or Afterburner. This is because of Boost 2.0, which is similar in philosophy to Intel's Turbo Boost.
Technically, you could run K BOOST in EVGA Precision, which forces the GPU to run at its boost clock 100% of the time, but we've found this to be unreliable and highly unstable when using Maxwell cards. It also isn't very good for the GPU in extended runs. You could also disable Boost 2.0 through .ini files, but the same issues arise. For extreme overclocking, it may be of interest, but hobbyist and entry-level enthusiast overclocking will be fine without such steps.
If you notice that the reported clock through GPU-z is actually lower than what Precision advertises, this is because you're hitting your watt-draw power budget and the GPU is throttling itself down. That's why it's always necessary to log – it's the only way to be positive that the overclock is actually applying. OC software can “lie” if the GPU is throttling itself. GPU-Z will be accurate, though.
As for temperatures, just be responsible. You probably don't want to start pushing 80C on Maxwell. Aftermarket coolers are always an option, like the Kraken G10 + CLC or similar liquid solutions.
Post Your Results & OC vs. Stock Benchmarks!
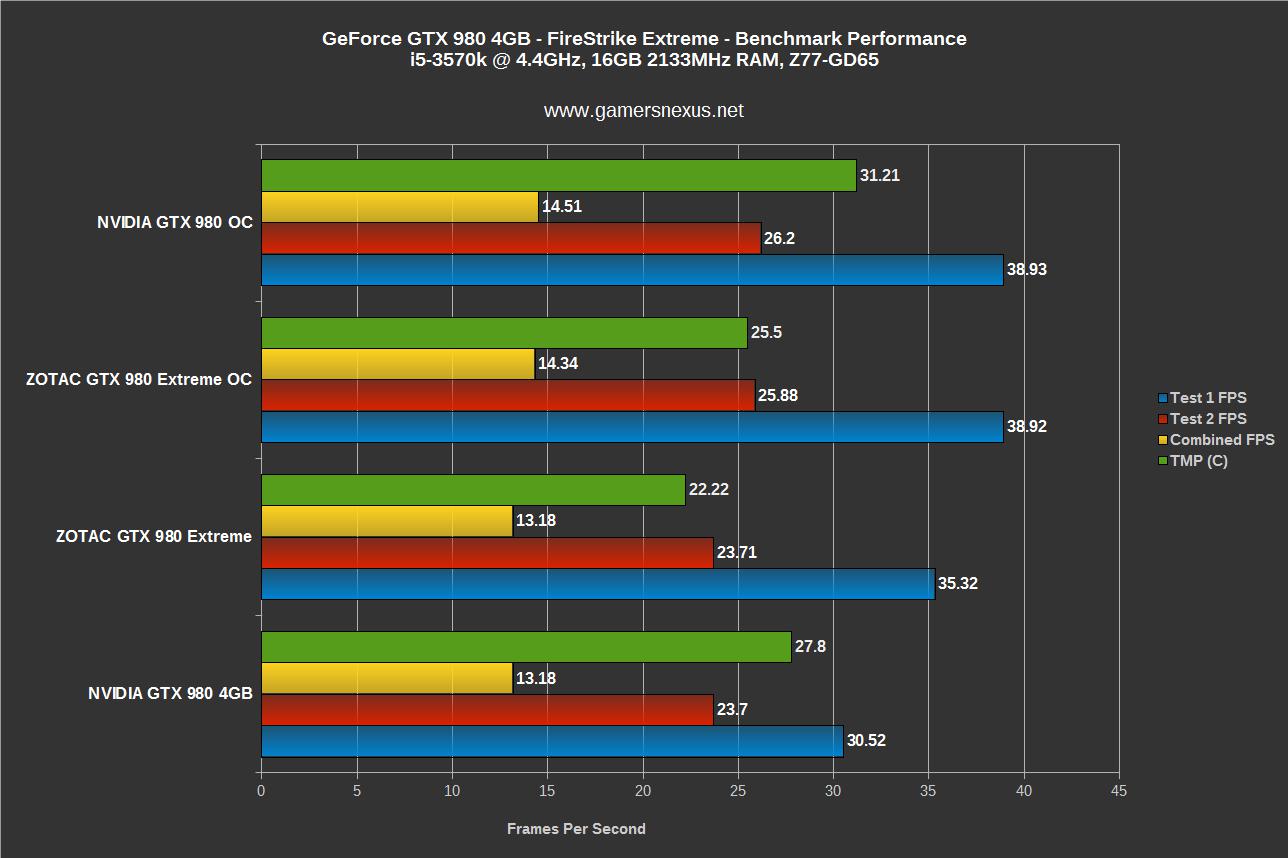
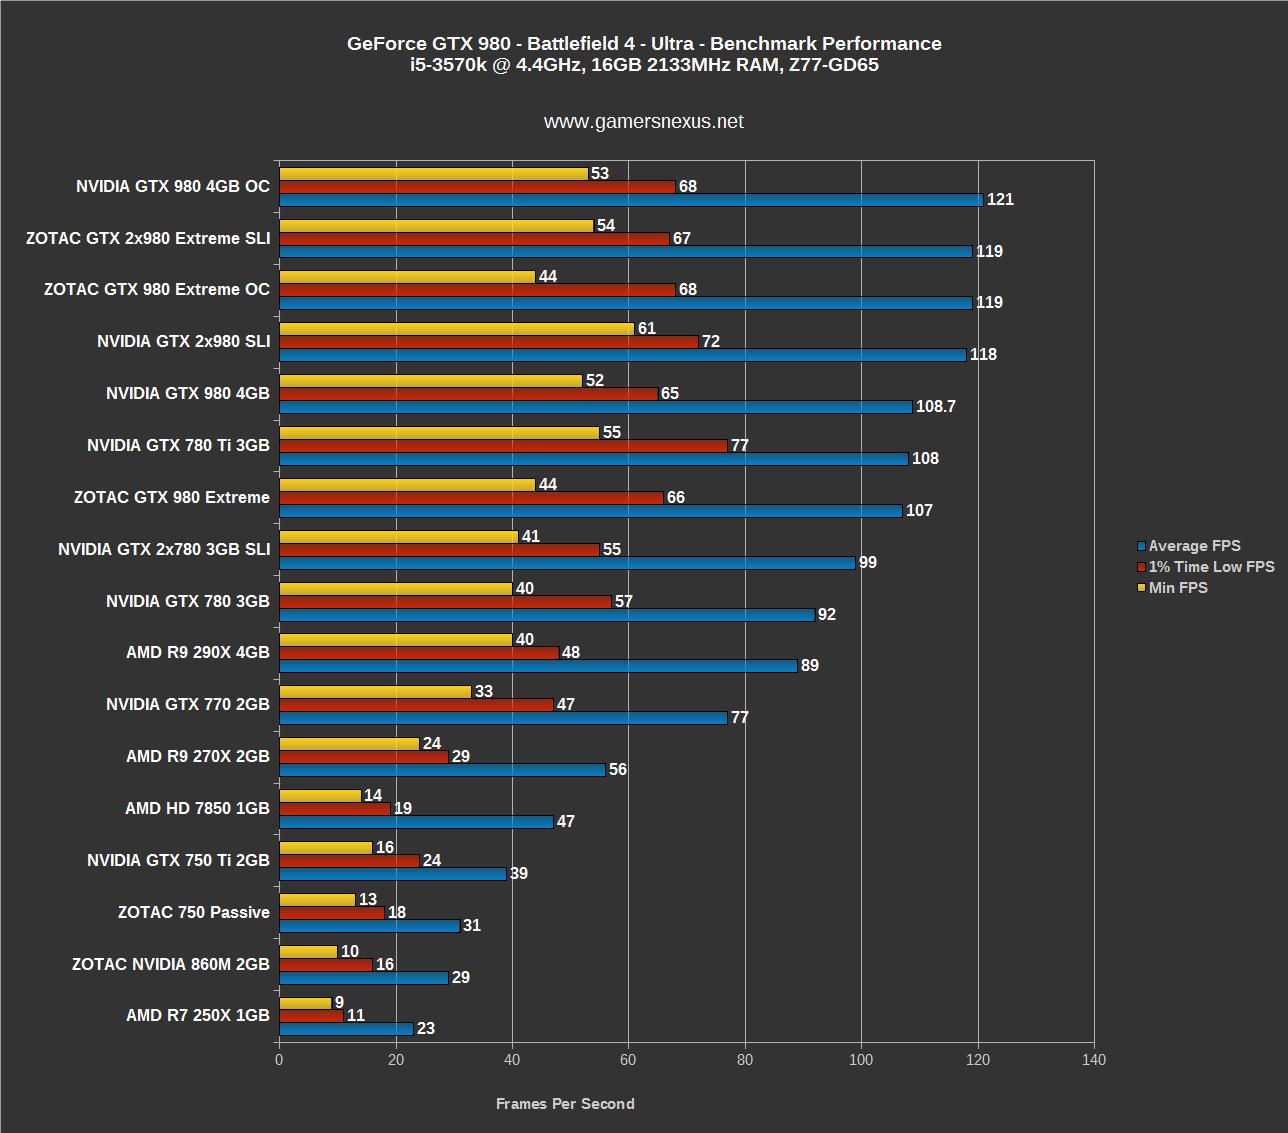 Big gains for OC vs. stock. This is shown in other games, too.
Let us know below if you've run into any technical issues, limiters, or other concerns! Be sure to list your GTX 980 model so that we can assist. If you've overclocked successfully, I'd love to hear the results. We've been able to hit ~1560MHz boost and ~400MHz memory clocks with stability, though I wouldn't run them like that for too long.
- Steve “Lelldorianx” Burke.
